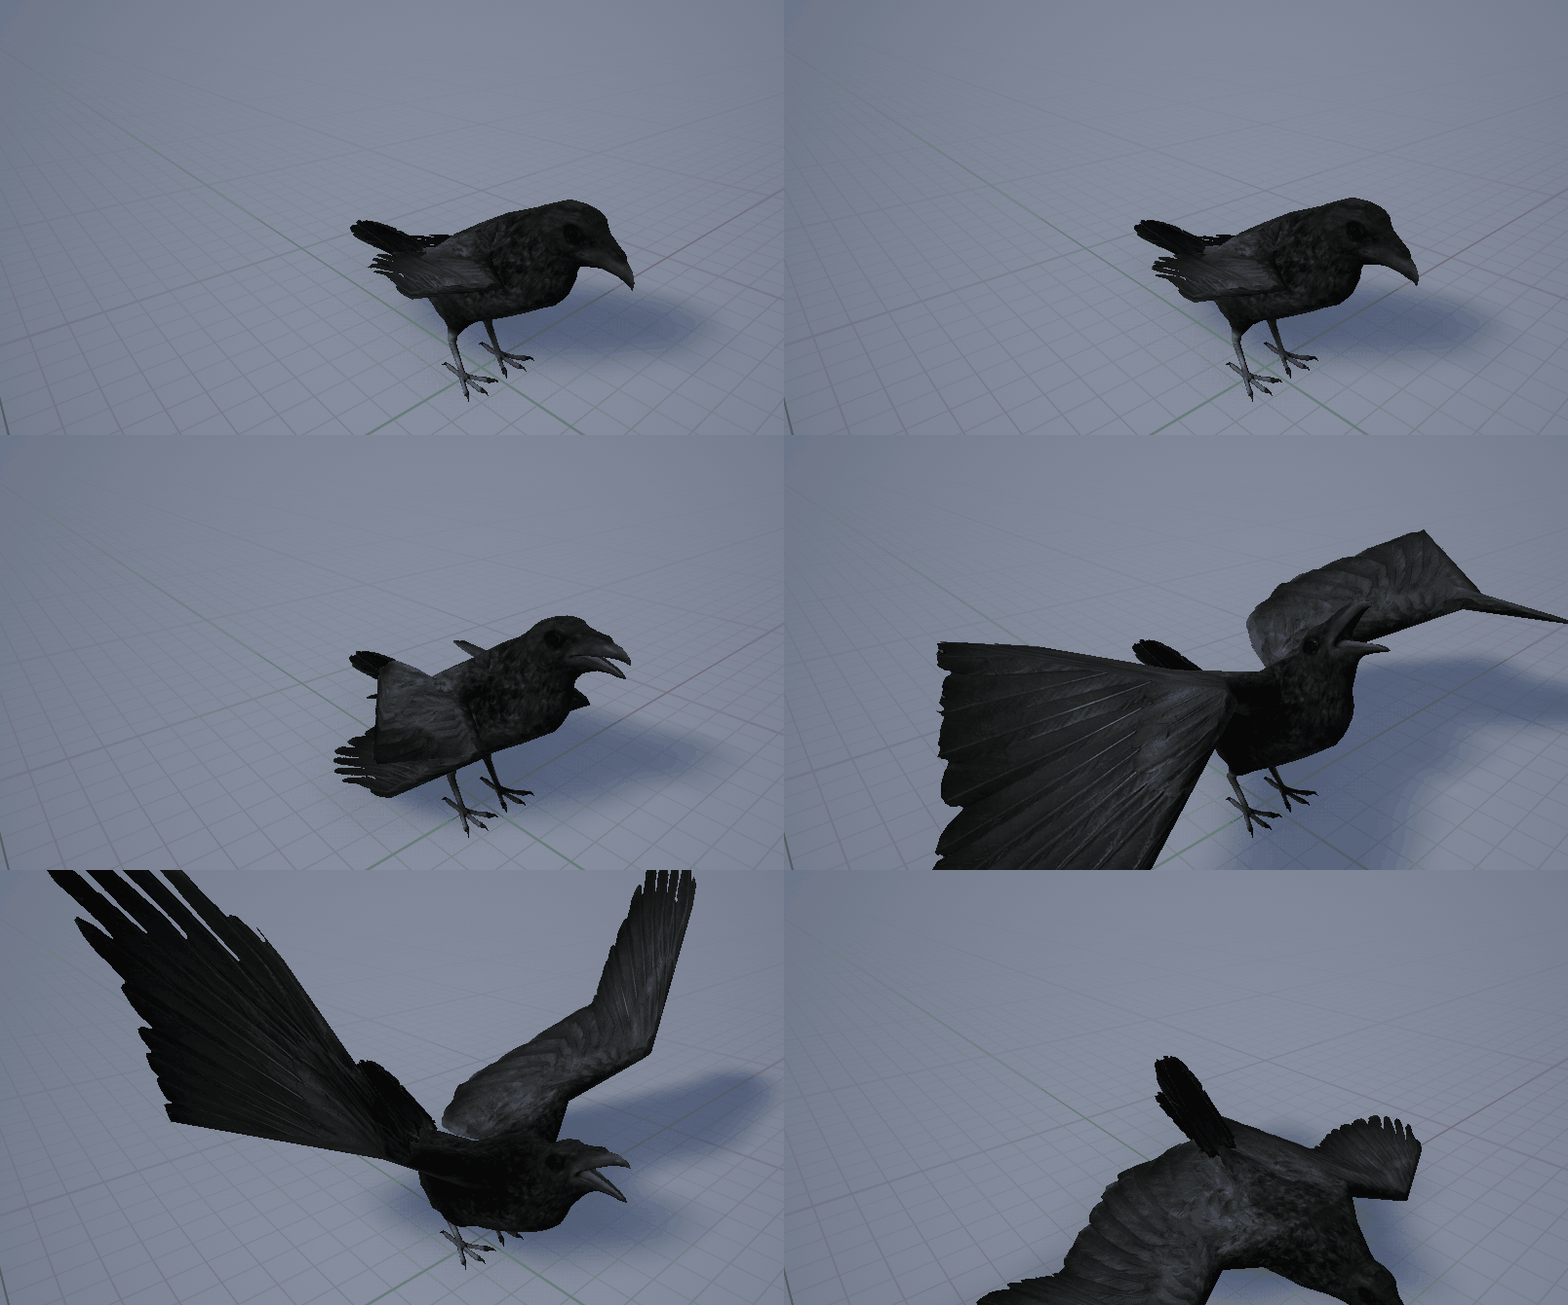
Creating Ambient Birds in Unreal with Niagara and Vertex Animations Continued (Advanced)
Contents
Intro
Reference Video
End Results
About Vertex Animations
Import and Baking in Blender
Importing Assets into Unreal
Material Setup
Niagara Function Scripts
The Idle->Walk->Take off -> Fly ->Glide ->Land Niagara Particle System
The Emitter
The Movement
The Animation Handling
Tying it All Together
Conclusion
Intro
This post is a direct followup to my previous post on the subject, which you can find here. However, in this post, I am going to be focusing on creating a bird that will idle, then walk up, take off into the air, fly, glide, and then finally land. The reference material for this guide is Example A in the Unreal Engine video linked below.
In this tutorial, I will also be redoing any work I did the first time, in essence, I am recreating the old tutorial in hopes to make it better than last time, and if the first material is confusing, or doesn’t provide enough information somewhere along the line, this will hopefully fill in the gaps.
I am going to cover the process of exporting the animations from Unreal, converting them into vertex animations in blender, importing those textures into Unreal properly, creating the material to use the vertex animations, creating the Niagara effect to be able to swap between animations and control the birds as particles, create basic blueprints in order to activate these effects, as well as show a final example of what we have at the end. I will include points at which I tripped up, and stumbled during the creation, as well as debugging techniques I use, so as to help you with any issues you encounter along the way. As always, if you have any issues, please email me, or write a message in the comments. Some specific aspects of the previous tutorial I amend in this version are:
Explanation on what Vertex animations are and their pros/cons.
Bird Artifacts. Last article, the bird’s animations had seems where the mesh would “come apart” or look as though the bird has holes in it. After reviewing my asset export and import settings, I showcase the proper export/import settings
My Vertex displacement texture baking process in Blender was quite sparse previously, only one paragraph with no pictures along the way. This process is completely reworked to be a step-by-step process.
A more in-depth explanation of the shader functions
Reference Video
Unreal Engine video guide on simulating large crowds in Niagara.
End Result
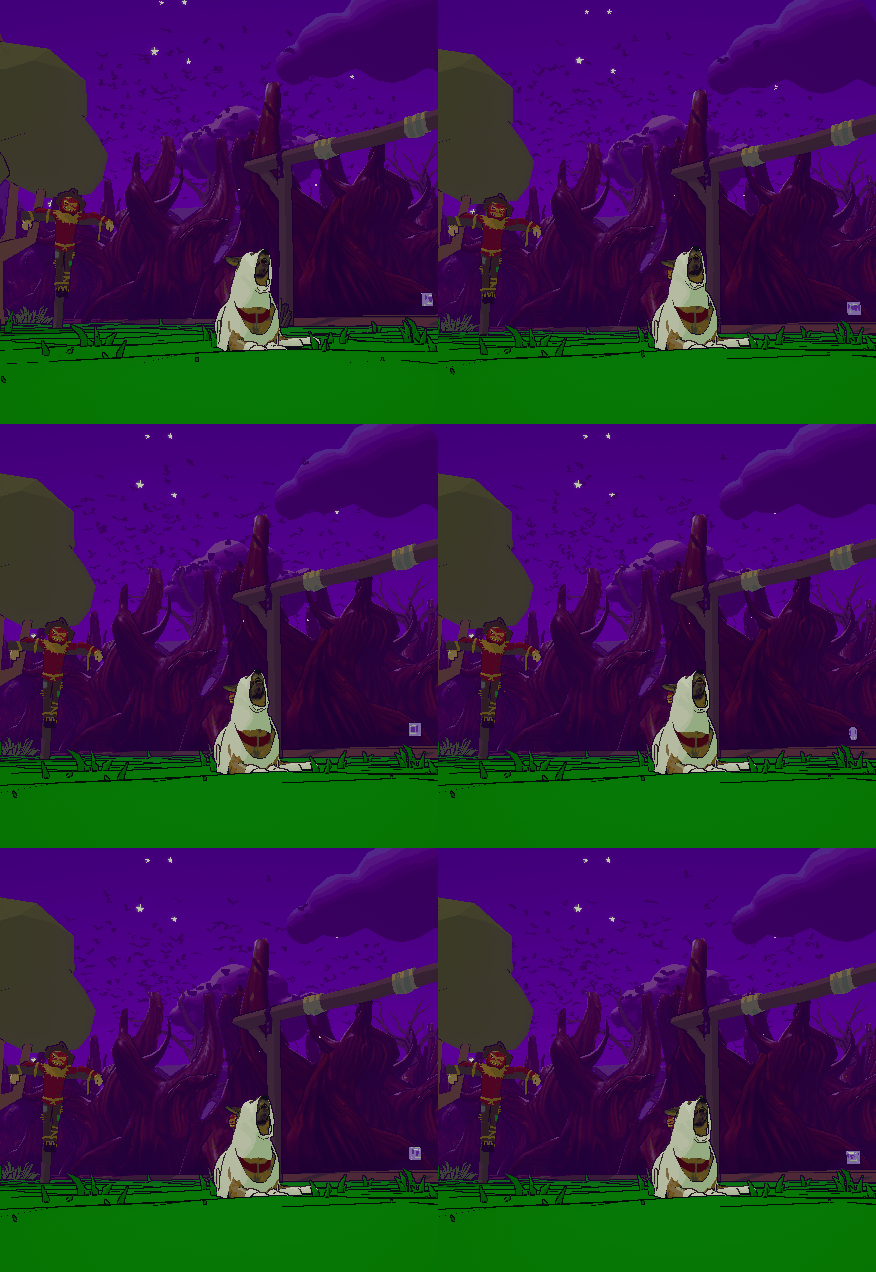
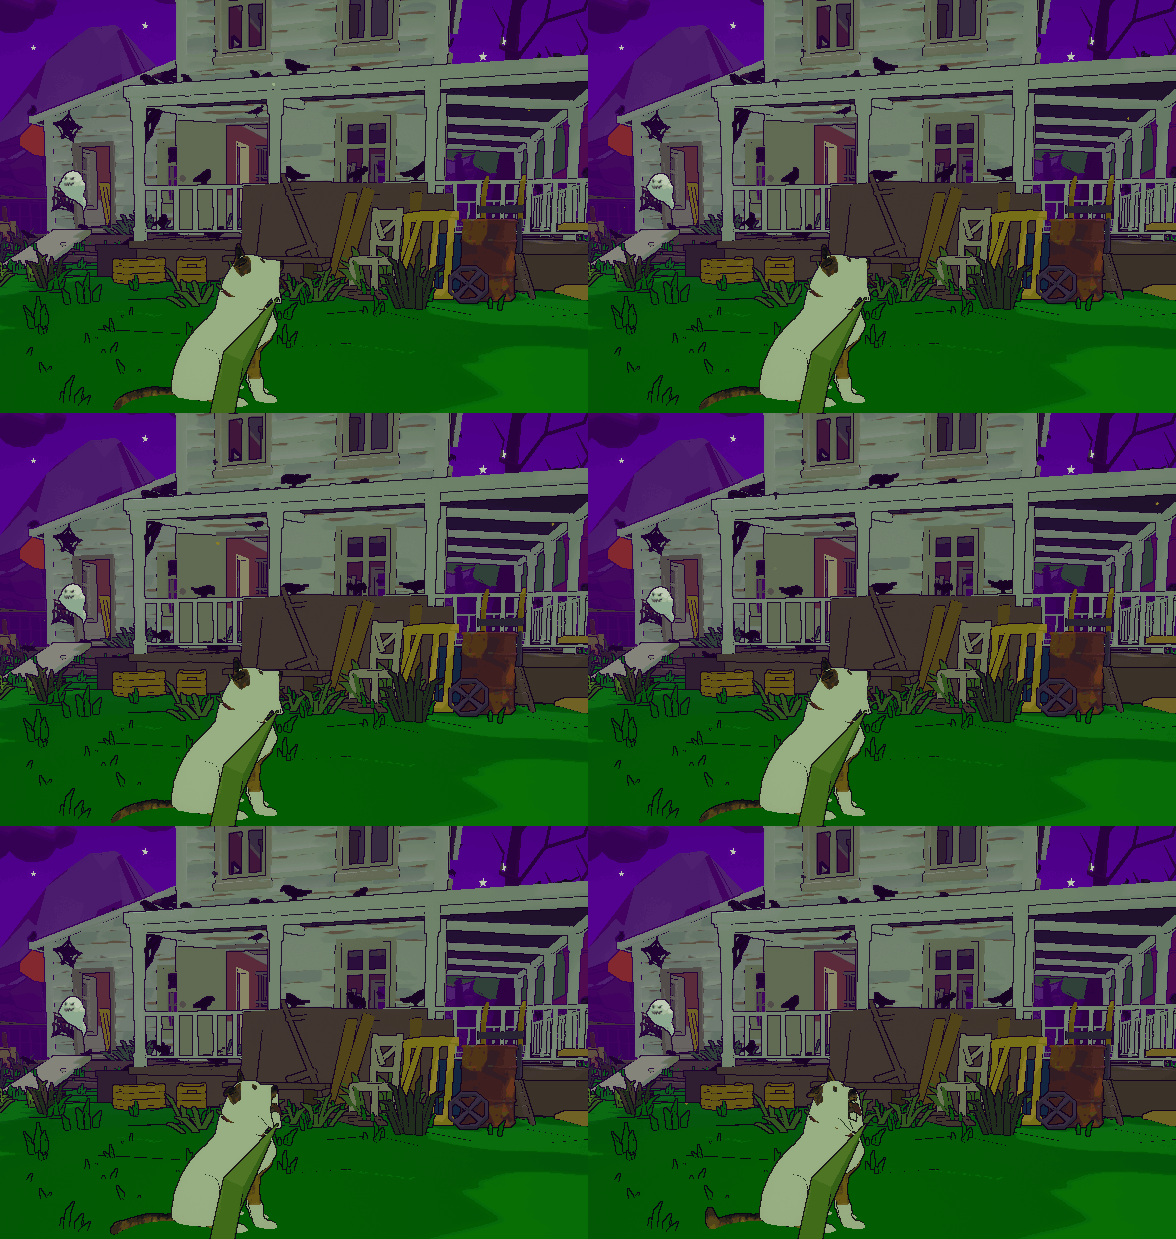
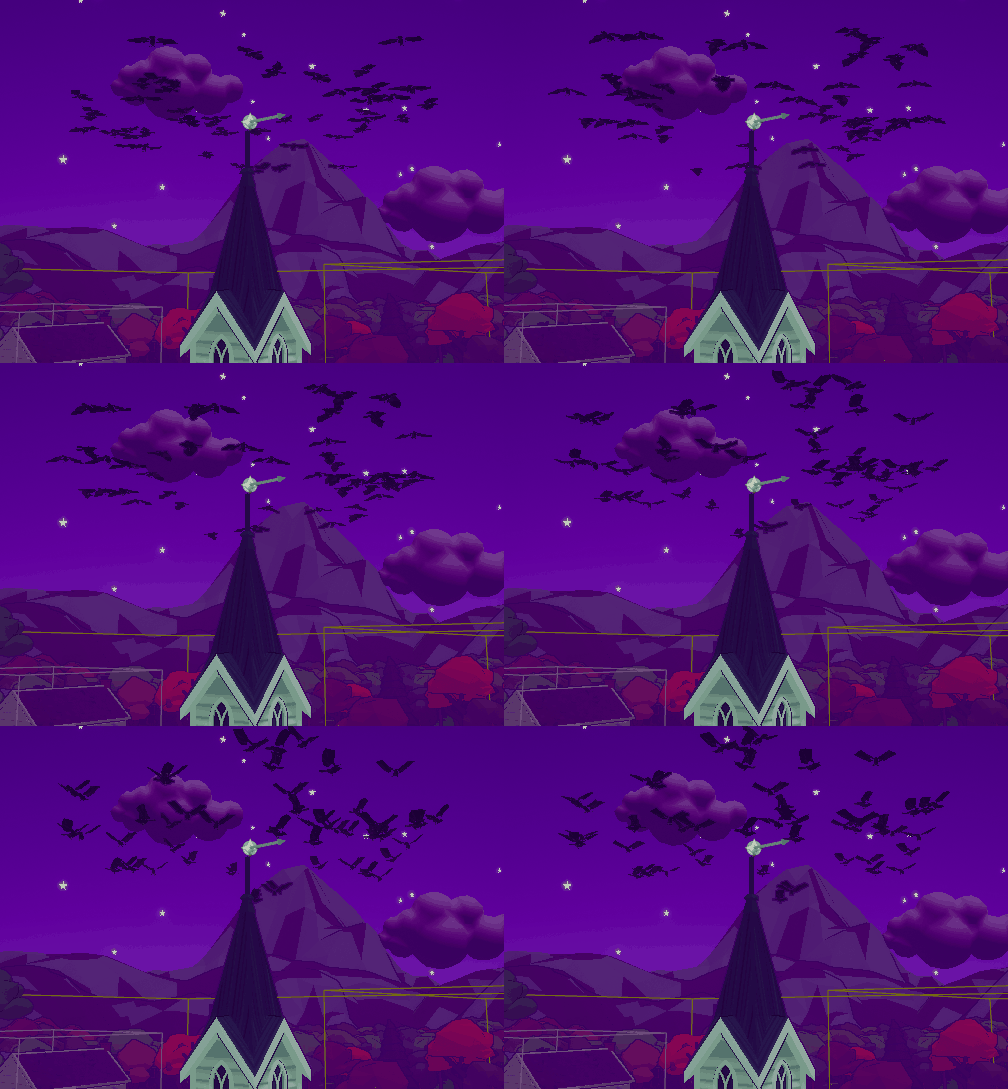
I started developing the original bird animations with Niagara for our game called Howloween Hero. I continued to develop the bird tech inside of this project, so that it’s visible inside of an actual running game, as opposed to some test scene. Here are some gifs of my results from the previous article:
Previous Results:
You can notice in this last picture the error I was talking about above where the crows have holes in them, it looks as though their wings detach from their bodies. At this distance (or any distance in-game) it’s hard to notice, but up close, there are gaping holes. This issue is fixed below.
Here is a gif where you can really see the gaps. This will be directly compared against slightly below:
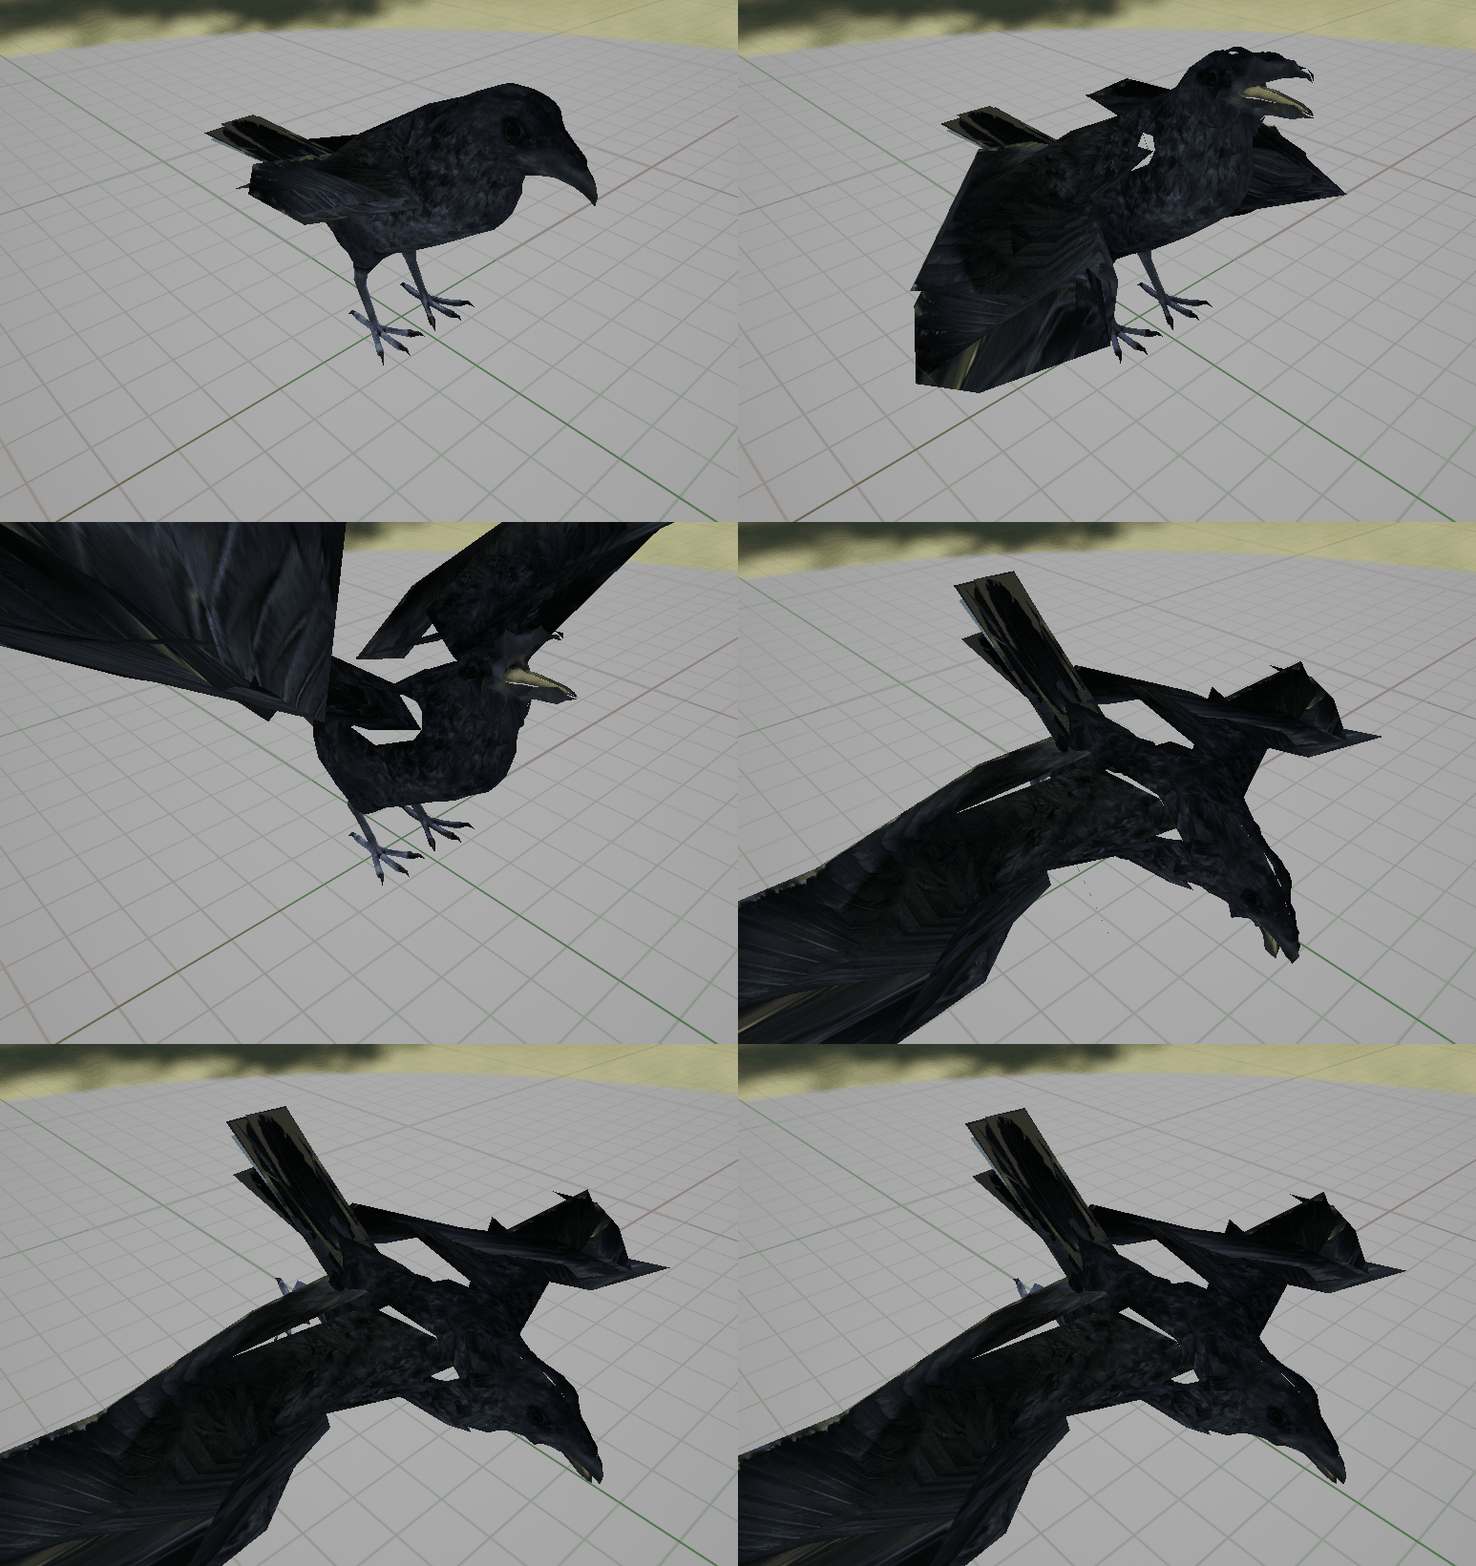
New Results:
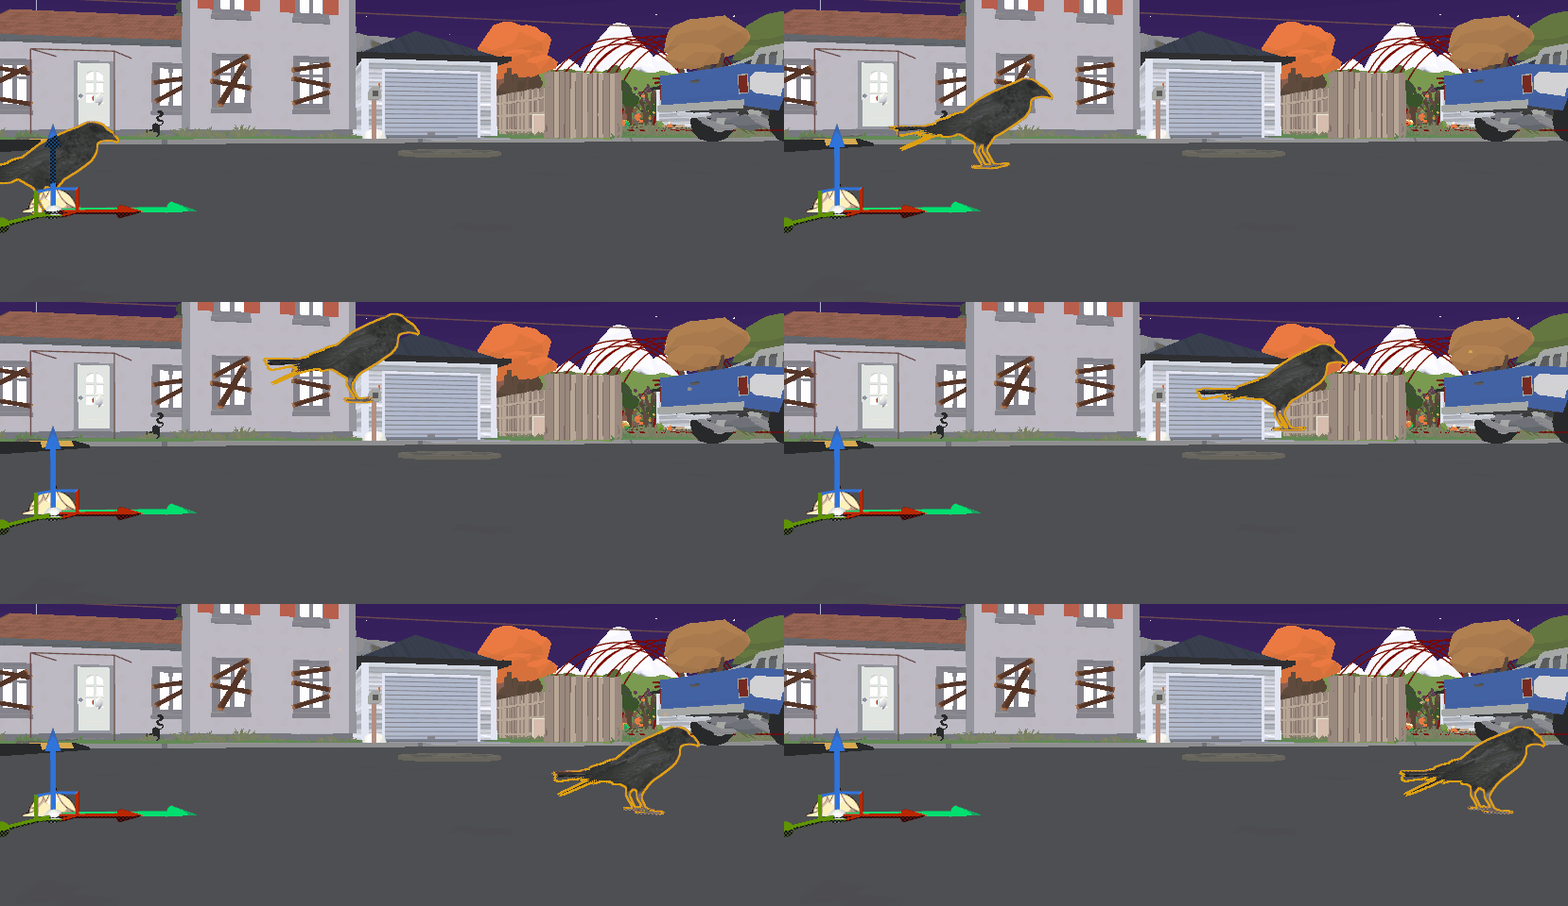
From Idle->Walk->Takeoff->Fly->Land->Walk->Idle
The movement can be slightly tweaked to get a new result.
You can see in the test frames, the smooth feathers with no holes, and no vertex artifacting like there was previously.
About Vertex Animations
Animations involve skeletal or skinned meshes, a bone structure called a rig, and weight painting from the bones of the rig, to the verticies on the mesh, to help give the verticies information about how to deform to try and adhere to it’s offset from the bone that it’s attached to. Once we move the bones around, and keyframe them in the animation timeline, we get a character moving around though animation! This is really awesome and good for most use cases. However, skinned meshes are harder to render than static meshes, and require more runtime computation, as well as data about not only the mesh, but also the rig, weight painting, and animation data. Some things like animating a cloth blowing in the wind, don’t work very well with traditional rigs, as a cloth doesn’t have a very concrete bone structure, in fact, cloth doesn’t have any bones in real life! This makes animating a cloth very complicated, and using runtime physics computation can be costly and give unpredictable results, in cases like these you may want to use vertex animation.
Vertex animation does not involve a skinned mesh, or weight painting! (Although, you most likely will need to make a skinned mesh, weight paint and animate your skinned mesh before being able to create a vertex animation. However, Unreal, or whatever engine at the end of the pipeline, will never know the difference.) Vertex animation uses textures to store animation data for every single vertex. The data stored here will be vertex normals, as well as vertex offsets (from their starting positions). The texture data is structured such that it is v pixels wide, where v is your number of vertices on your mesh, and k pixels high, where k is the number of keyframes. So our crow with 1,500 verticies and 530 keyframes will create a 1,500x530 image, where every pixel represents the vector offset for verticie 0 through 1,499, for frames 0 through 529.
When we import this into Unreal, we just tell Unreal to move each verticie, and update which row we are looking at each frame, and then suddenly we have a crow that looks like they are moving with a skeleton!
Vertex animations have their pros and their cons. For instance, they can be quite costly to produce, as they involve extra preparation, and are more complex to setup. They also involve large textures that scale to the number of verticies on your mesh. You cannot use meshes that have too many verts, as the Blender Plugin doesn’t support this, but also, you can imagine that if you had a mesh with 100,000 verticies, you would need a texture that is GIANT in order to store actual animation data. In fact, the limitation is set at 8192 vertices, this is due to the Direct X 11 limitation that a texture cannot be larger than 8192 pixels in either the x or y direction. This means you also cannot have an animation baked out that is more than 8192 frames, as that would surpass the maximum size in the y direction. Working with vertex animations can also be troublesome as Iteration is not a simple process. However, they shine, especially when you want something animated without a bone structure. They also can be more performant for things like crowd simulations. You will need to determine which assets and animations are worth your time transforming into vertex animations.
Getting the Crow and Initial Setup
Getting the crow will use the same asset from the previous tutorial. I will link the asset here. This is a free asset with a few animals including a crow. Once you download this asset through the Marketplace, you can add the asset to your project through the Epic Games Launcher, as you would any other marketplace assets.
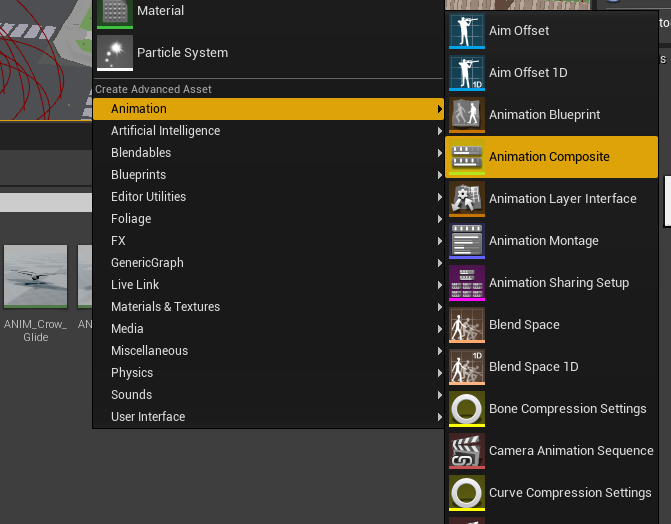
From here, we need to get all of the crows various animations, such as idle, glide, take off, die, etc. into one animation, so we can bake it all out into the one vertex offset texture to scrub later. To get all these separate animations together, we can create an Animation Composite in the Content Browser. Just right-click->Animation->Animation Composite.
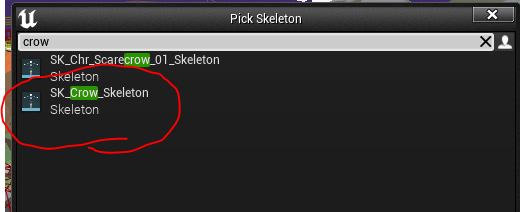
Then select the Crow Skeleton.
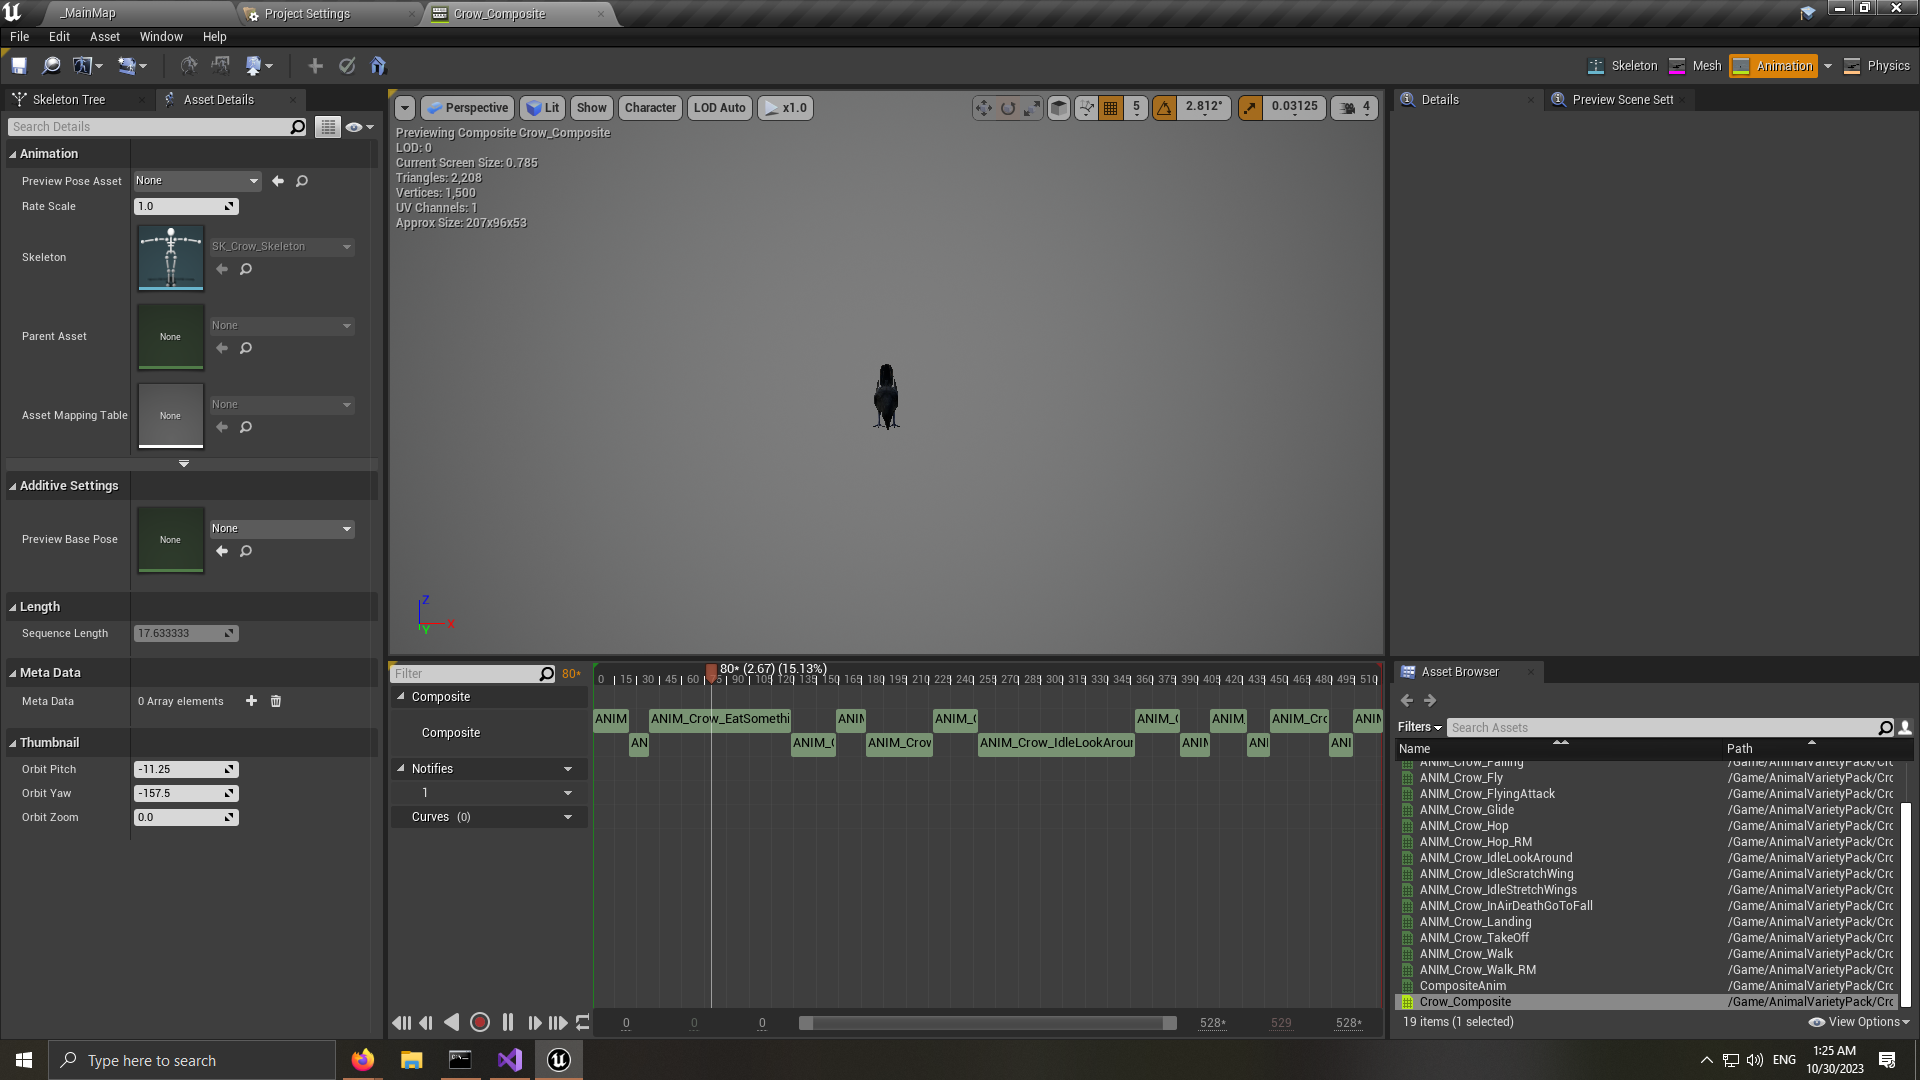
Once the composite is open, you can drag in all the animations from the Asset Browser window in the bottom-right, or at least all the ones you plan on using, into the composite timeline.
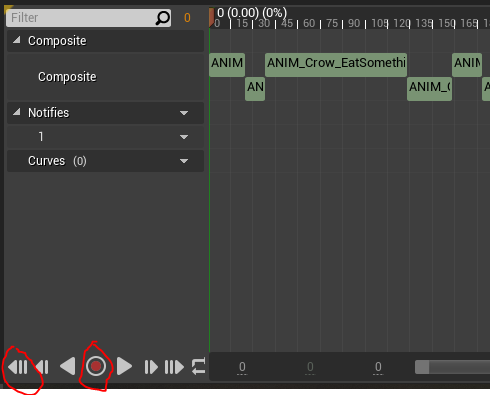
From this point, we now need to get this animation composite baked out into a single FBX for us to import into blender, that way we can turn the animations into Vertex offset and normal textures. To do this, we can make a recording. The best way I have found (which isn’t that great to be honest) is to drag the slider to the first frame, or hit the “To Front” button. Then hit the “Record” button. You will have to give the recording a path to save to, as well as a name. Then finally hit the “Play” button. Once it gets through all the frames of the animation, hit the “Record” button again, which at this point has turned into a “Stop Recording” button.
This method will unfortunately leave dead frames at the beginning of the animation, as well as loop, or leave dead frames (depending on your timeline’s loop setting), at the end of the animation composite as well. We will have to trim these leading and trailing frames within Blender. The good news is, that in the composite, we can see that our animations start at frame 0, and go through 529, so we can see that we have 530 frames of animation to work with, which should help us ensure we cut the correct number of frames within Blender!
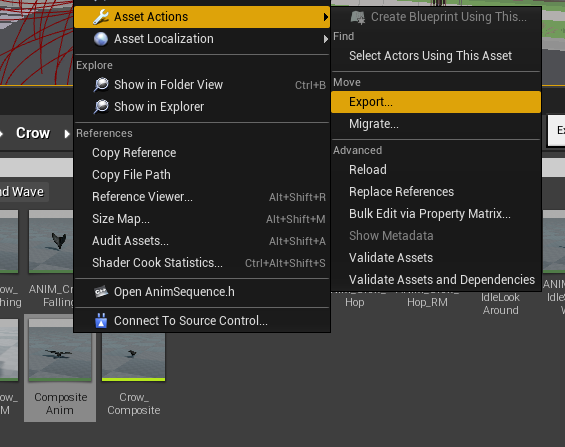
Once you have finished making your recording within Unreal, we still have to convert this new animation into an FBX to get inside of Blender. If you navigate to the asset you created, then right-click->Asset Actions->Export, then find a place on your PC to save it, such as your Desktop, and save it as an FBX.
Modifying and Baking the Asset in Blender
To take our bird with their animations and convert them into a single static-mesh with texture data for the vertex animations, we need to import them into Blender, trim our animation data, install the vertex animation plugin, bake out the new fbx, vertex offsets texture, and vertex normals texture. We will then import these three assets back into Unreal.
Getting The Plugin
For starters, this vertex animation plugin was developed by JoshRBogart, and very kindly released this plugin to the public on GitHub. You can find the plugin here. This plugin is notably developed for Blender version 2.83. So I suggest that you download this version of blender, as I cannot say how well the code works on new versions of Blender. You can find a download link to Blender 2.83 here. You can download the whole repository, or download the vertex_animation.py file, as that will be the only file that we need. To access the forum post where I found this plugin, as well as help from the creator and community, as well as more information about the plugin, see the forum post here.
Setting Up Blender and Your Scene.
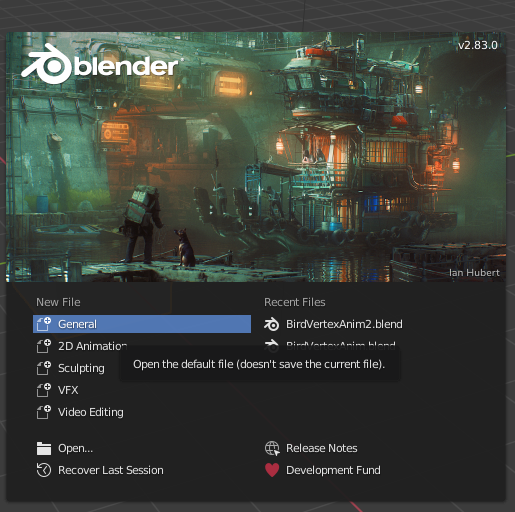
Once you have downloaded Blender and the vertex_animation.py. Open Blender, and under “New File” hit “General.”
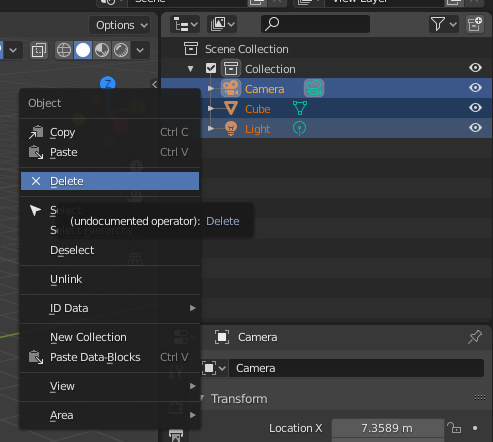
You can then delete everything in the scene, you can do this by clicking on the “Camera”, “Cube”, and “Light” in the Scene Collection in the top-right of the screen, right-click, and press “Delete.”
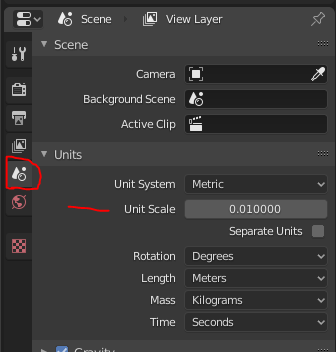
Next, navigate to your “Scene Settings” in the bottom-right of the screen. The icon looks like a cone, and two spheres. In here, you will need to set your “Unit Scale” to 0.01 to align with Unreal’s scale of centimeters, where Blender typically uses meters.
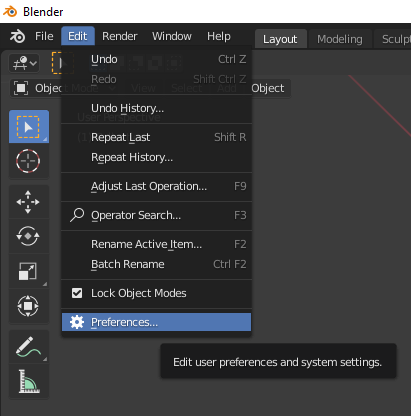
Next, you will need to open your “Preferences Window” in order to install our new Add-on.
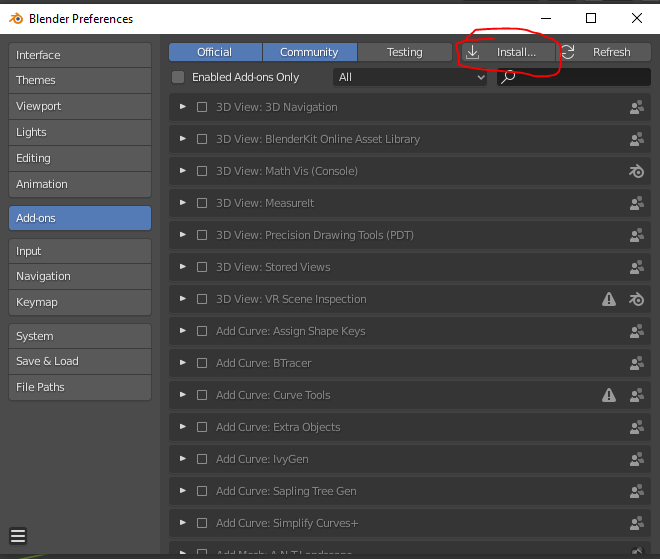
When the window opens, navigate to the “Add-ons” tab, and then click the “Install” button on the top of the window.
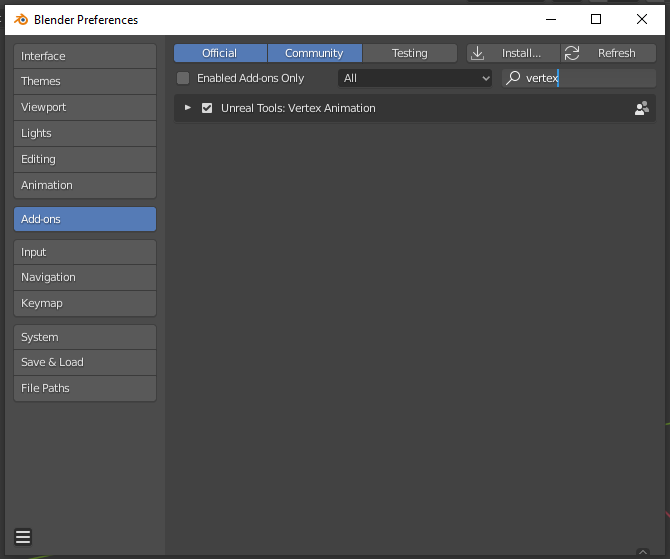
Navigate to the vertex_animation.py file, select it, and click the “Install Add-on” button. The plugin should install very quickly, once complete, you will need to search for the plugin inside your plugin’s folder and enable the plugin by clicking the check-box next to the add-on.
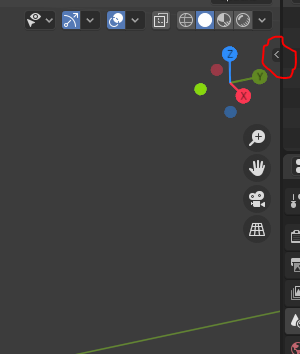
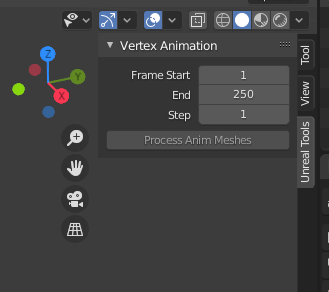
You can check to make sure that you have access to the Add-on by clicking the tiny arrow next to the 3D gizmo. Once expanded, there should be a section for Unreal Tools, click on it, and there should be options for Vertex Animation.
If you don’t see this section, make sure that you enabled the plugin, and maybe try restarting Blender.
Importing into Blender, and Baking out the assets.
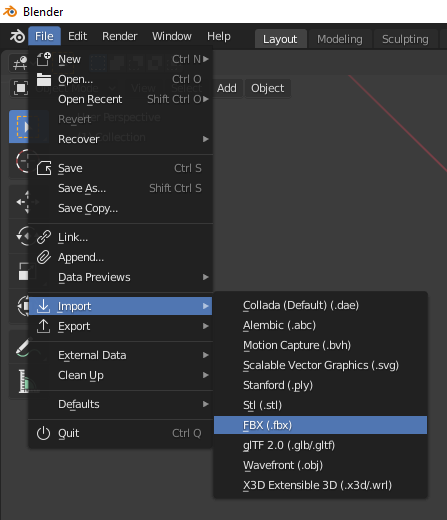
Finally we are ready to import our crow into blender, with the animations, and bake out the vertex texture data. First, we need to import the crow fbx. Navigate to File->Import->FBX and select your exported Crow_CompositeAnim.fbx
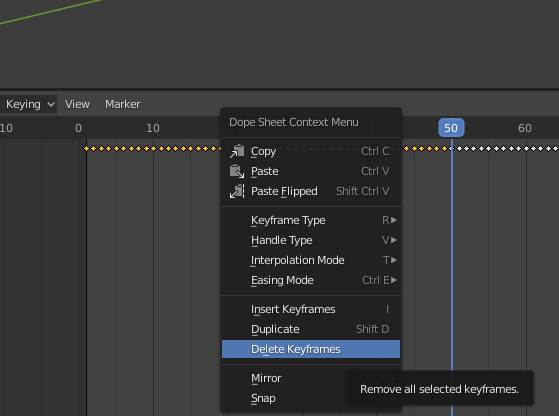
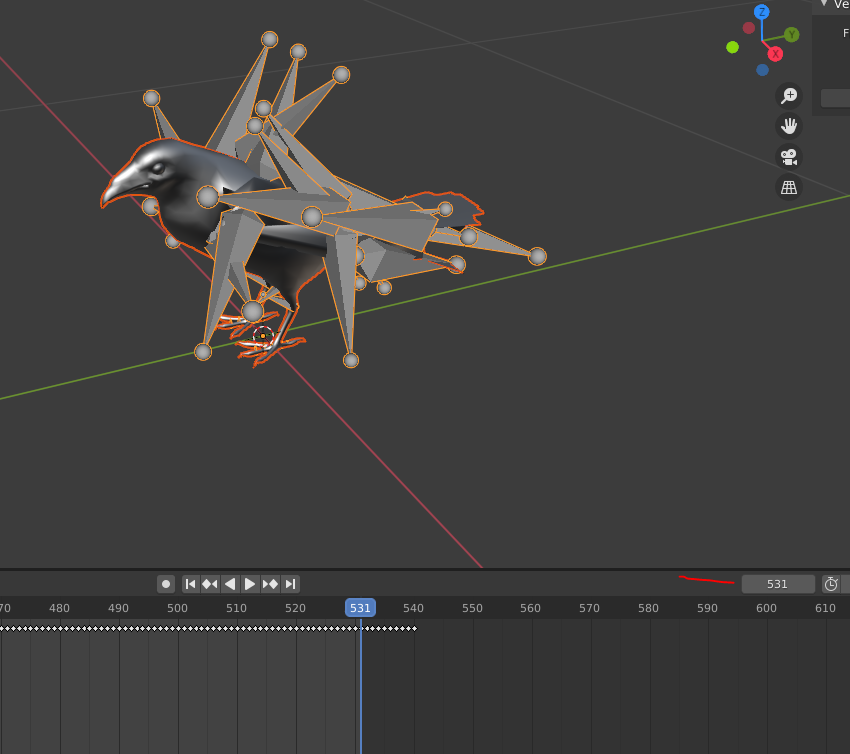
Once imported, you can cleanup any frames at the start of your animation by deleting the keyframes, and then select-highlighing the rest of the keyframes, and drag them forwards to frame 1.
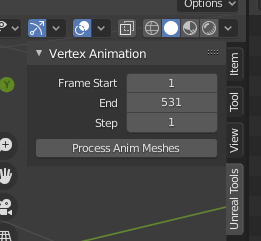
You can delete extra frames at the end if you wish, however the plugin specifies a max-frame, so you can alternatively just input the frame you would like to be last in the plugin. In my case, I deleted leading frames, drug them to frame 1, and then had my timeline stop at frame 531. I used this same data inside of the Vertx Animation plugin.
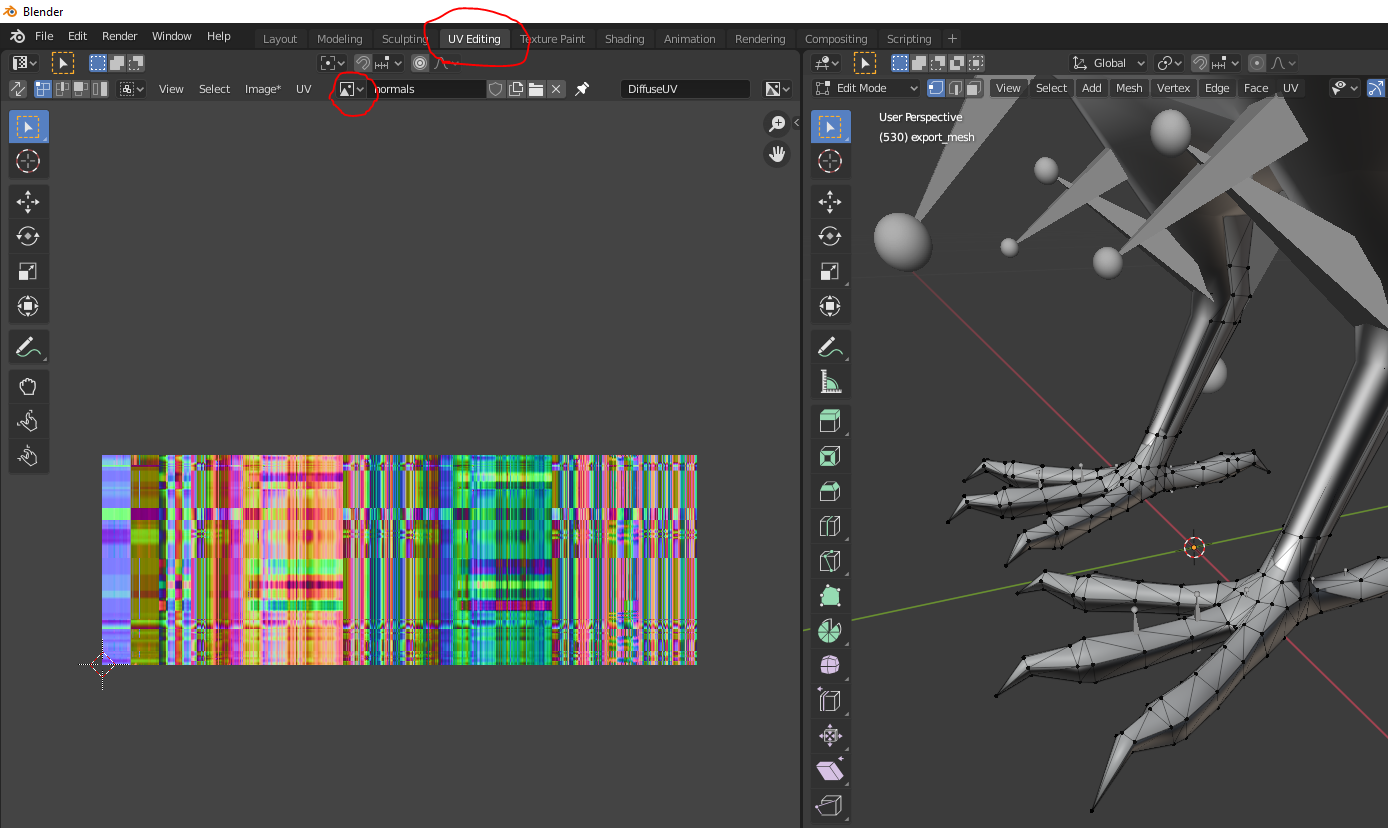
Next, hit “Process Anim Meshes”, this should take a little bit to compute, however, once it’s finished you should have a second mesh in the scene called export_mesh, and if you navigate to the UV tab, there should be an offsets image, as well as a normals image. These three things are what we need to export and bring into Unreal. (Note, when you go into the “UV Editing” tab, and click on the UV, make sure to de-select your export mesh, or else the UVs will show up on the texture and get exported out, which would not be good!
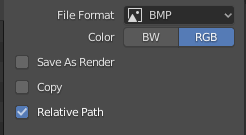
Select normals from the dropdown menu and then click on the “Image” drop-down at the top, and select “Save As…” We are going to export the normals as a BMP file, in RGB colorspace as so.
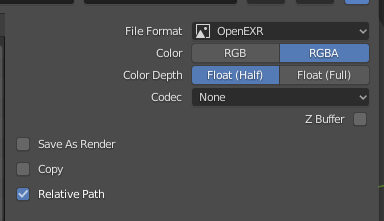
Next, we will select the offsets image. We will export this asset as an OpenEXR file format, with RGBA colors, in Float (Half) depth.
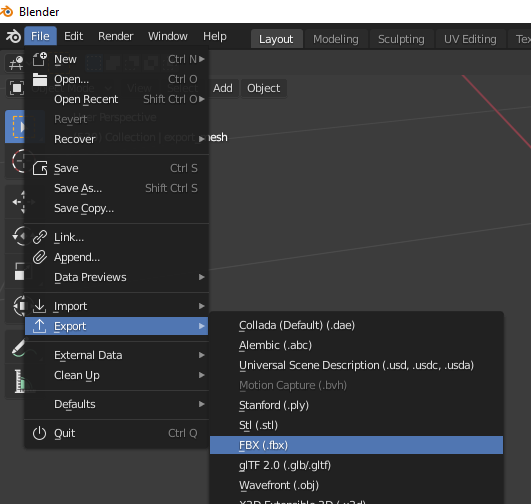
Finally, we can export the crow mesh, select your export_mesh in the viewport, or in the top-right “Scene Collection” and then navigate to File->Export->FBX (.fbx) along the top bar.
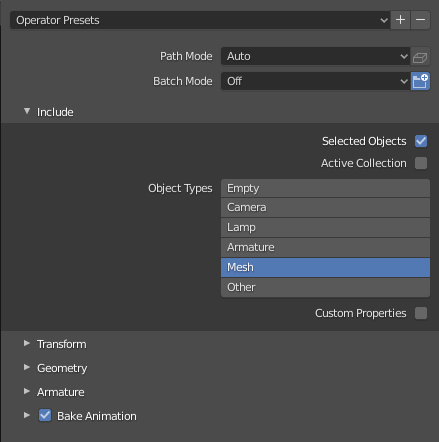
Under the “Include” section, tick off “Selected Objects” and set “Mesh” as the “Object Types”.
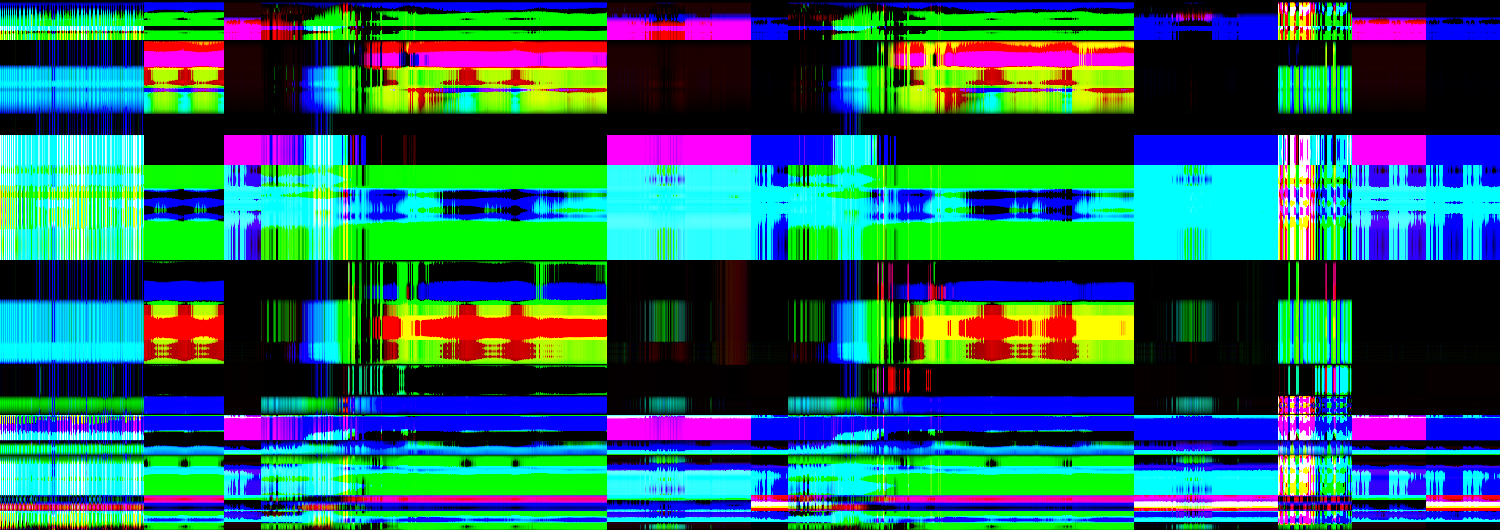
Once you have all these assets exported, we should be ready to import them into Unreal! I don’t know exactly how converting from exr, or bmp to png will be, or how squarespace will compress my images, but here is roughly how my offsets and normals images look.
offsets png.
normals png.
Importing Assets into Unreal
We have three assets to import into Unreal, the crow Static Mesh, the vertex offsets texture, and the vertex normals texture. Each has a unique import configuration that you will need to follow. We can start with the textures.
Vertex Offsets Texture
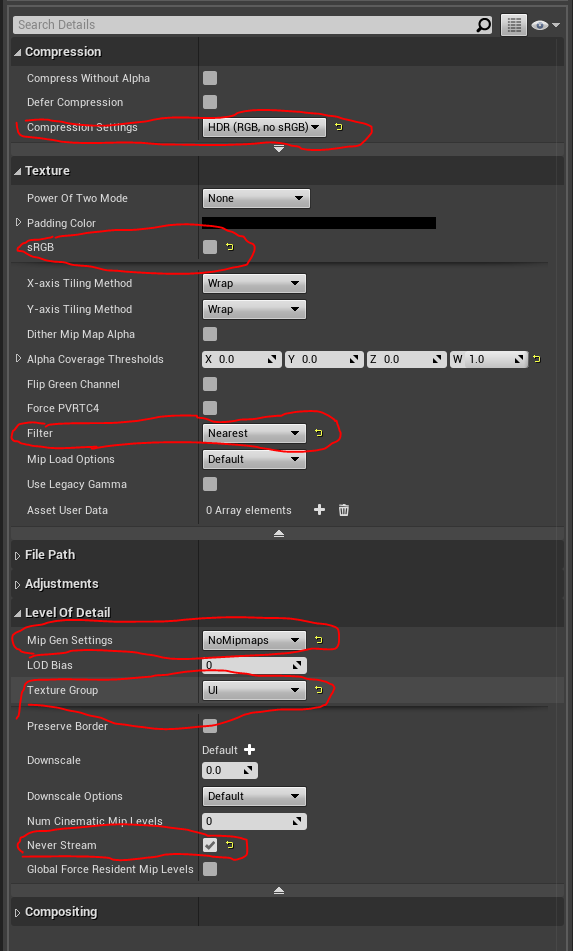
Once you drag in the texture, you can double-click on the asset to open up it’s import settings, for this texture you need to make sure the following settings are set as such:
Compression Settings : HDR (RGB, no sRGB)
This is the best representation of the exr data we have stored.
Texture Group : UI
Ensures that it will filter and use settings to best preserve it’s natural state.
Mip Gen Settings : NoMipmaps
This is direct data, you can’t “mip” or obscure it. For more on mips, see my post here.
sRGB : false
Want linear, direct color data.
Never Stream : true
Similar to mips, it won’t ever stream lower mips, it will always have the texture highest quality in memory.
Filter : Nearest
We want the direct color and we want it at the most close pixel as possible, no filtering or blending at all.
Vertex Normals Texture
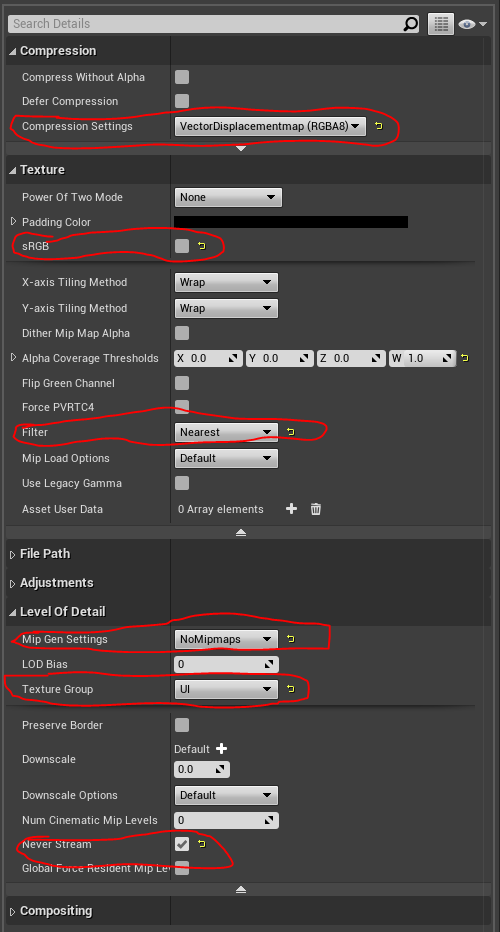
Once you drag in the texture, you can double-click on the asset to open up it’s import settings, for this texture you need to make sure the following settings are set as such:
Compression Settings : VectorDisplacementMap (RGBA8)
This is the best representation of the bitmap data.
Texture Group : UI
Ensures that it will filter and use settings to best preserve it’s natural state.
Mip Gen Settings : NoMipmaps
This is direct data, you can’t “mip” or obscure it. For more on mips, see my post here.
sRGB : false
Want linear, direct color data.
Never Stream : true
Similar to mips, it won’t ever stream lower mips, it will always have the texture highest quality in memory.
Filter : Nearest
We want the direct color and we want it at the most close pixel as possible, no filtering or blending at all.
Crow Static Mesh
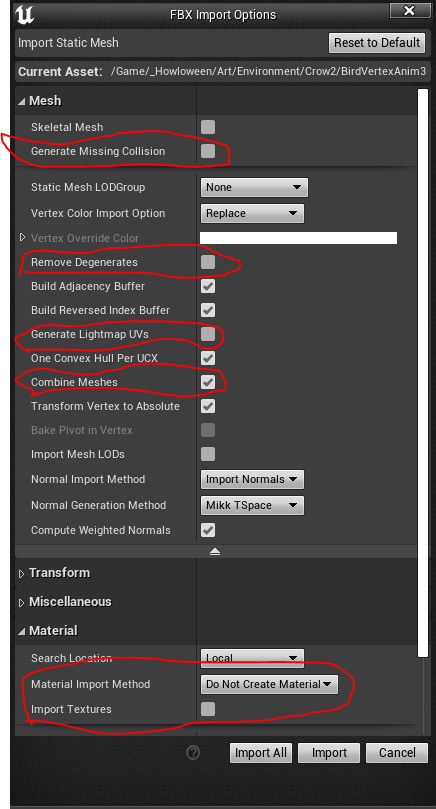
When importing the static mesh (fbx) the import settings will pop up when you drag in the file, and I haven’t been able to figure out if I am able to mess with these settings after importing it the first time. So try to get these settings right the first time! Or else you may have to re-import.
Generate Missing Collision : false
We don’t want extra collision data
Remove Degenerates: false
We want the mesh data preserved
Generate Lightmap UVs : false
We won’t be baking lightmaps for this, dynamic
Combine Meshes : true
Want to make sure it is all one mesh
Material Import Method : Do Not Create Material
Making our own material with custom textures not from Blender
Import Textures : false
Nothing to import from blender
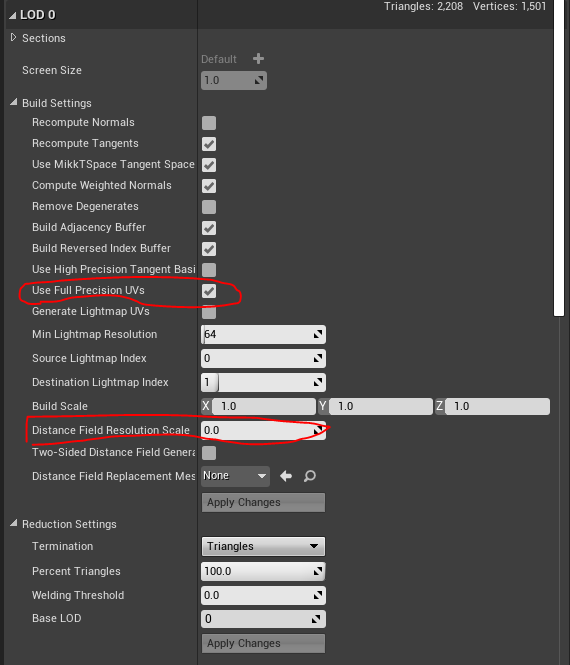
Once the mesh is imported, we need to change some settings on the mesh LOD settings, to change these, we need to double-click on the imported Static Mesh Asset. Navigate to the LOD0 section, and then under the Build Settings, change the following settings:
Use Full Precision UVs : true
This ensures that we are getting the most accurate texture sampling when looking at vertex displacement, which is important for making sure the animation doesn’t artifact
Distance Field Resolution Scale : 0
We don’t need SDF, these will by dynamic and we don’t want AO, or anything in our birds.
With these set. We should have all of the assets properly created and imported, ready to use. Now we can actually get started on creating the material and manipulating that material through the Niagara particle systems.
Setting up the Materials
Now to start setting up the material for the Crow to use. We are going to have to have a material with our textures and parameters setup, then we will derive a material instance in which we can mess with some of the parameters for testing the material frame scrubbing.
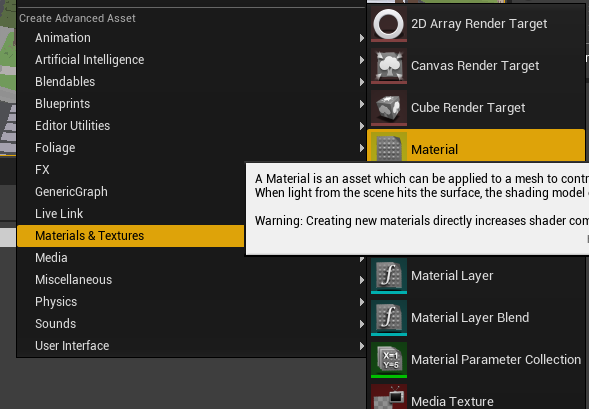
To make the material, in the Content Browser, right-click->Materials & Textures->Material. Name it something like M_CrowNS (You should prefice materials with M_ as recommended under Epic’s guidelines).
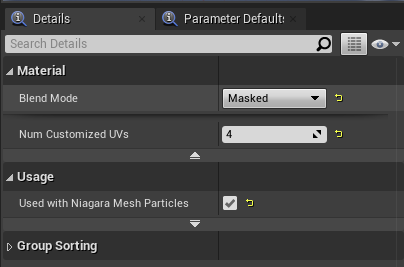
We need to first adjust some of the base material settings. Click on the output node labeled M_CrowNS (or whatever you named your material). Then in the details pannel, you will need to search for, and change the following settings:
Blend Mode : Masked
We want some Opacity Mask for the feathering on the wings.
Num Customized UVs : 4
The vertex animation function we use requires the use of 4 custom UV channels
Used with Niagara Mesh Particles : true
We are going to put it into a Niagara mesh particle system!
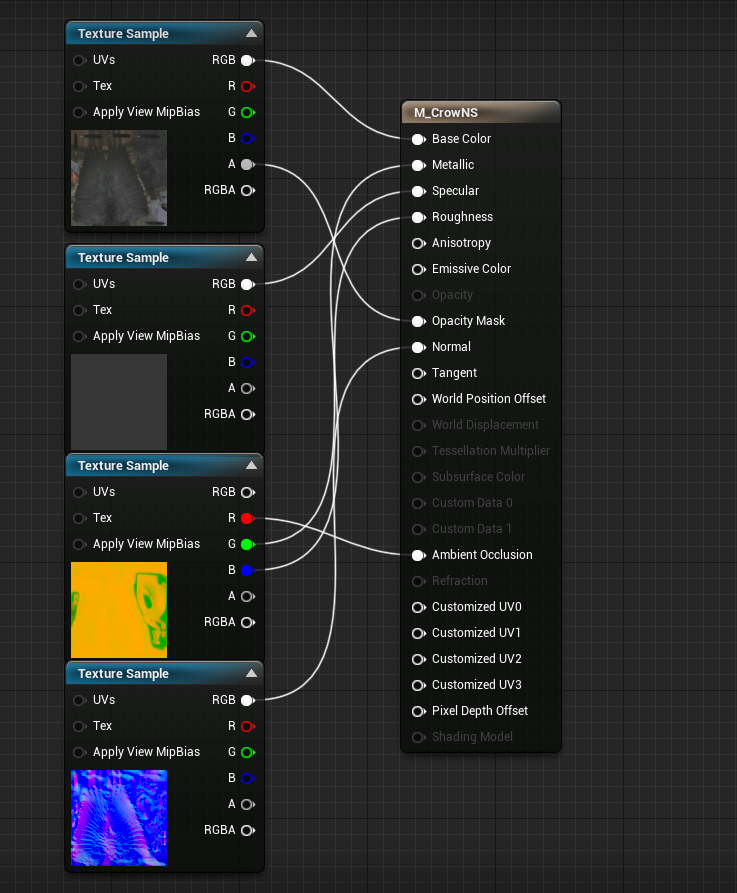
Next, we can drag in our textures that we need. We need to drag in the basic textures supplied from the asset, these being:
T_Crow_BaseColor (included in package)
Plug RGB into Base Color (we will multiply this by a parameter for variation in a bit)
Plug A into Opacity Mask
T_Crow_OcclusionRoughnessMetalic (included in package)
Plug R into Ambient Occlusion
Plug G into Roughness
Plug B into Metallic
T_Crow_Specular (included in package)
Plug RGB into Specular
T_Crow_Nml (included in package)
Plug RGB into Normal
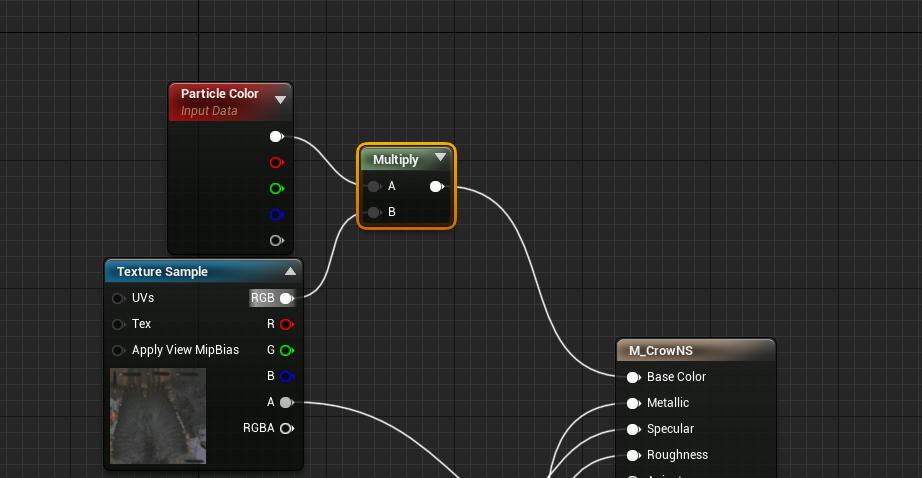
As mentioned earlier, we will want to have some variation in color between all the crows. We can do that here by creating a node for the particle color, and then multiplying this with the RGB value from the base color.
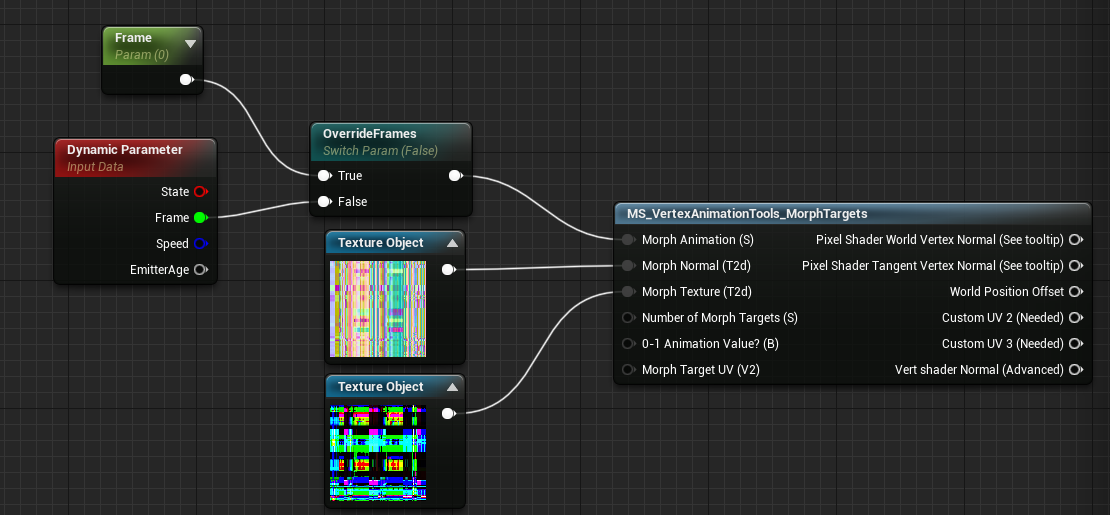
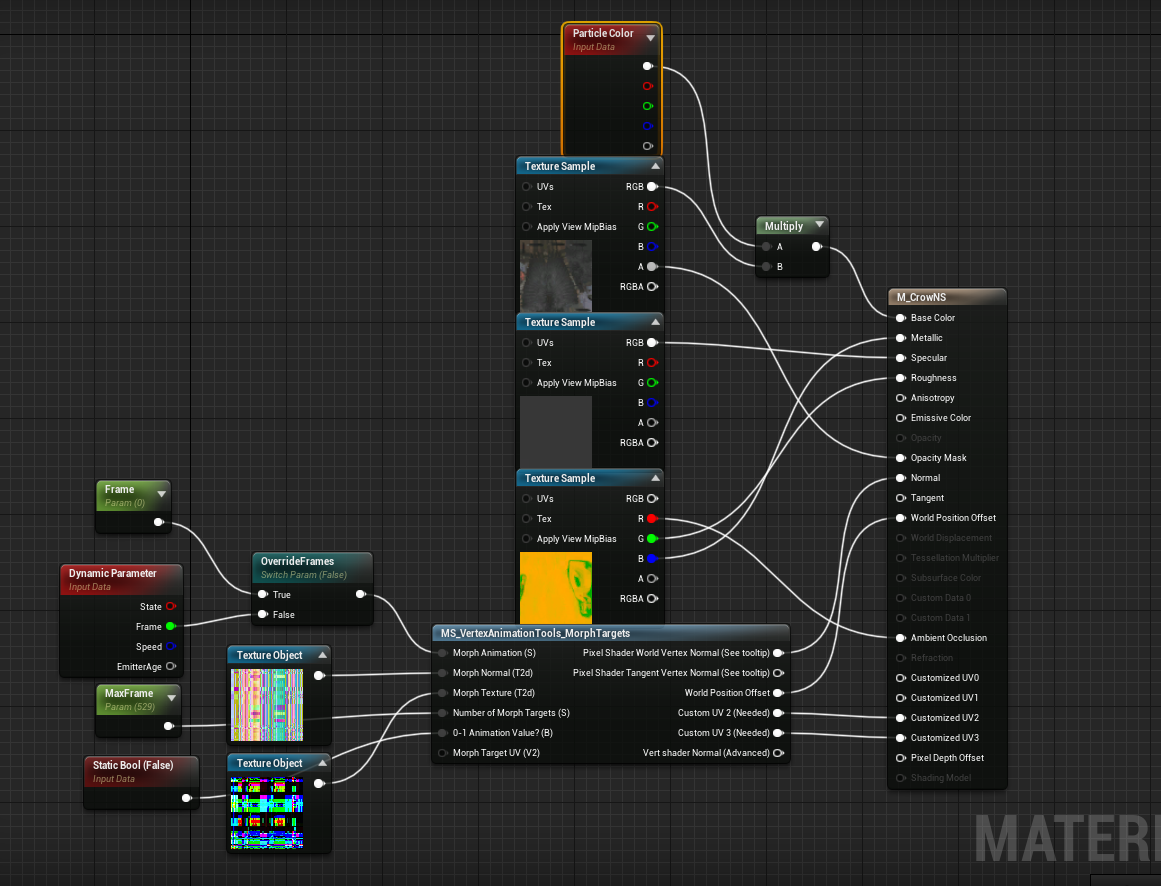
Next we can go about implementing the function that allows you to use your baked vertex colors. To do this, we will use a built-in function called: MS_VertexAnimationTools_MorphTargets. This will ask for many different pieces of data, such as the frame we want to display, the normals texture, offsets texture, total number of frames, and animation interpolation state info. First, we can create two Texture Object nodes, one for our normals, and one for our offsets. On each of these nodes, be sure to set the “Sampler Type” to “Linear Color.”
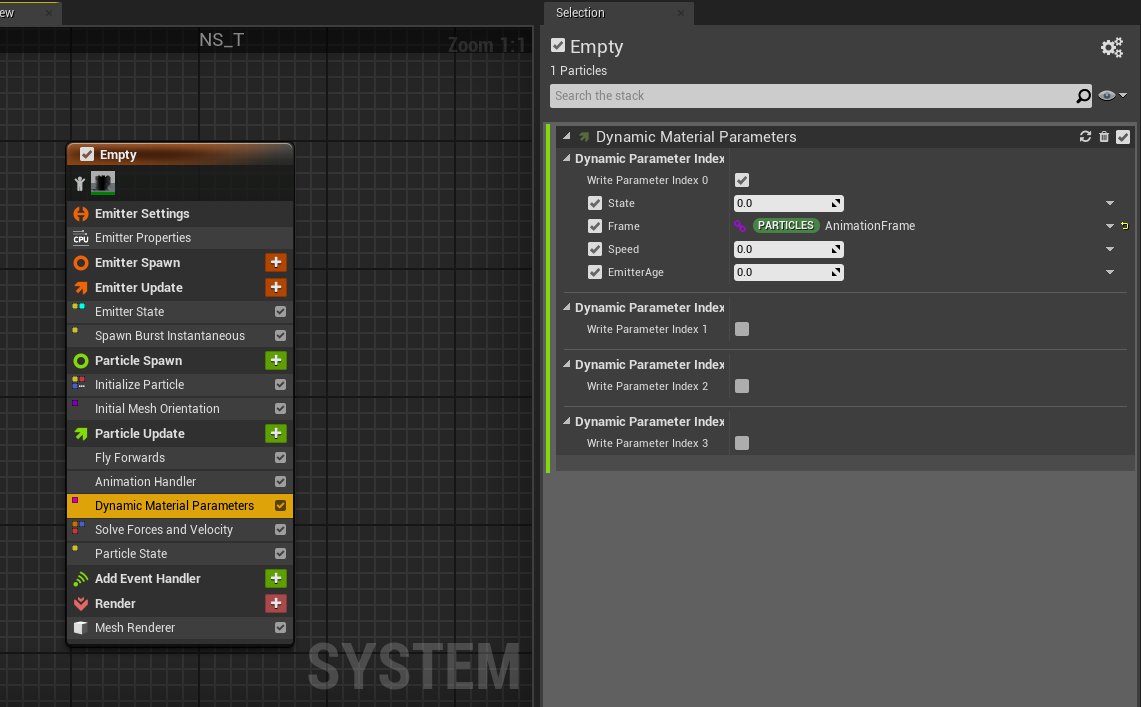
To set the “Morph Animation (S)” value, we want to supply which frame we want. We will also want to be able to test this outside of the particle system so that we can edit it easily from the Material Instance. To achieve this, we can create a “Static Switch Parameter” Node, call this “OverrideFrames”. In the “True” value we will pass in a “Scalar Parameter” that we name “Frame”. In the “False” input, we will pass in a “Dynamic Parameter” Node. In the details panel of the node, name the parameters as follows:
State
Frame
Speed
EmitterAge
We won’t be using anything except the second parameter, “Frame” but these will be here for any future uses. Plug the “Frame” output of the “Dynamic Parameter” into the “False” value of the switch. At this point. Your graph should look as so.
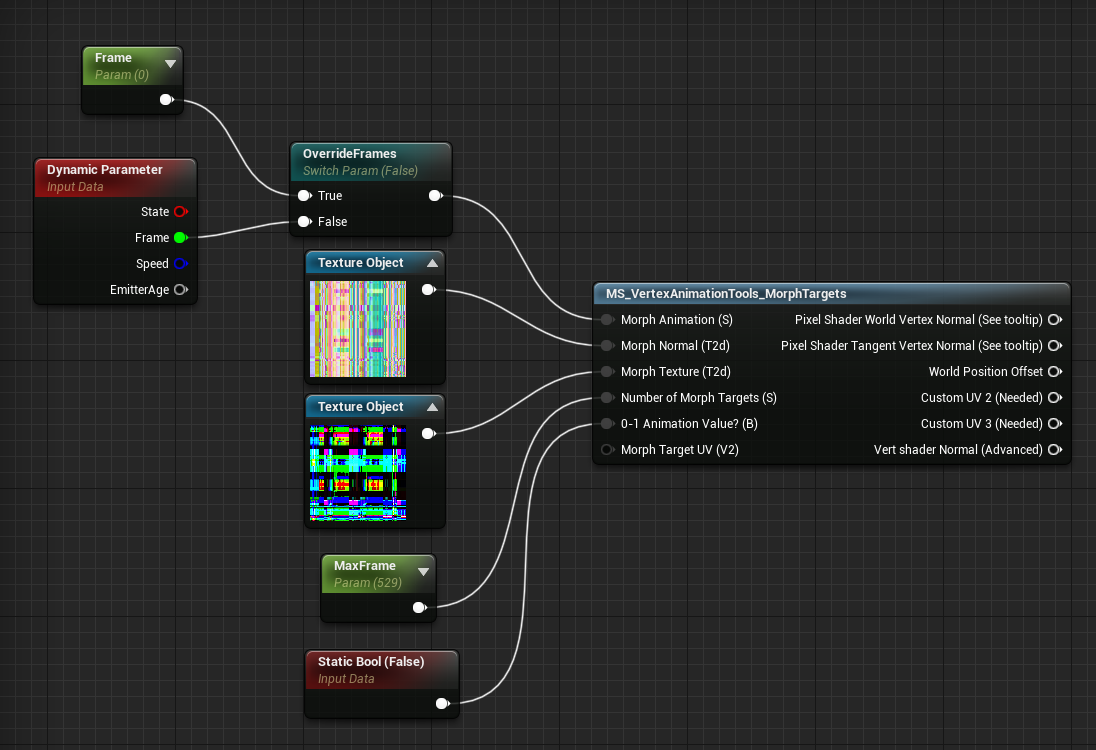
Now we only have two inputs left. For “Number of Morph Targets (S)” let’s plug in a new “Scalar Parameter” node into this slot, we will call the parameter “MaxFrame” this we will set to a default value of however many frames you have in your texture file, in my case, 529. As for the “0-1 Animation Value? (B)” input, we will plug in a “Static Bool” node. We can leave this as is. Your final node inputs should look like this.
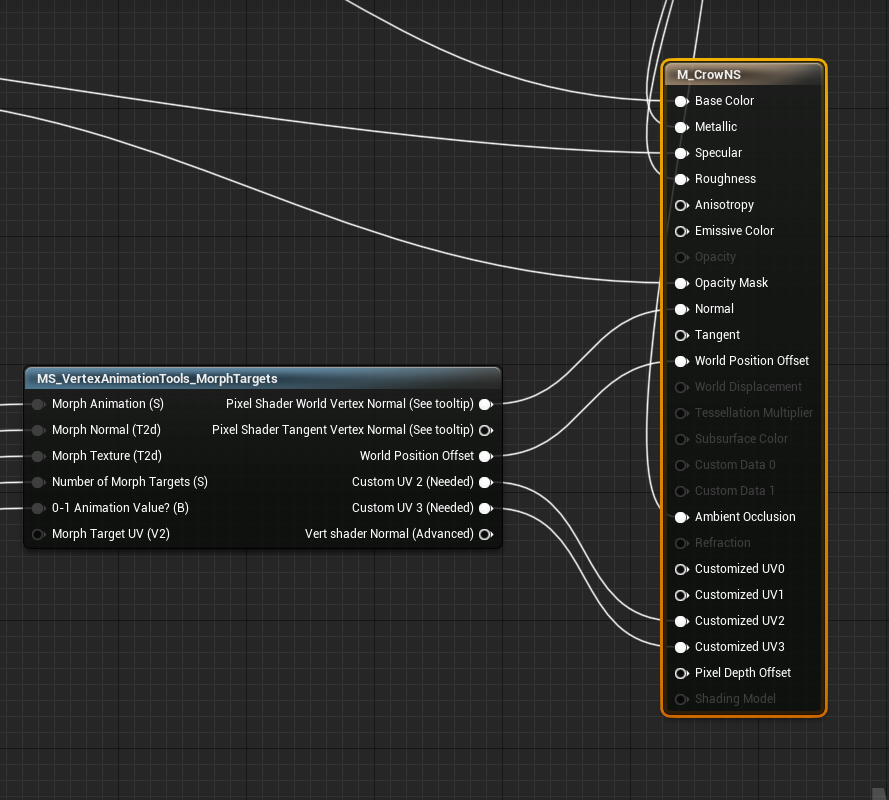
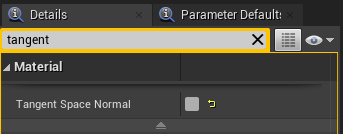
We can now connect in our vertex animation tool outputs into our material’s outputs. We can connect “World Position Offset” into “World Position Offset” directly, we can also connect “Custom UV 2 (Needed)” into “Customized UV2” as well as “Custom UV 3 (Needed)” into “Customized UV3”. Finally, and this involves a little back-tracking, we can replace the static mesh’s baked normals with the normals that come out of our “animation” data. This involves disconnecting the normal map that you connected previously, and instead connect the “Pixel Shader World Vertex Normal (See tooltip)” into “Normal”. Along with this, we will need to update the “Tangent Space Normal” option within the material’s details to “False”. This switches the normals into worldspace. I recommend pulling up your bird, looking at it with it’s current normals, and seeing if it doesn’t look drastically incorrect once you make this change, that would be a good indicator of something going wrong with your normals texture bake or import.
Once you finish making all these adjustments, your final graph should look something like this.
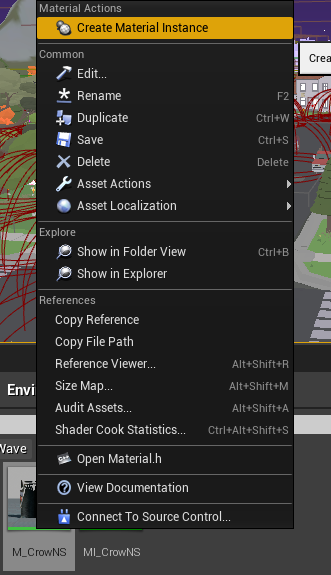
Now, let’s take this material, and create a material instance from it, you can do this by navigating to your material in the Content Browser, and then clicking on “Create Material Instance”. We can now name this MI_CrowNS (The MI_ prefix is Epic’s guideline asset name creation for material instances).
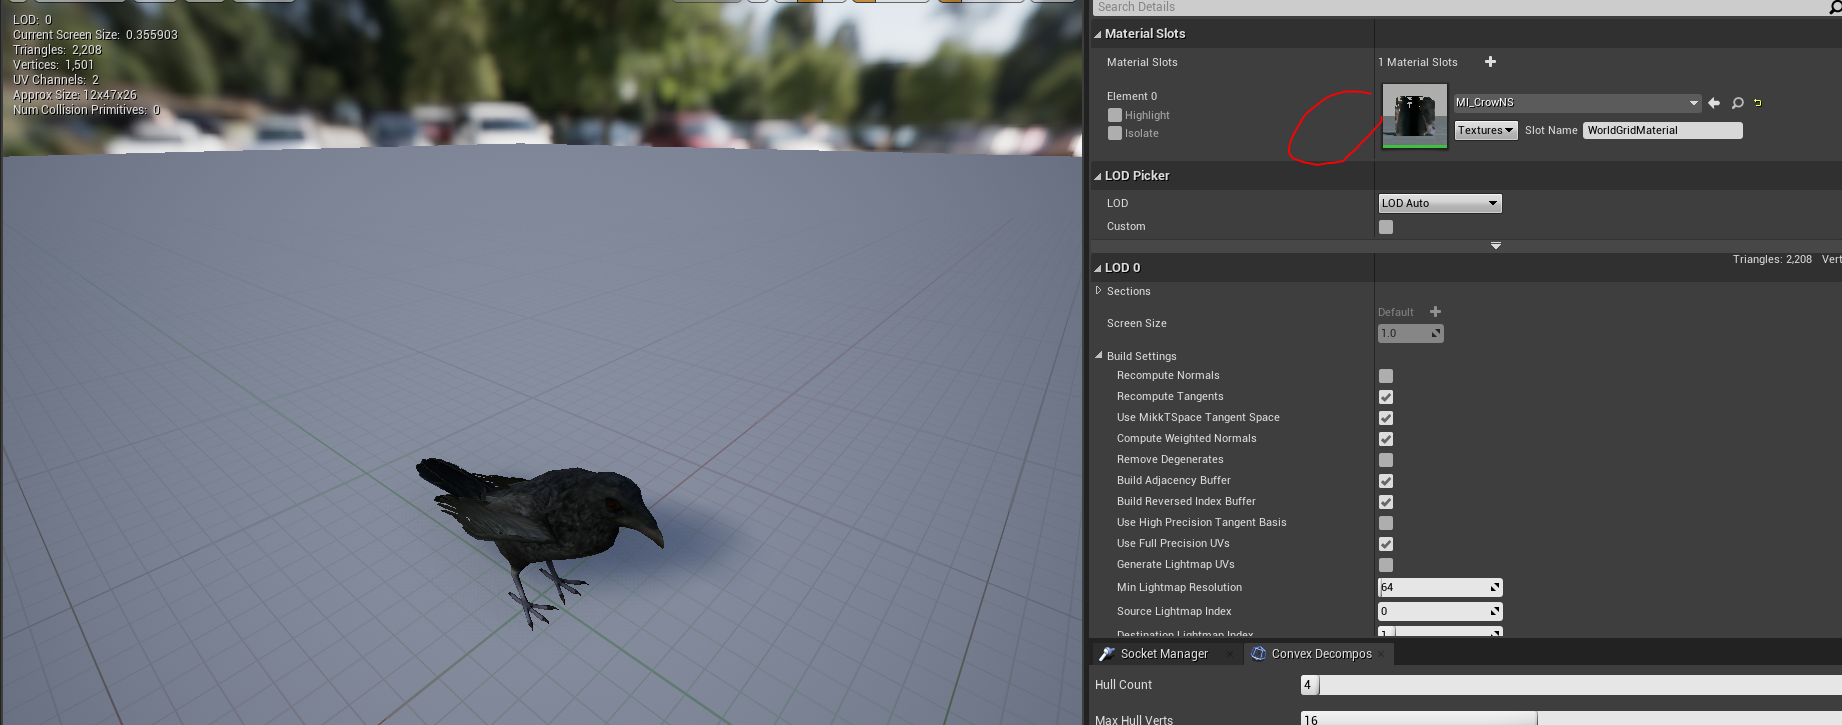
Double-click on the material instance to open it up, and you should see, in the “Parameter Groups” section, the “Override Frames” toggle, as well as the “Max Frame” parameter. Let’s now open our Crow Static mesh, and in it’s material slot, let’s put in MI_CrowNS. Now, we can see the crow with the proper texturing, and when we update the base material, or the instance’s parameters, we can see the changes reflected in the viewport.
If you keep both this window open, as well as the MI_CrowNS window open, we can check off “Override Frames” and then set it to “true”. This exposes a new parameter called “Frame” if you slide this value around, you will be able to see your crow animating!
Here, you can see me starting to scrub through those first many frames of animation, clearly my import process was successful, I can see the alpha masking working on the tips of the wings. The colors and normals all look proper to me, and I would say that this is good to move on with!
If your crow does not look correct, make sure the material is setup properly. If you see some verticies seemingly “spiking” up around the character, or sticking somewhere in space, make sure to set the textures on the proper import settings, and set the mesh LOD to use full precision to get the most accurate displacement data. If your crow does not look correct, it would be worth fixing at this time, as anything moving forward will just use these animations and frame data, and will not be adjusting the way that the crow looks like any further.
Niagara Function Scripts
Play Animation
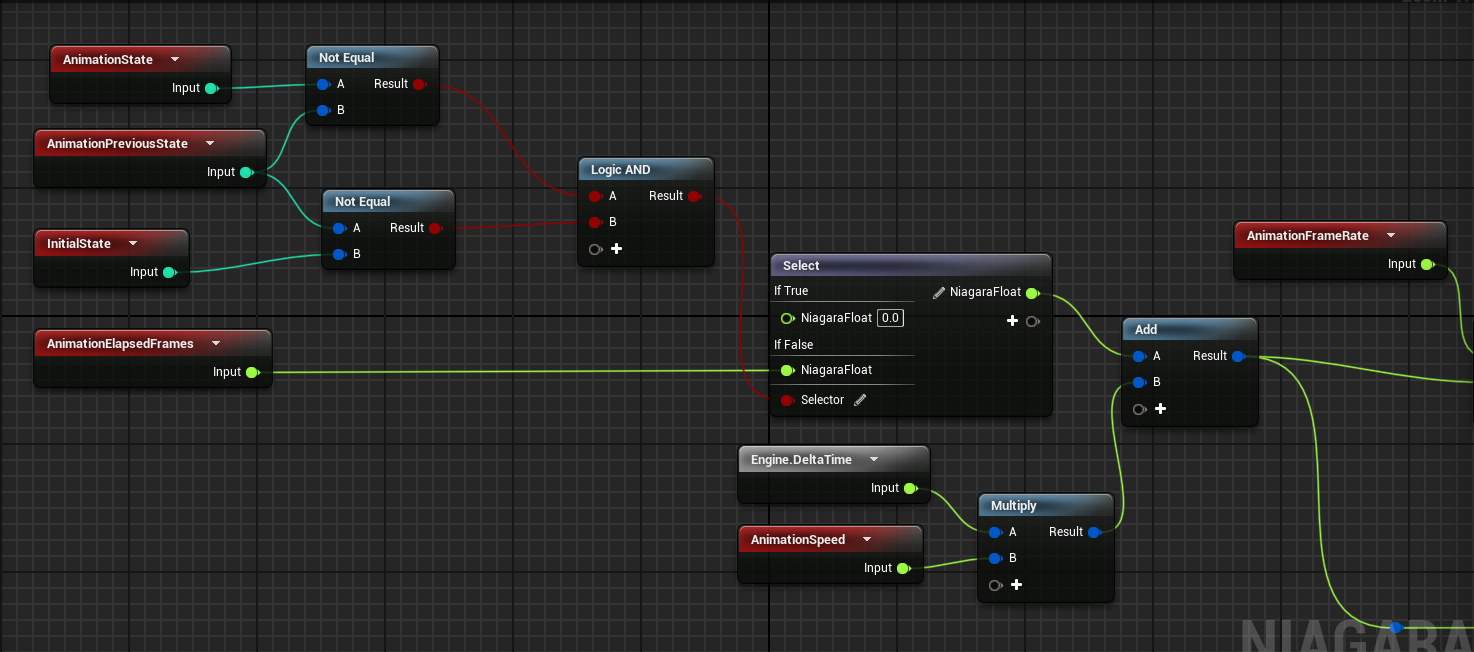
Now, I didn’t come up with this function at all, as it is pretty well documented in the Unreal video I liked to above, however, I will provide my implementation here in picture format, as well as a gist of the copied nodes. Some things in the video have changed implementations, such as the branch, which was removed after UE4.25 or so.
And here is the gist: https://gist.github.com/cjm399/1bd09acb1c0dd2480af4d00a209aae36
The Niagara Particle System
Here we want to do two things, we need to setup the ScratchPad controlling the birds velocity, and we also need to create a module to do the animation handling based on that velocity, position, and ground height. For this example, we will be replicating example A in the video, which has an idle, walk, takeoff, fly, land, idle sequence. We will tackle these two scratch pads separately, as well as anything outside of the scratch module that we need for basic setup. In future examples that I will add to this blog post at a later date, we will utilize much of this logic and functionality, but develop new systems to either avoid the player, or fly towards a tree, etc.
The Niagara Emitter
First, create a Niagara System, in the Content Browser, right-click->FX->Niagara System. Create an empty system, and then name it NS_BasicCrow or something similar.
Once opened up, you should have a blue system node in your Niagara System, and nothing else. We need to create an emitter to actually emit a particle, in this case a bird, and a particle are synonymous, as we will render a bird at every particle in the system. Let’s create the emitter, right-click->Add Emitter->Empty.
Now we have an emitter! There isn’t much of anything happening though. Even still, we have quite a bit of boilerplate to get through before we will see anything worthwhile. First, click on the “Emitter Properties” under the “Emitter Settings” section. Under the “Emitter” section, check off “Local Space” this will ensure that when setting the bird’s velocity and rotation, it is relative to our base system’s transform
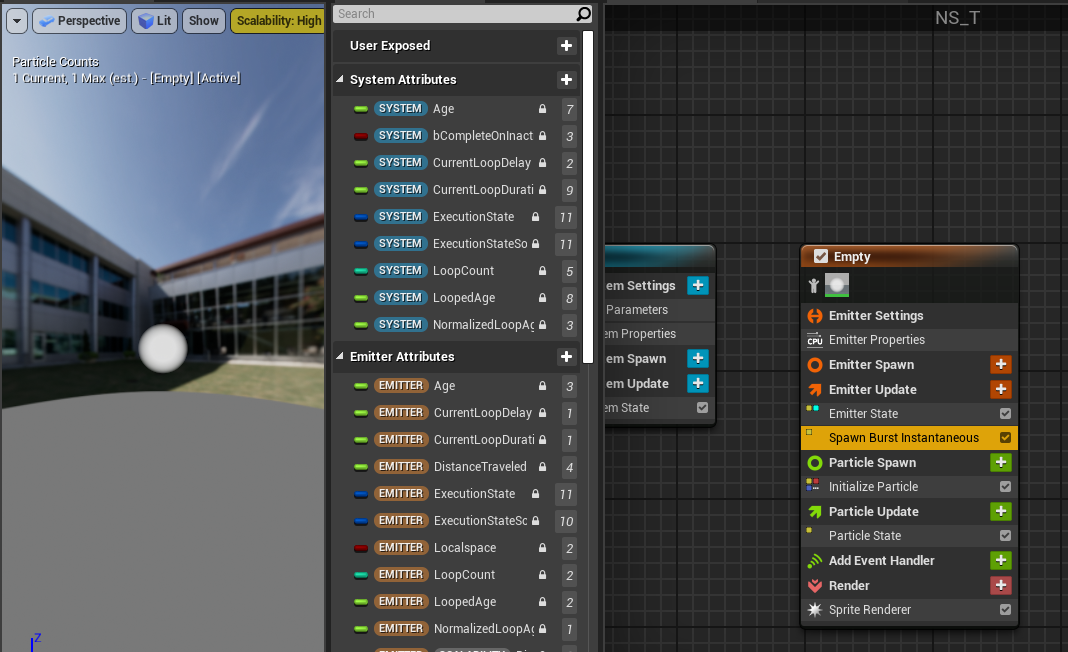
Now, we need to spawn the bird, for this example, we want one bird to spawn, with no randomness to its location. For this, we need to add a “Spawn Burst Instantaneous” Module inside of the “Emitter Update” section of the emitter. Here, we can ensure that the “Spawn Count” is set to 1. Now, in the preview window, there should be a white circle at the center of the system.
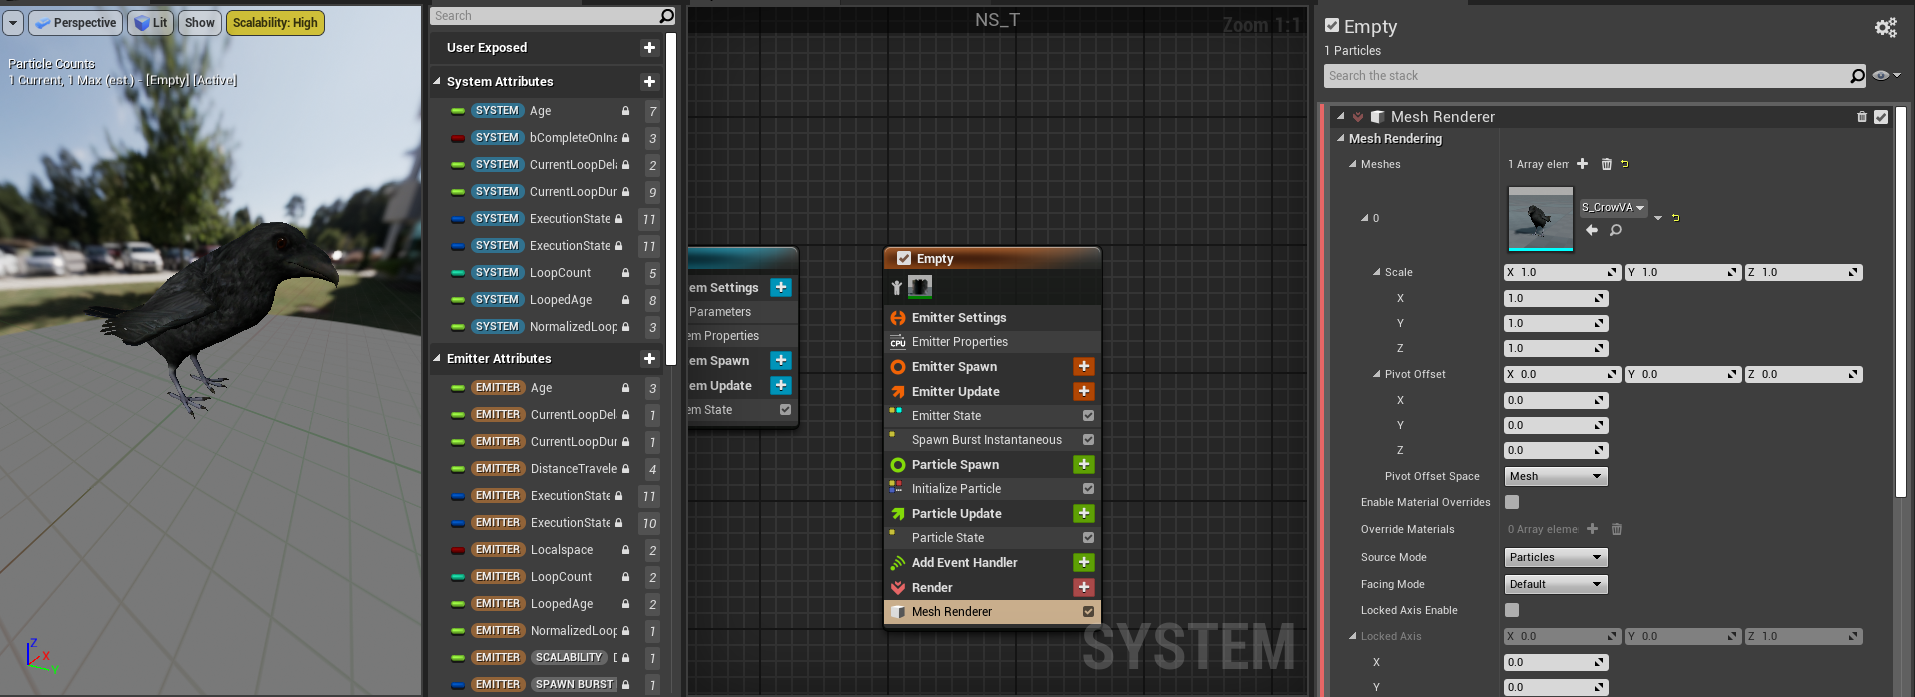
Let’s change this circle to a crow, then we can directly see how our modules will effect the bird mesh. At the bottom of the emitter, there is a “Render” section with a sprite renderer listed, delete this “Sprite Renderer“ and the white dot will disappear. Instead, let’s add a “Mesh Renderer” to the Render section. Then, under the “Meshes” section, let’s add our crow vertex animation static mesh, in my case, S_CrowVA. Now, the crow should appear in the preview panel at it’s baked out pose.
Now our crow is setup so we can see it and spawn it in the world! Now, most of the things we need to add are to manage particle state, change the dynamic material parameters to reflect the current animation frame, velocity to move the crow through space, and handle animations based on particle state. Let’s start with moving the crow through space, it will be easier to tell if our animations are working properly if the crow is moving first. To do this, let’s add a “Solve Forces and Velocity” module to the Particle Update section. Then, above that, we want to add a “New Scratch Pad Module”. We can name this module something like “FlyForwards”. If this comes in below the “Solve Forces and Velocity”, you can just click and drag the module to be at the top of the list.
Bird Movement
For the motion that we want, we want the bird to stay still for something like .5 seconds, start walking forwards until 1 second, in which we take off into the air, hover, fly back down, and idle once again for the remaining time. Controlling this velocity and position in such a scripted way proved quite a challenge, as I wasn’t sure the best way to tackle it, and I am not convinced that I tackled this in the best possible way. Theoretically, you could draw out a spline in the world, and use blueprints to move along that spline, with actual functionality, and send in the goal position to the niagara system through blueprints, then based on position differences calculate the required velocity given a speed. Or you could expose it to a “Level Sequencer” and change the niagara particle system user parameters through a timeline in a sequencer, and have very fine-tuned control over the velocity for the particles lifetime. You could even potentially sample a random position, then fly towards that position with a take-off and landing that’s calculated based on distance and animation time. For very short distances, you could even make the determination to fully walk, and never takeoff and fly. However, I didn’t want to over-complicate the system, and I wanted to keep everything inside the Niagara System, thus the function for position is crude and difficult to fine-tune. As a future update to this post, or a future post, I might look at controlling the birds in ways mentioned above.
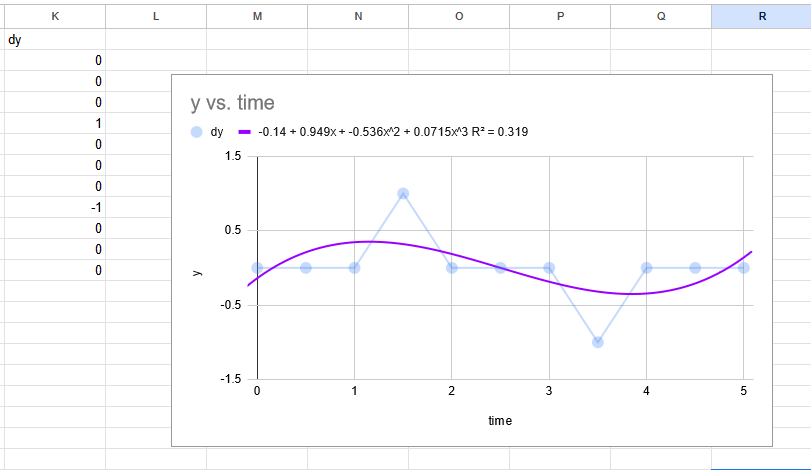
Anyway, to come up with my velocity function, I used Google Sheets, plotted my velocities I would like, and at what intervals, I charted them with a graph, and used the series to generate a polynomial function that approximates the movement. I plotted the desired y velocity against time in increments of 0.5 seconds. We wanted to stay still, then move up, stay still, move down, then stay still. Leading to the following values, and chart.
You can see the plot as the transparent, blue line, and the approximation as the purple, smooth line. I was using a polynomial of 3 degrees, and you can see the formula that it created listed above the graph, it is as-follows.
dy=-0.14+0.949x-0.536x^2+0.0715x^3This means, that if we use this function, and plug in the particle’s age in for x, the bird’s movement should follow this line. As you can see, the line isn’t perfect, it’s not actually still from 0 to 1, and from 4 to 5, but we will fix that later. To make it easier to read, I delegated this calculation to a Niagara Dynamic Input Script. So I made a new one in my Content Browser called NFS_CalculateZVelocity. The function has one input, a float representing time, and has one output, a float representing the desired Z velocity at that given time. To replicate this function, I just use a simple multiply node to multiply time against itself to get the respective second and third powers of time. Here is the function! (PS: The Multiply 100 at the end is simply to convert any velocity from cm/s to m/s, as I find meters easier to work with). Make sure to expose this library so that you can call it from the Niagara System! This can be found under the “Script Details” panel, mark the “Library Visibility” as “Exposed”.
Here is a gist of the nodes copied out, you will need to properly configure your input/output nodes though, as those will not paste properly: https://gist.github.com/cjm399/9c3122fdb1016e4812d7af3cee814f05
Now, we can use this function inside of our “FlyForwards” Module! What we are going to need is the time to send into the function, we want the particle’s age, and now the system’s age as a whole, as we will have the system loop. I have even found that accessing the Emitter’s age is not correct, possibly because the system is managing the lifetime, but the system managing it is more performant, and we don’t need self-management per emitter. So to get the age, we use the “Normalized Age” and “Lifetime” parameters within the “Particles” namespace. Drag or add these parameters to the “Map Get” section of the module. We then can get the age by multiplying the normalized age by the lifetime (lifetime, we will set to 5, and normalized age indicates a 0-1 value of a percentage of how old they are. Thus, if they are 0.5 normalized age, we can multiply against it’s lifetime of 5, and get an age of 2.5.
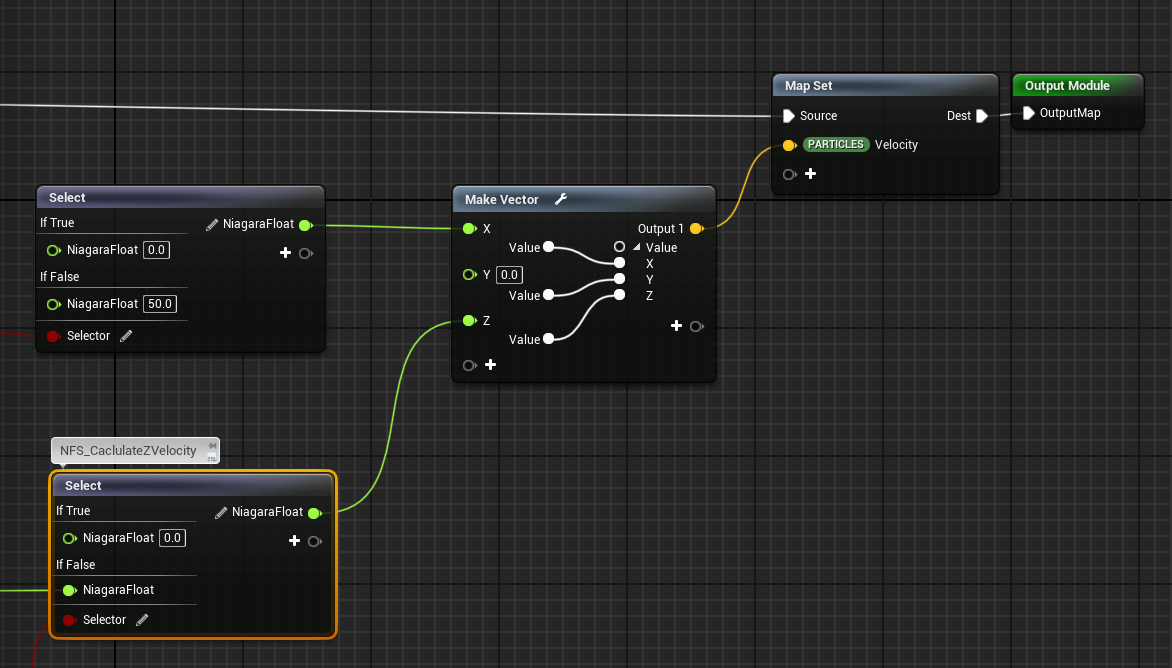
From here, we can send this time into the NFS_CalculateZVelocity function, and get out the height! We can then make a vector, and send in the height into the Z value of the vector. In the Map Set node, we can add the "Velocity” parameter of the “Particles” namespace. We can feed our new vector into this velocity.
Now, as I mentioned before, this isn’t exactly the flight behaviour that we desire, so we can add some conditions to force a behaviour within specific age ranges, and make a piecewise function, where we use one function within an age range, and another function within another age range. We have 3 ranges we care about for the upward (Z) change, and 3 we care about for the forward (Y) change. These cases are:
Z - Before takeoff, we want to keep Z at 0.
Z - After takeoff, but before landing, we want to use our NFS_CalculateZVelocity
Z - After landing, we want to keep Z at 0.
Y - Before walking, we want to keep Y at 0, to idle.
Y - After starting idle, but before ending idle, we want to move forward at a constant rate of 50cm/s
Y - After landing, we want to idle, or continue walking before coming to an idle.
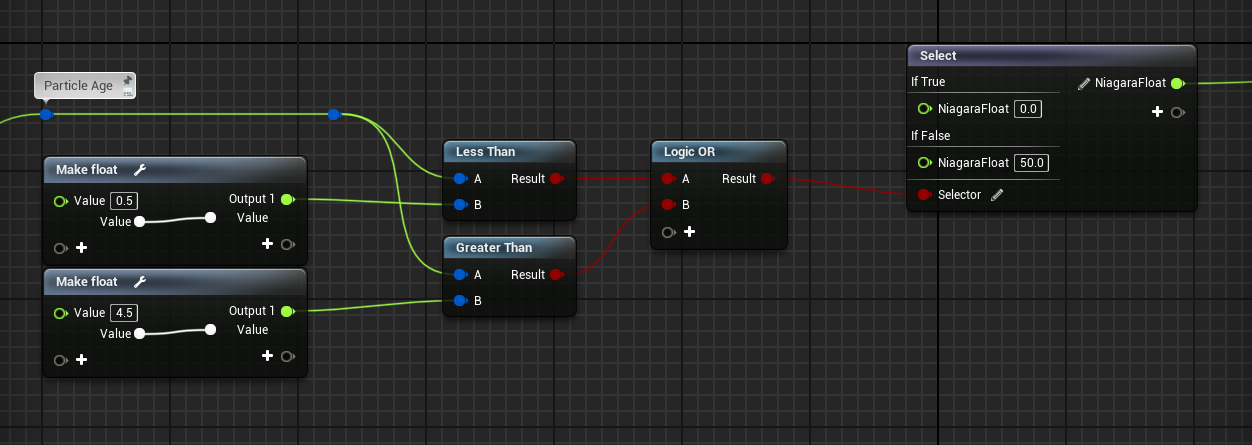
We can accomplish the following rather simply, as we only have two real states for each axis, in Z, we are constant, or NFS, and for Y, we are constant at 50, or constant at 0. So we only need one select node per axis. Let’s tackle the forwards direction first, we want to take our age, and compare it against a couple hard-coded values we have based on our desired movement, in this case we want to check if the age is less than 0.5, or greater than 4.5. If the previous condition is true, we want to stay still, if false, let’s move 50. This, in execution looks like this:
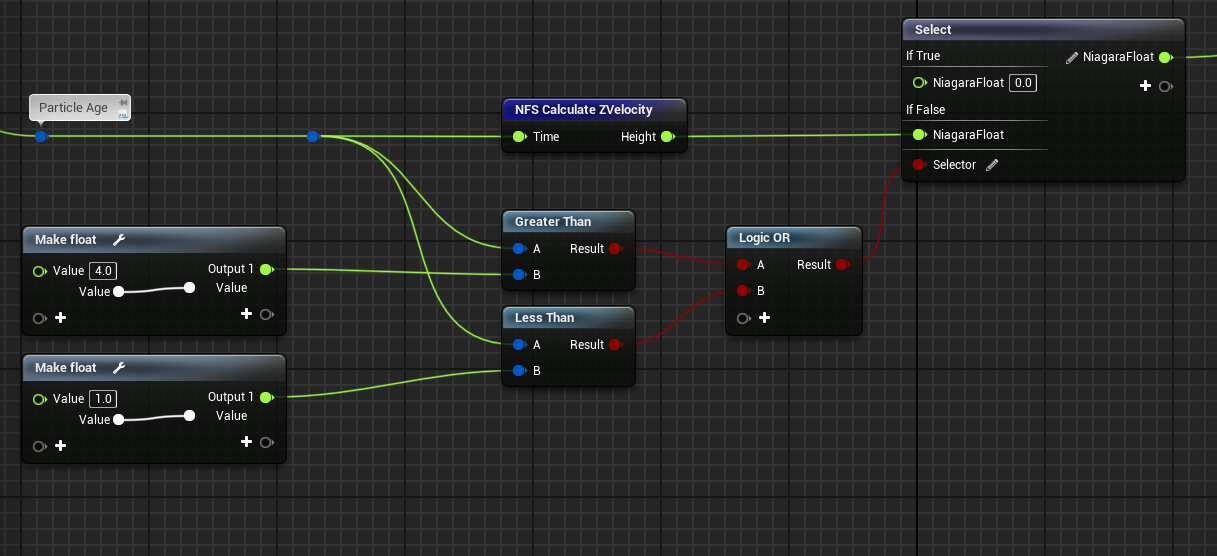
The Z-height calculation should look very much the same, altough instead of a constant value when true, we want to use our calculation function. We also want slightly different constant age values, so that we can takeoff after walking, and allow for landing and following that up directly with a walk. Here is the current implementation for that.
For this implementation, I am assuming that the world-Z is always up for the bird, and that any ground will be in Z-direction as well. Knowing this, we can use this value and feed it directly into the Z component of velocity. The forward direction, I am also assuming is fixed, as we are operating in local space, we know that X-forwards is the forwards direction of the particle system, so if we want the bird to fly in the direction that the particle system is facing, we just need the X-axis.
Now, with this taken care of, our bird should be able to move within our space! If you place the particle system in your world, you should see that the bird flies up and down, and forwards along the direction that your Niagara particle system is facing!
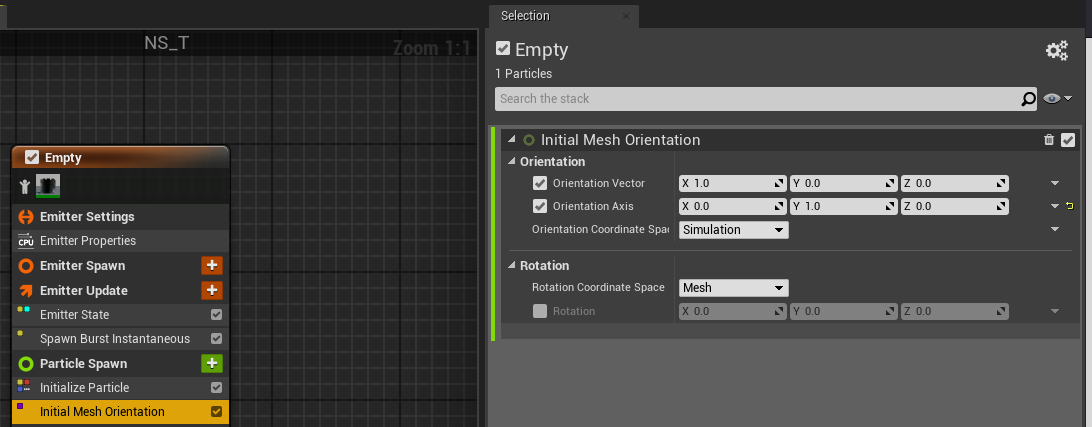
Your bird may be like mine, where I accidentally imported the crow into Unreal facing the wrong direction! Unreal wants assets to be facing down the positive X direction, however, my crow is facing positive Y direction. The best way to fix this is by changing the facing direction in your DCC tool, or when importing into Unreal, editing the import settings to change the facing direction, this rotation is then baked into the asset. However, if you don’t want to re-import, or edit your base file, you can do what I did, and add an "Initial Mesh Orientation” module to the “Particle Spawn” section of the emitter. Then, you will need to edit the “Orientation Vector” and “Orientation Axis” so that you rotate your bird properly along the direction of movement.
Once you edit the “Initial Mesh Orientation” properly, the bird should be hoping along the emitter direction, facing the proper direction.
Bird Animations
Now that we have basic movement implemented, we want to incorporate animations to accompany this movement. Now, this animation system, should be fairly generic to accomplish similar animation state handing regardless of the movement code we wrote above, to some extent. As Unreal advises, any specific behavior, like walking away from a character, should be handled in it’s own emitter. However, this animation handler should be fairly standard for the purposes here. As mentioned above, I may add more complex bird movements, possibly along splines, or in relation to player movement, and cover those topics in future blog posts. Onto the module!
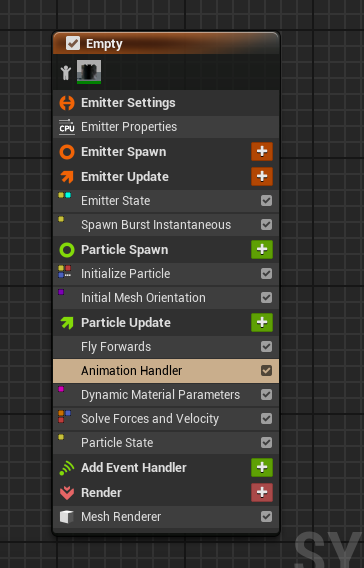
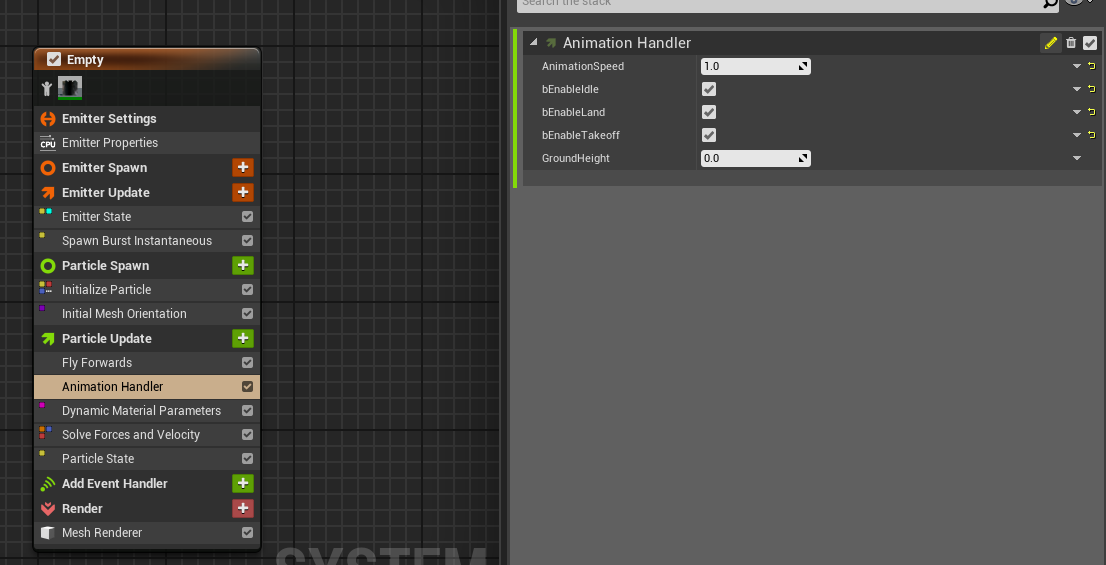
Navigating back to the “System Overview” of the Niagara System, we want to add a “New Scratch Pad Module” to the “Particle Update” section, underneath “Fly Forwards”. I named my module “Animation Handler.” Before we start editing this module, we need to create some parameters for us to use, as add a “Dynamic Material Parameters” module to the “Particle Update” section. Once these modules are added, this is how the emitter should look to this point.
Now, let’s add the parameters that our module is going to need. We want to add, to the “Particles” namespace, an int32 called “AnimationState”, a float named “AnimationElapsedFrames”, as well as a float called “AnimationFrame”. You can add these under the “Parameters” window, scroll to the “Particle Attributes” section, hit the “+” button->Make New->Common->float. These variables will be used to maintain state information, as well as send animation frame out to the material parameter.
Now open the module. There are a couple more parameters we want to setup, these are all within the “Input” namespace, as we will directly plug in these values in the system graph. The parameters can be created in the “Map Get” node, by clicking the “+” button->Make New->Common->bool, etc. The parameters we want to create are a bool named “bEnableIde”, a bool named bEnableTakeoff, a bool named bEnableLand, a float called “GroundHeight”, and a float called “Animation Speed”.
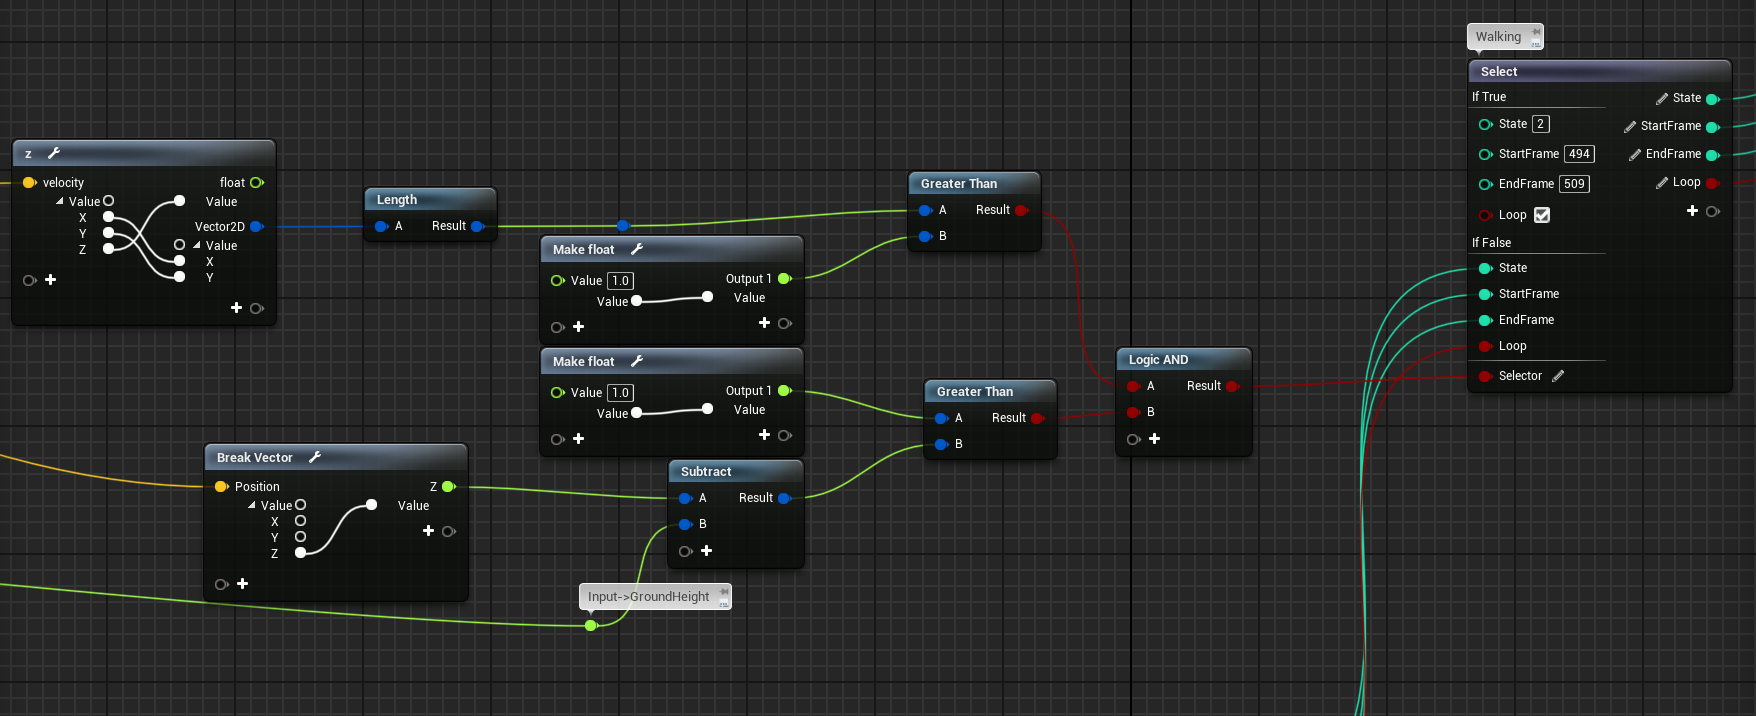
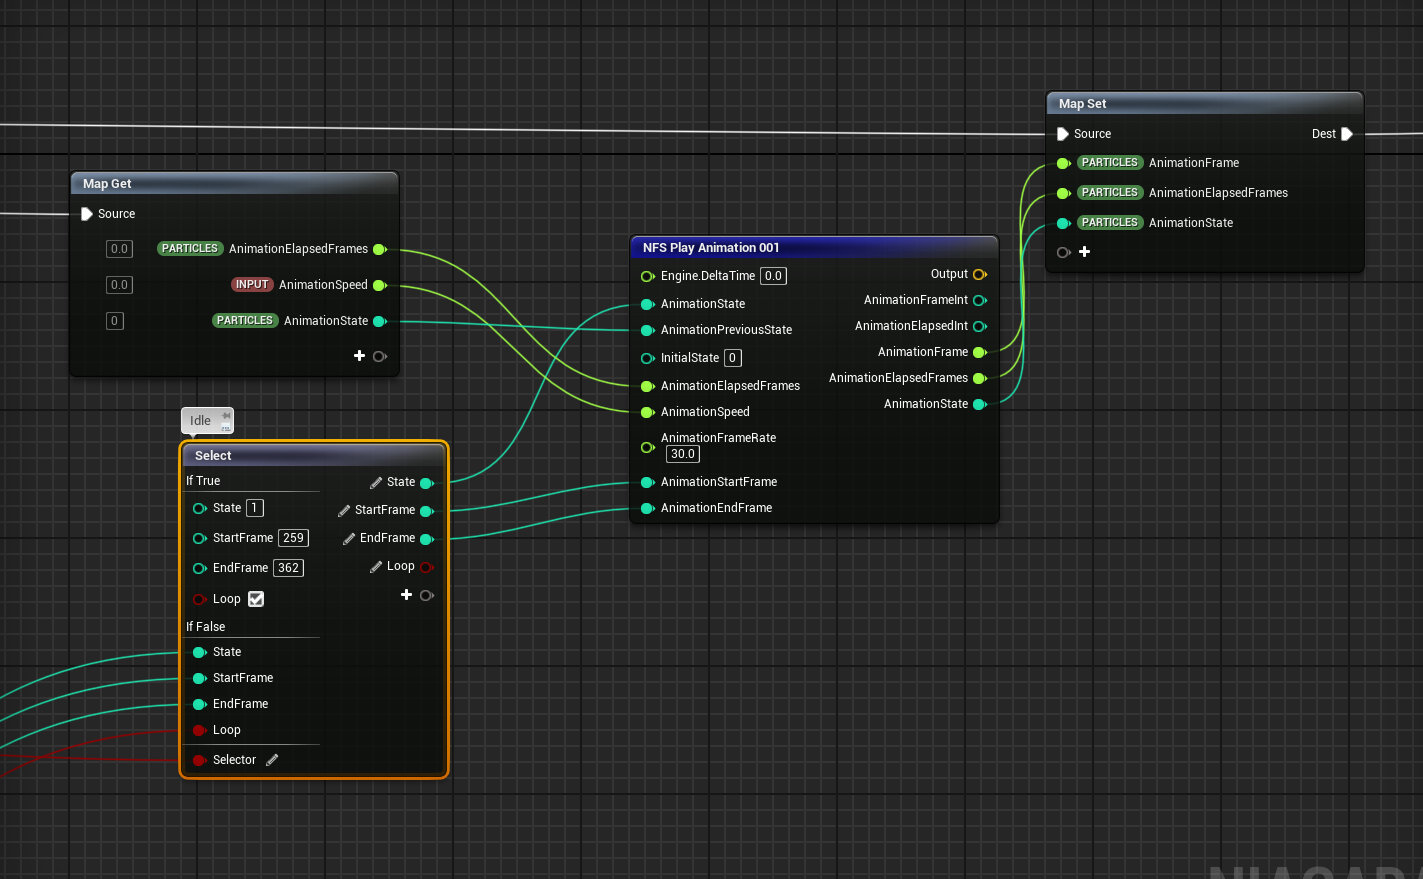
Once created, we can get into the actual logic of the animation handling. Basically, we are just going to get some information about our bird’s state, such as it’s velocity and position. Using these, we can determine if we are moving, what direction, and where we are in space (particularly relative to the ground). We also use AnimationState and AnimationFrame, to determine things like if we are in the middle of taking off from the ground. While the graph looks quite large and complex, we are really just checking a few conditions about state, primarily:
If we have no velocity, we are idle
Otherwise, if we are close to the ground, and have forwards velocity, we are walking
Otherwise, we are flying
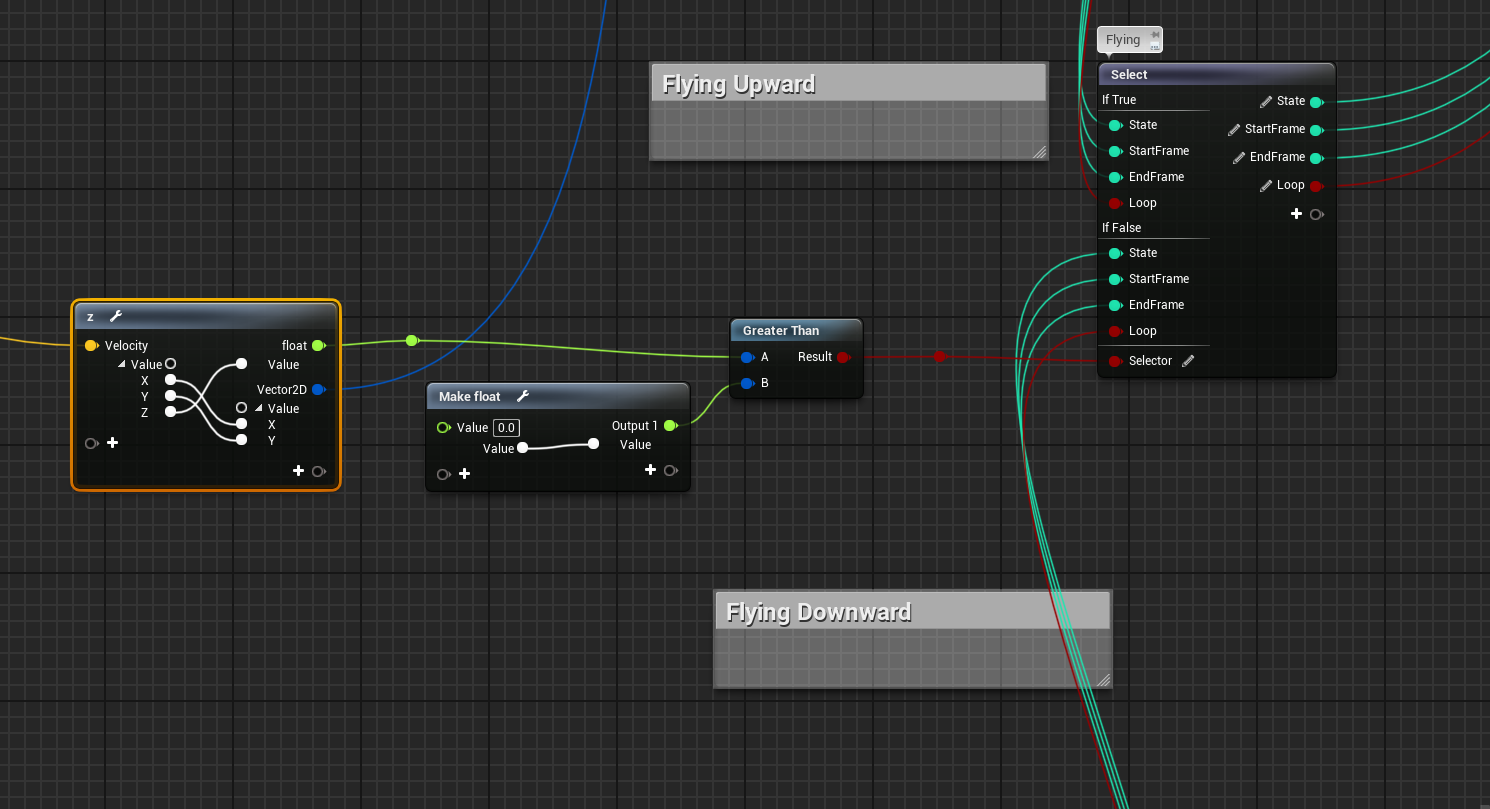
If our velocity is up, we are flying up
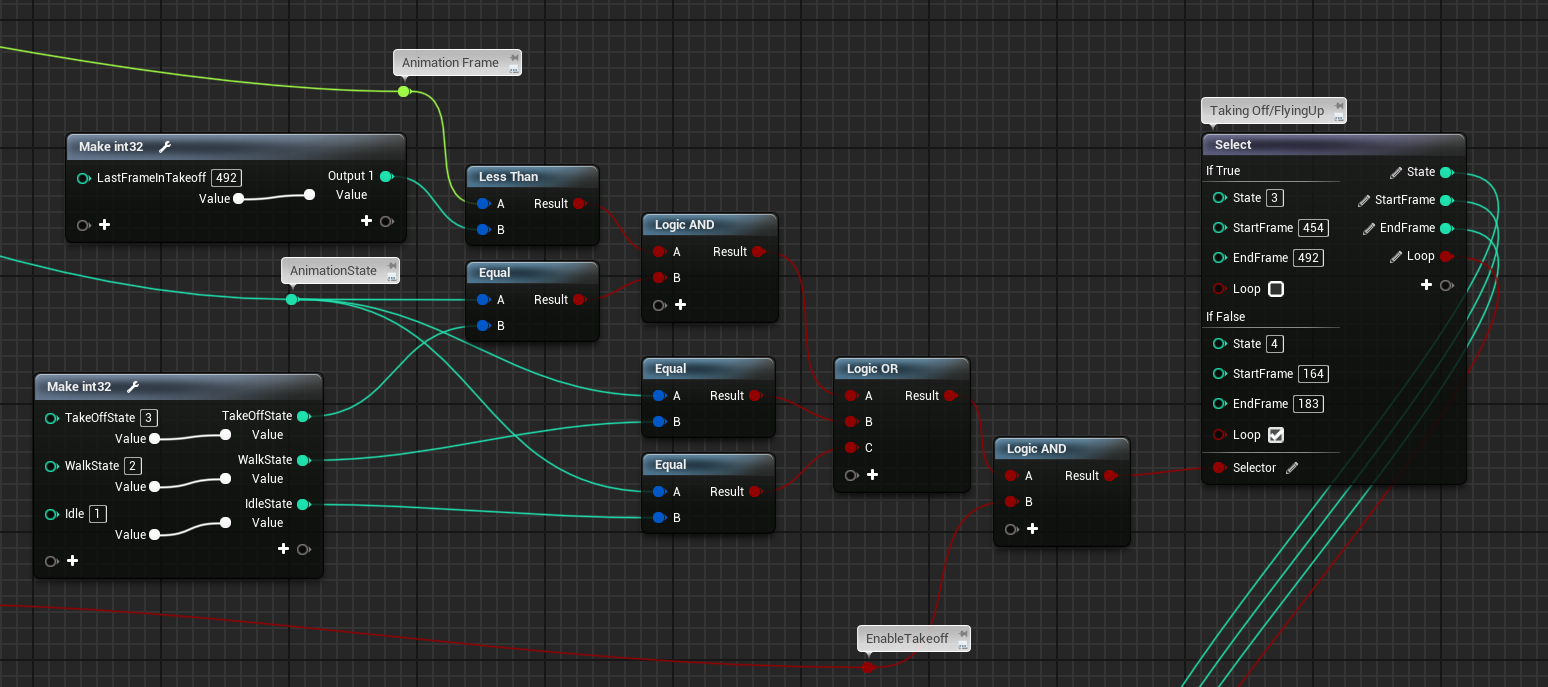
If our current animation state is idle,walking, or taking off, and we haven’t finished taking off, we are taking off
Otherwise, we are flying upwards
Otherwise, we are flying downwards
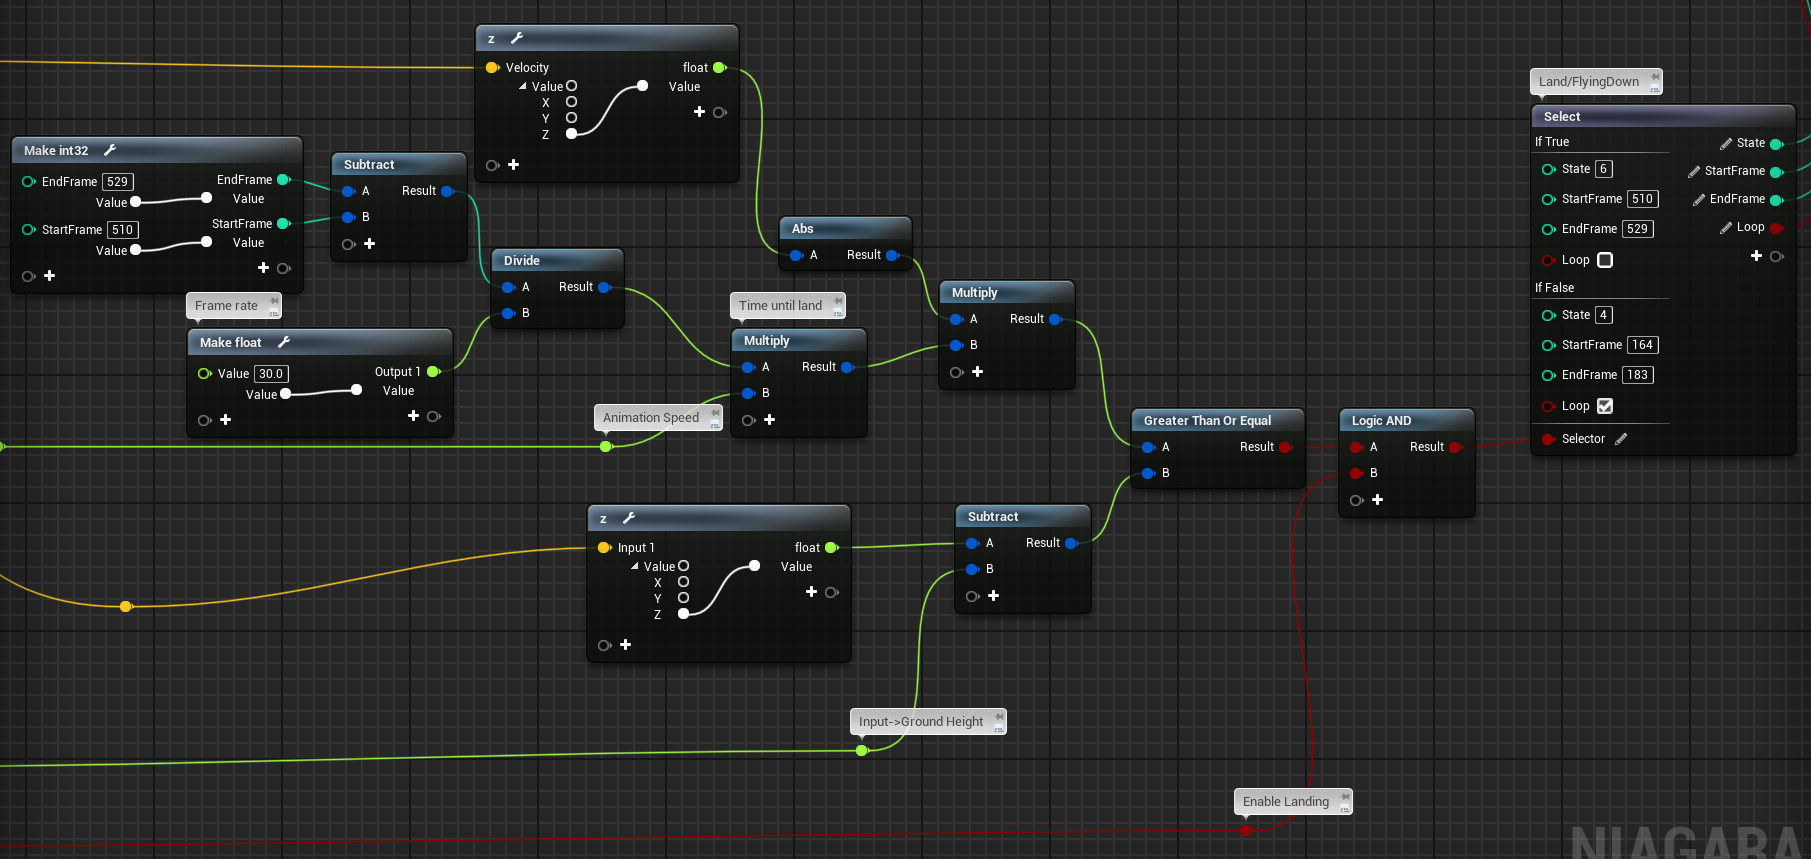
If we are going to hit the ground in less than or equal to the time it takes to play the landing animation, we are landing.
Otherwise, we are flying downwards
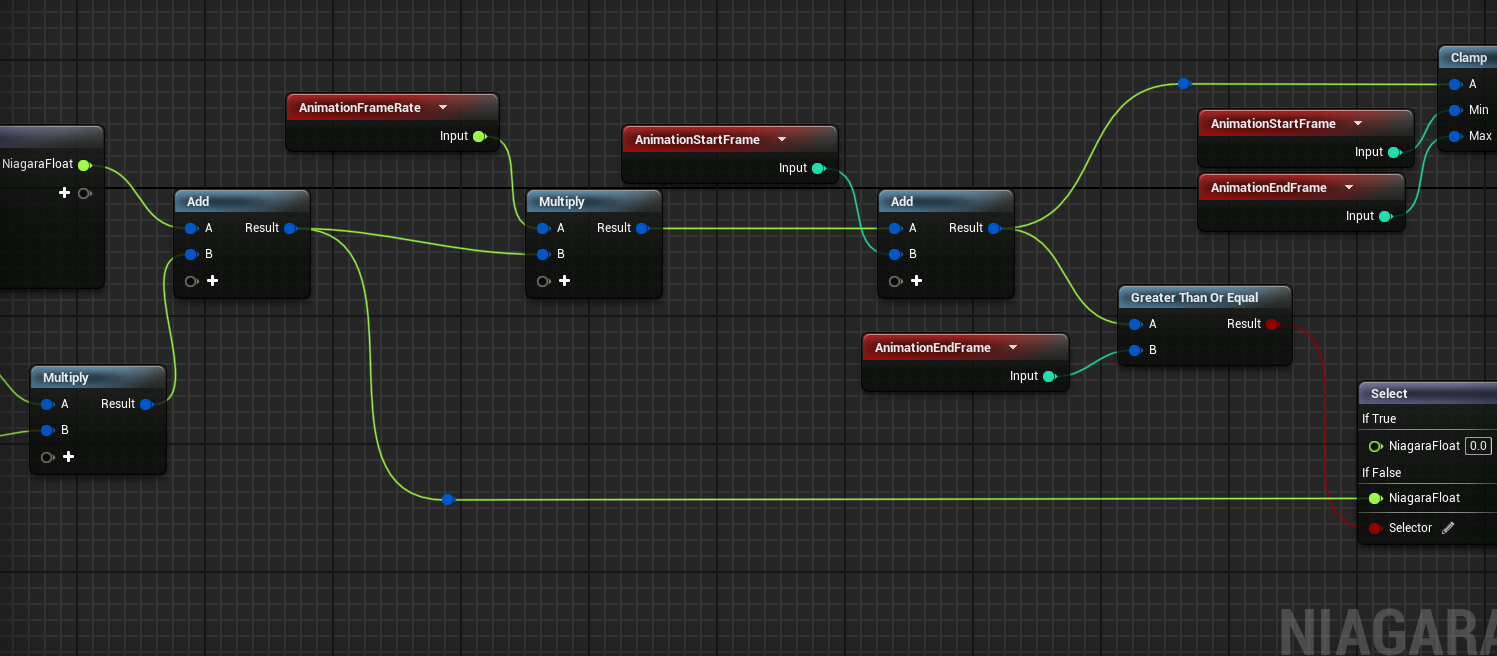
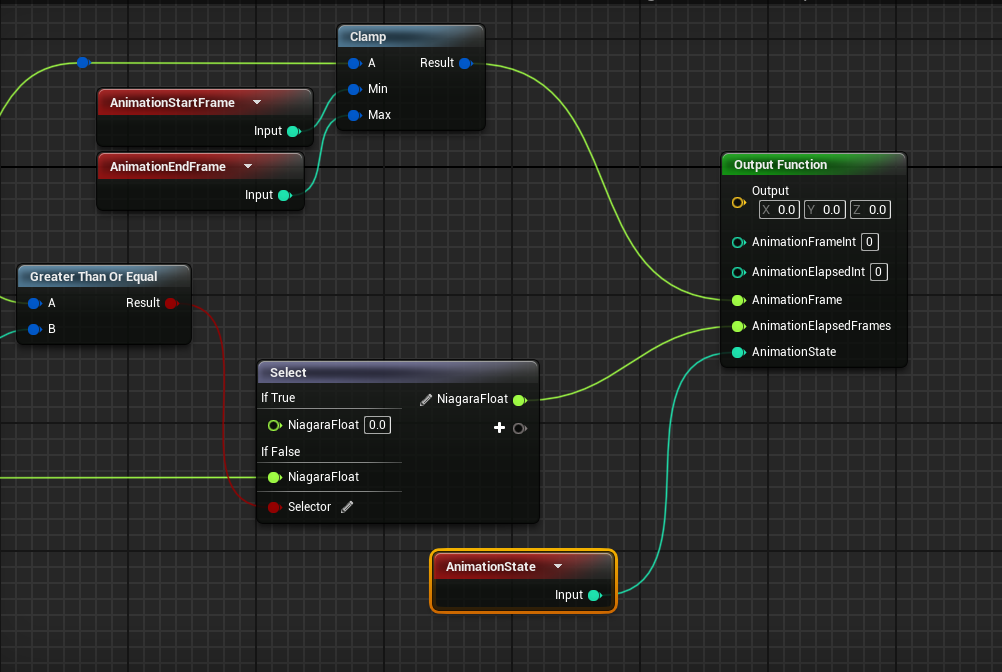
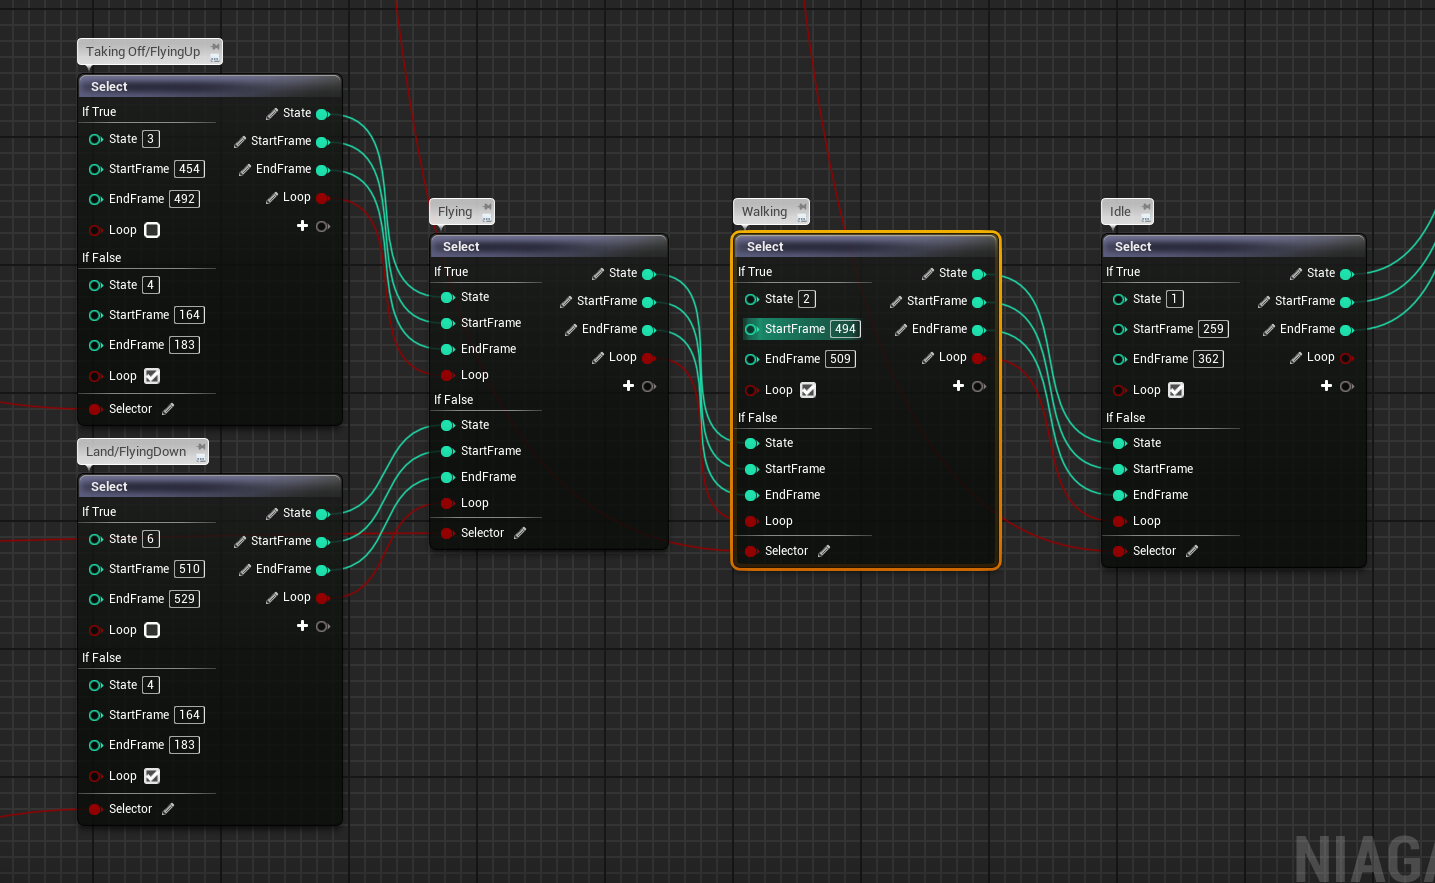
Once we have this state picked out, of which there are 6 total possible states, we call the NFS_PlayAnimation function with our given state and animation information. Then we set our animation state and frame variables for use later.
Here we go, delving into the graphs, I will, as above, provide a link with the copied nodes.
Idle State
Walk state:
Flying Condition:
Takeoff/Fly upwards State:
Landing/Fly downwards State:
The states flow together as so:
Finally, the output of the last selection feeds into the animation function we created:
Here is the gist for the copied nodes: https://gist.github.com/cjm399/d0a789d1b7ff203abd25b99460e401d4
Setting the material parameters
Looking back at your crow, you might notice that nothing’s animating! That’s because we need to set the dynamic material parameters and set our input’s for the module! If you navigate back to the Niagara System window. If you first click on the Animation Handler, let’s set our AnimationSpeed to 1. bEnableIdle to true, bEnableLand to true, bEnableTakeoff to true, and GroundHeight to your ground height, in my case, this is 0.
Finally, we can click on the Dynamic Material Parameters module, and set the “Frame” parameter to the “AnimationFrame” parameter in the “Particles” namespace, you can simply drag the parameter onto the “Frame”.
With that taken care of, everything should be complete for your bird! Now, when you drag the Niagara System into your world, you should have a functioning bird flying by!
If it’s not working/Common Issues
If your crow is moving, but is not animating properly.
Please check that you have set the animation handler parameters, and that you are accessing the proper parameters, as well as that your material is setup properly. Your material is setup properly if you can override the frame in the material instance, and see a different animation frame from the crow.
Your crow is not moving
You could start more simple, and just add a constant force. Make sure that you have the “Solve Forces and Velocity” module in your Particle Update!
Your crow is not facing the right direction
Add an “Initial Mesh Orientation” module in the “Particle Spawn” and configure it such that your crow faces properly.
Your crow is not flying in the direction of the particle system
Make sure that in “Emitter Properties” you check off “Local Space”
Conclusion
So there you have it! The entire process to export, modify, import, shade, and program your bird particles! It’s quite the comprehensive tutorial, much better than my last tutorial, as it fixes issues previously encountered, but also helps through the whole process better. We also have created an animation handler to take advantage of bird state! Now, this should work with a variety of bird movement paths.
In the future, I would like to expand upon this article with more effects for the bird. We can skip the import and setup and get right to the effects. I’d like to revisit the effects from my previous article, as well as the examples listed in the Unreal video. When I release these articles on more specific bird movements or effects, I will list them here at the bottom under External Resources. Please check back in for more effects later!
External Resources
The previous (older) Niagara bird article, this includes circle effects, and random idle placement.
