How to Convert a Blueprint into C++
Converting A Blueprint into C++ (UE4 / UE5)
Blueprints are a great tool. They allow an introduction to programming without care of syntax or requiring understanding of libraries, file structures, etc. They are also great for prototyping, as they compile almost instantly in-editor, and have complex functionality built into simple drag-and-drop nodes. However, Blueprints have their limitations as well, the primary one being performance optimization. Blueprints are known to be much slower than C++. Blueprints also don’t contain all of the variable types you might want, and lack some functionality that is exclusive to C++. This means that you will frequently find yourself creating prototyping code in Blueprints, and then having to convert them over to C++ down the line. What also happens, is when I’m converting one class, and suddenly I need a reference to another blueprint class! Converting Blueprints to C++ is more of a process than a one-size-fits all tutorial, but I will go through the steps I take to convert, and if you just want a quick fix to get some speed back, I can also show how to generate native blueprint code automatically at build time, this doesn’t always work, and won’t be as good as code you write, but it is a great help still.
Outline
Generate Native Blueprint Code (Quick Fix for Performance).
Starting with C++
Creating an Enum or Struct in C++
Creating the parent class for Blueprint in C++
Moving a variable over to C++
Moving a function over to C++
Useful Resources
Blueprint Nativization
This first option, Blueprint Nativization, doesn’t really let you just generate C++ code for your whole project that you can then jump into and start messing around with. This is because the code is generated in a non-user-friendly format, at cook time, and is designed to be rebuilt, not taken outright and used. Even still, it can sometimes be enough to simply click a button and get huge performance boosts to your game. This is a great option to have on in your game, even if you also plan on implementing some specific classes at the c++ level on your own. Turning on this feature is extremely simple. You go to Project Settings->Packaging->Blueprints->Blueprint Nativization Method -> Inclusive/Exclusive
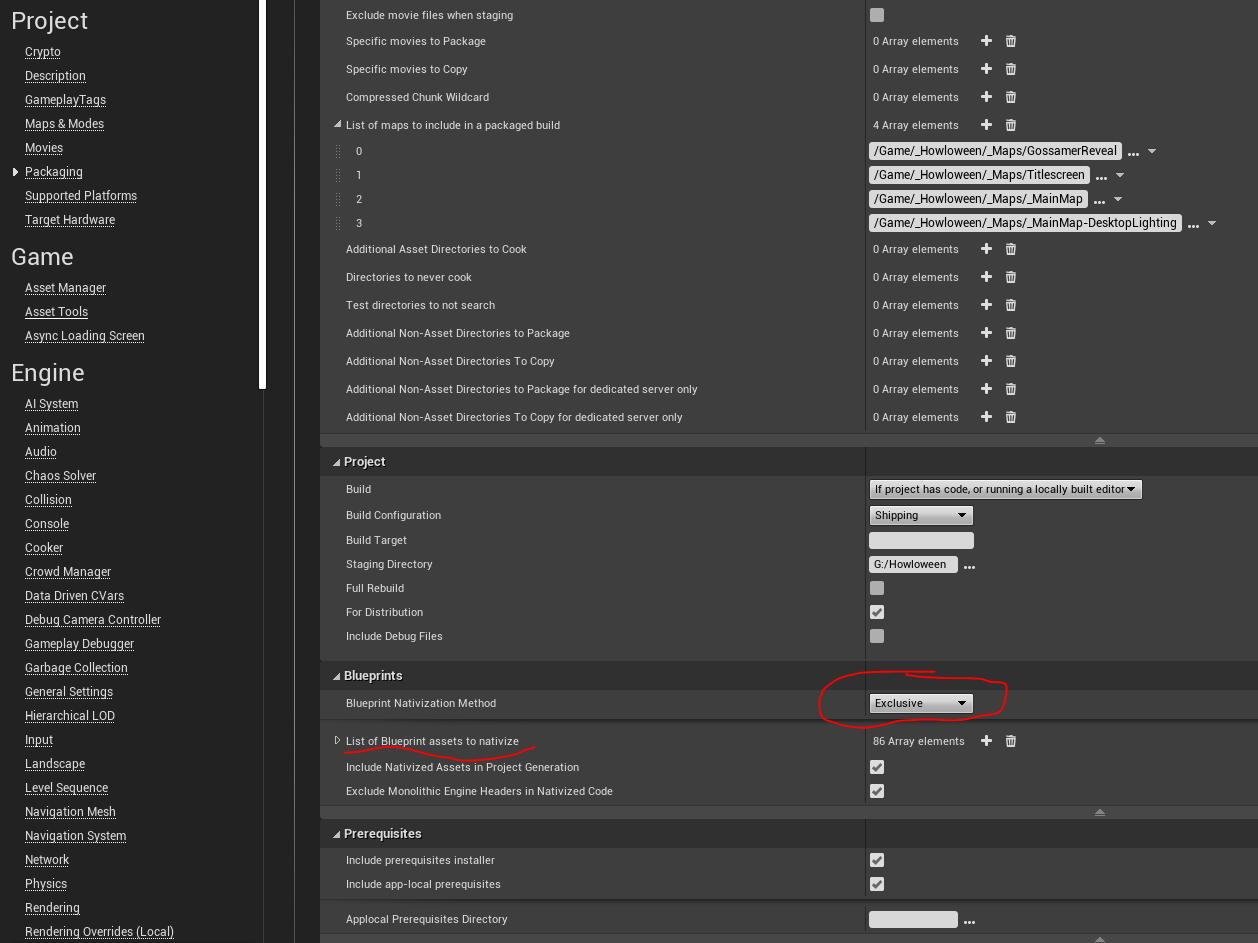
Setting this value to inclusive will compile ALL blueprint assets into c++. I think this is the optimal approach unless you need really small build sizes, but check the size output on your project specifically. It’s worth noting that Level Blueprints and Blueprint Macros will not nativize. I have run into issues in the past with the inclusive method, as not all of my blueprints convert properly, and so I have been forced to use exclusive mode, and add as many as I can, specifically needing to exclude building the ones that fail during the cook process. Even still, this is a great place to start, and will get your code running quickly!
Starting With C++
I’m writing this with the assumption that you will learn how to actually program and learn Unreal Engine C++ from some other source, this is more of a starting point of how to even start, or go through the conversion process. Somewhere like this may be a good place to start learning more of the C++ specific side of this: https://www.tomlooman.com/unreal-engine-cpp-guide/
Creating an ENUM or Struct in C++
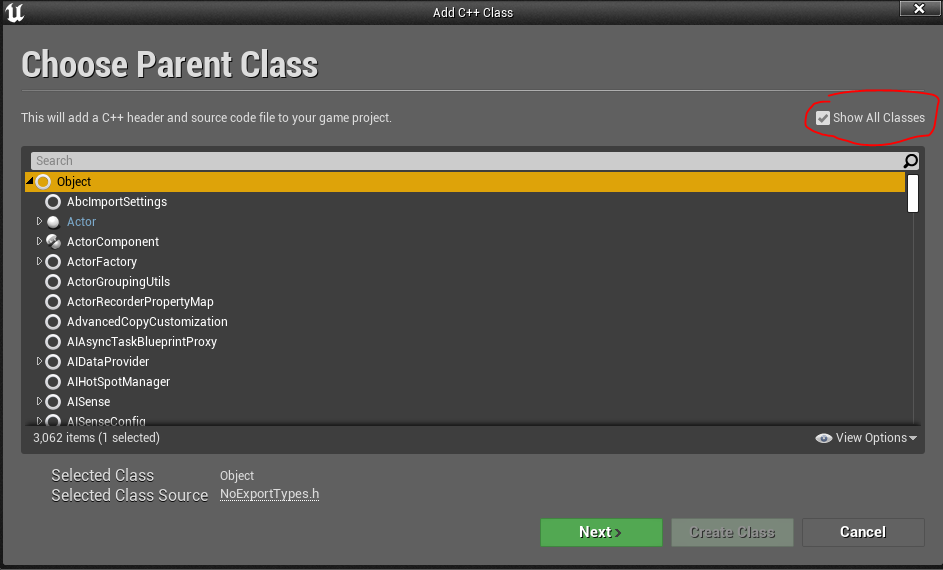
When creating any C++ files, I STRONGLY recommend creating them inside of Unreal, as creating them in Visual Studio, or in your file explorer can make Unreal confused, and make it kind of hard to generate it’s .gen files associated to the scripts, or get picked up in the editor at all. I always go through the process of going into the Content Browser->C++ Classes->Right Click->New C++ Class. If this is your first C++ class, you most likely will not have this area in the Content Browser, in which case you can go to the File dropdown menu in the upper-left corner of the UE4 Editor->New C++ Class.
When the goal is to create an ENUM or struct, this approach is still the best, however, when choosing a parent class, select “Show All Classes” and select “Object” the most basic parent you could have.
Once in Visual Studio, we can delete the UCLASS that it has generated for us, which leaves us with only #include headers. Instead of a UCLASS, we will want to make a UENUM, and a USTRUCT.
UENUM
Creating an enum in C++ is simple at this point, simply follow this format:
UENUM(BlueprintType)
enum class EAchievementId : uint8
{
	NONE = 0			UMETA(DisplayName = "NULL"),
        ACHV_1 = 1			UMETA(DisplayName = "Finish Tutorial")
        ...
        ACHV_34 = 34			UMETA(DisplayName = "Finish Game")
};
ENUM_RANGE_BY_FIRST_AND_LAST(EAchievementId, EAchievementId::ACHV_1 , EAchievementId::ACHV_34);
The “UENUM(BlueprintType)” lists it as an enum, and the “BlueprintType” specifically exposes the enum to blueprints. As for the elements, you just need a name, the UMETA properties here are optional, but you can define a DisplayName for the id to show as in blueprints, which can help designers. There is also the UMETA(Hidden) which will not expose the enum value to blueprints, which can be helpful for null values, or Count values.
Along with having a hidden count, you could also use Macros such as ENUM_RANGE_BY_COUNT, or ENUM_RANGE_BY_FIRST_AND_LAST, or ENUM_RANGE_BY_VALUES to supply a simple means of iterating over the enum values as such:
for (EAchievementId achievement : TEnumRange<EAchievementId>()) This website has amazing listings and descriptions of more of the UENUM and UMETA specifiers. Please refer here for more cool things, like specifying a UENUM as bitflags! https://benui.ca/unreal/uenum-umeta/
USTRUCT
UStructs begin their creation the same as UENUM, the same headers will work, and deriving from a UObject when creating the C++ file is a great place to start. The only exception, is that I often like to create structs, so that I can create data-tables using their data format. You can do that by adding the
#include <Engine/DataTable.h>header to the top of the file, and also by inheriting from FTableRowBase, as opposed to having no inheritance.
From here, the USTRUCT is quite simple:
USTRUCT(BlueprintType)
struct YOURPROJECT_API FAchievement : public FTableRowBase
{
	GENERATED_BODY()

public:
	UPROPERTY(EditAnywhere, BlueprintReadOnly)
		EAchievementId internalId;

	UPROPERTY(EditAnywhere, BlueprintReadOnly)
		FText Name;

	UPROPERTY(EditAnywhere, BlueprintReadOnly)
		FText LockedDescription;

	UPROPERTY(EditAnywhere, BlueprintReadOnly)
		FText Description;

	UPROPERTY(EditAnywhere, BlueprintReadOnly)
		FString SteamId;

	UPROPERTY(EditAnywhere, BlueprintReadOnly)
		FString IOSId;

	UPROPERTY(EditAnywhere, BlueprintReadOnly)
		FString GoogleId;

	UPROPERTY(EditAnywhere, BlueprintReadOnly)
	FString XboxId;

	UPROPERTY(EditAnywhere, BlueprintReadOnly)
	FString PlaystationId;

	UPROPERTY(EditAnywhere, BlueprintReadOnly)
	TSoftObjectPtr<UTexture2D> lockedTexture;

	UPROPERTY(EditAnywhere, BlueprintReadOnly)
	TSoftObjectPtr<UTexture2D> unlockedTexture;

	UPROPERTY(VisibleAnywhere, BlueprintReadOnly)
	float progress = 0;

	UPROPERTY(EditAnywhere, BlueprintReadOnly)
	float unlockProgress = 1;

	UPROPERTY(BlueprintReadOnly, SaveGame)
	bool hasBeenUnlocked = false;
};
This describes what a potential struct could look like, that would allow you to then go into Unreal Engine, and create a data table using the information listed above! As with the enum, listing “BlueprintType” makes this struct accessible to Unreal Engine, and not just the C++. Otherwise, everything inside of a struct is just a variable. We have the UPROPERTY specifiers to include things like how you can interact with in in blueprints (can I only see the value, or edit too?)
Creating a Parent C++ Class for a Blueprint
Once you have a Blueprint that you want to move over to C++, navigate to it, and open the Class Settings panel, and determin what it’s current parent class is. Odds are it will be Actor, for a normal actor, or maybe a Pawn, or Character for someone that you control.
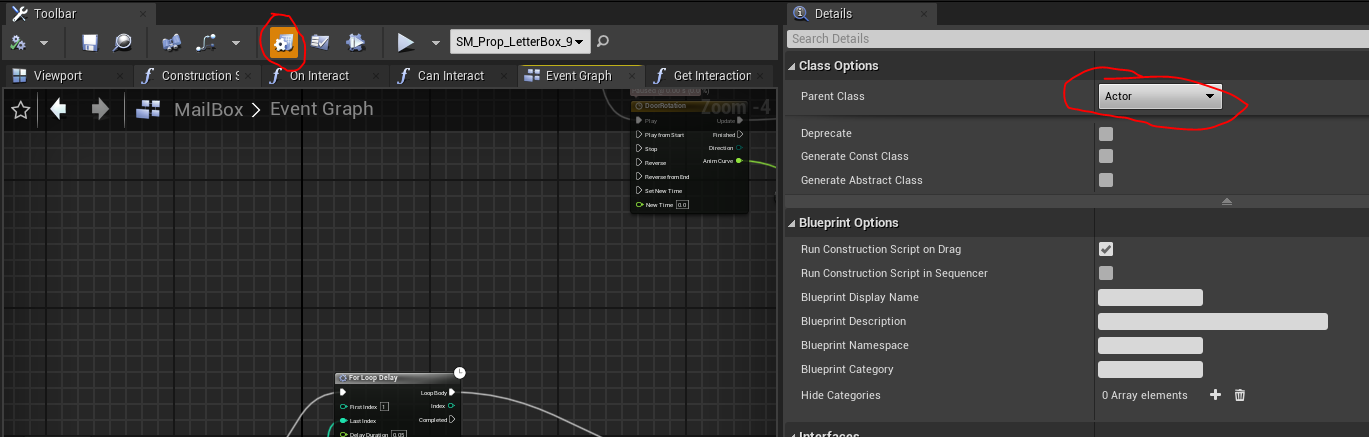
Once you have the parent class. Make a new C++ class, and select the matching parent class. Once the file is open in Visual Studio, you can go back to Unreal Engine, and compile the proejct, and go to your Blueprint you’d like to swap the parent of, in my case BP_MailBox. And you can select the dropdown, and change the parent class to your new C++ class that you just created!
Just because you have a new parent, that doesn’t mean it’s done, but it’s a great start, now if you wanted a specific function to be moved over to the C++ side, you will need to first bring over any variables that the function depends on. Sometimes this can even involve creating new parent classes for other blueprints in your scene. For instance, if I wanted my player to open a mailbox when they press ‘F’. If I am writing this code in the player's class, and I haven’t created a C++ version of a mailbox yet, how am I supposed to tell the mailbox to open? I need to create the parent class in C++ first.
Moving a Variable over to C++
Before we try and tackle moving a whole function, I think moving a variable is a little easier. First of all, let’s just cover exactly what’s going to happen. We have a new parent function, with a child. Let’s say the child has a variable “bool isOpen = false”. When we want to implement the variable in C++, we still want it to be called isOpen. However, if we name our variable “isOpen” and our child has a variable called “isOpen” Unreal is going to get confused and try to append naming onto the variable in blueprints to fix it, and I have had bad things happen suffice to say.
Because of the above issue, I have found the best course of action to be renaming the Blueprint variable to something like “isOpen_OLD”. This mass rename should carry across all the blueprints. Then, implement the variable “isOpen” in C++. Compile the code, go to the Blueprint, and then right-click on “isOpen_OLD” and select “Find and Replace” and replace with the new variable “isOpen”, the variables are swapped, you can clean up anything needed, and delete the old variable. It’s not the best solution but it is viable.
Alternatively to fix this issue, you could try and use the Core Redirects, as explained here: https://docs.unrealengine.com/4.27/en-US/ProgrammingAndScripting/ProgrammingWithCPP/Assets/CoreRedirects/
I have used Core Redirects, and they are incredibly handy. I would love to write a full article on them. However, I specifically have had issues trying to use it in these situations, and also I like to reserve these for more important changes like when I wanted to change the name of a base class MyCharacter over to PlayerDog, or CharacterBase over to NPCBase. It’s up to you in how you want to handle it in the end.
Moving a Function over to C++
The most straight forward way of moving a function over to C++ is by first recognizing all of the variables that need to be used for that function, and taking care to properly convert all those over to C++ first. Once all of those variables are moved over, you can begin the implementation process. Similarly to the variables, I recommend renaming your existing function to something like {FunctionName"}_OLD so that when you implement the new version, Unreal doesn’t get upset about this conflict.
Defining the function definition in the header file is quite straight forward, although there are some UFUNCTION specifiers that you should bring some attention towards.
BlueprintImplementableEvent - Can be extended in blueprint, does not need a c++ implementation.
BlueprintNativeEvent - Overriden in blueprint, but must have c++ implementation.
BlueprintCallable - Lets the function get called from within blueprint code
The primary differences between BlueprintNative and BlueprintImplementable are that BlueprintNative functions must be defined in C++ and any blueprint implementation OVERRIDES the C++ one. You can make a call to the parent function, however, this must be done at the blueprint level. BlueprintImplementableEvents CAN be defined in C++, and if they are, their code will always run as a “super” type call before any defined blueprint code. Using BlueprintImplementableEvents will ensure that the C++ code always runs, if there is any.
Those minor details aside, here I assume you want an implementation in C++, so either could work, it’s up to you to make the call. From here, writing out the function should be pretty straight-forward if you are used to working in C++ or most other languages really. The main gripes will come in cases where you use built-in functions such as Sine. Finding how to gain access to a function like this can be quite tricky. It’s typically easiest to hover over the node inside of the blueprint, and see what library it comes from. Using the online unreal documentation.
Typically with any Blueprint nodes, things will come from the Kismet Libraries, such as Sin. However, it’s worth noting that Kismet is Unreal’s name for their old Blueprint system, these are typically wrappers designed for node-based access. Especially for math functions, there is typically an equivalent somewhere else. In this case, FMath has a function called SinCos, which will return the sine and cosine for a particular value.
Searching through the documentation is the best way to go, step-by-step, little-by-little. Once the function is implemented to the point of compilation, you can go into the blueprints, delete your old function, and then play, this will tell you all of the places across all of the blueprints that are now broken, you can go through and replace these function calls with the new versions of your function and they should all tie over nicely.
TIP: If you have a function that is rather complex, you could use the extensibility of BlueprintImplementableEvent, or call the parent function version of BlueprintNativeEvent in a blueprint implementation. This way, you could work on moving over part of a function, or the expensive part of a function into C++, and leave the rest in blueprints to move over at a later date.

