Creating Ambient Birds in Unreal with Niagara and Vertex Animations
Update:
Please note that a much newer, updated version of this article, with more detail and step-by-step instructions, and proper bird animation state handling has now been posted here. This article still has some useful bits, but I would recommend the newest article as your primary resource. Thank you!
https://www.chrismccole.com/blog/creating-ambient-birds-in-unreal-with-niagara-and-vertex-animations-continued-advanced
Our team at Gossamer was looking at starting up a new game development venture! In this process, we started looking to have many characters on-screen. While doing some research, we stumbled across this video provided by Unreal, that focuses on “Simulating Large Crowds in Niagara.” as shown here:
While watching through this, I was super inspired to try and start working with Vertex animations, and Niagara in Unreal (which I had previously never worked with.) The applications that they show in the video mostly revolve around simulating birds, either avoiding the player, circling the sky, dispersing themselves to fly onto a tree, etc. And I thought that a similar bat/crow effect would work perfectly inside our existing game, Howloween Hero. So, with this video as a guide more-so than tutorial, I set out to make a bird circling effect and ambient birds on trees that can play animations through Niagara. So this is how I went about it.
I need a bird with animations
I needed to combine all the animations from the bird into a single animation
I needed to bake these animations out into vertex animation textures from within Blender
I needed to export these into unreal.
I needed to recreate the Niagara particle systems, scratch pads, modules and functions.
Place into the scene and tweak the parameters!
Here was the outcome of the two different kinds of systems that I made with Niagara.
An in-game representation of the flock above the forest, some of the thicker birds are from the post-processing that adds an outline.
An in-game representation of the ambient birds spread on the abandoned house in-game.
An alternate use of the bird-circle that I placed at the tip of the church, this is an up close view from editor.
An in-editor up-close perspective of the crows dispersed around the house. It’s worth noting, the birds are also inside, as the whole building is a single mesh with one material, but you can filter by sockets or materials for placement.
Purpose of this Blog
I just wanted to express what I thought the purpose of this blog is. As it’s not something I’m super familiar with, and it’s going to be a little faster than a tutorial an it’s kind of going to expect that you have watched the video linked above to really understand everything. This isn’t a tutorial so much as just supposed to fill in some of the gaps that I saw and struggled with in the video linked above so that you can start working with vertex animations and using Niagara in Unreal. That said, I have structured this in such a way that if you have not watched the video content above, you should be fine, but some parts (such as making the Niagara system) are just better expressed in video form, and I am just explaining the steps and things I did that aren’t shown in the video that I thought were nice. Anyway, I hope this is helpful!
Getting and Creating the Crow Animation
The first thing I needed was the crow asset, and luckily I was able to get an asset that was once free on the Unreal Asset store at some point previously. That asset is listed here: https://www.unrealengine.com/marketplace/en-US/product/17c2d7d545674204a7644c3c0c4c58ba?sessionInvalidated=true
From here, I imported the animations, meshes and materials into unreal, and then I needed to somehow combine all of the animations into a single animation. Now, the way I went about this probably was not the best method. Anyhow, I tried two methods, exporting every animation into blender and combining them manually, and an animation composite, which is an Unreal Built-in Asset. In the end, I ended up using the latter method.
To make an Animation Composite, in the Content Browser, right-click->Animation->Animation Composite. Then select the Crow skeleton as the Animation skeleton. Once the asset is open, you will see the animations that you can drag in on the right-hand side in the Asset Browser window. Drag these into the composite section so that it looks like this.
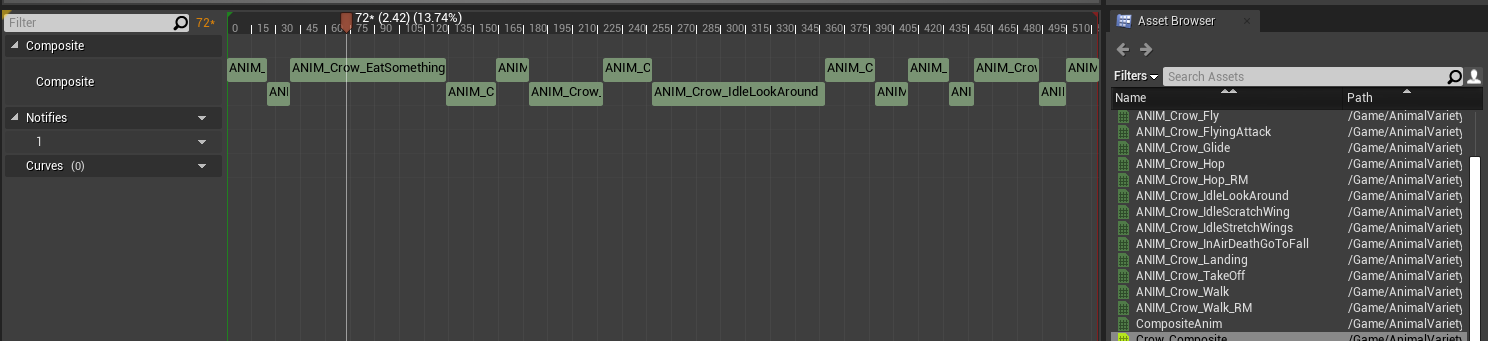
From here, now we need to turn this into an animation, and then export it so we can use it in Blender. Now, this is where I don’t think I did this too well, as I couldn’t figure out how to get the animation recorder to record a specific set of frames. So basically, my animation ends up with extra dead frames of nothing animated at the beginning, and then at the end of the animation, it automatically loops and goes back to the beginning. I never figured out how to get it better than that, so in the end, I just exported the animations with the extra dead frames, put them into Blender and trimmed it down in Blender.
So, to make the recording, stop the animation from playing, by toggling the Play/pause button. Then select the Record button, select a file name and location, then hit play, and once the scrubber loops back to the front, hit the stop-recording button. From here, you can navigate to the output animation in the Content Browser of Unreal, right-click on the asset, and then click “Asset Actions”->Export, then find a place on your PC to save the FBX file.
2. Modifying and Baking the Asset in Blender
For starters, I opened Blender and imported the animation via the File->Import->FBX buttons in the top-window. Then I imported the crow animation composite that included the skeletal mesh. First things first, I had to make sure my units were matching that of Unreal, and secondly, I needed to cleanup the crows animations, removing the extra dead-frames at the start, and removing the extra looped frames at the end.
Once that was done, I looked to a few different resources about how to bake out Vertex animations inside of Blender. I first watched this super informative video that explains what vertex animations are, why they are useful, how they work and how to make them. That video is listed here. This video was super helpful and went through the whole process of how to make the Blender scripts to actually capture and export your vertex animations. I tried following this tutorial, however something was going wrong with my exports and it wasn’t working. (Later, I realized that I think my Blender units were not matching that of unreal, meaning the vertex offsets were all wrong proportionally.) So I went online and found a really nice person who had developed their very own vertex animation exporter plugin for blender! This was listed on the Unreal Forums here. For the git repository, that is listed here. Originally, I did run into issues (that I fixed by adjusting the scale in blender) but I eventually got my textures to export with new UVs and all! Here’s a look at some of the cool texture outputs.

This image shows the vertex offsets.

The vertex normals
3. Setup in Unreal
Now we want to bring our Crow and textures back into Unreal, setup the crow’s material to use these, setup the Niagara events to actually play their animations!
First we’ll import our textures we gerneated as T_VertexNormals and T_VertexOffsets. Make sure in the texture settings, the “Mip Gen Settings” are set to “NoMipmaps” as we need all the vertex data, if it gets compressed we lose frame information.
Material Setup:
Next we have to setup our material. The first thing we need to change is the base material settings. We need to make sure to setup the material to have “4 Customized UVs” as opposed to the default 0. And we also need to check “Used with Niagara Mesh Particles” Next, let’s bring in the following textures:
T_Crow_BaseColor (included in package)
Plug RGB into Base Color
T_Crow_OcclusionRoughnessMetalic (included in package)
Plug R into Ambient Occlusion
Plug G into Roughness
Plug B into Metallic
T_Crow_Specular (included in package)
Plug RGB into Specular
T_VertexNormals (generated from Blender Plugin)
T_VertexOffsets (generated from Blender Plugin)
At this point, we need to plug our vertex normals and offsets somewhere, for this we will use a built-in function provided by unreal called MS_VertexAnimationTools_MorphTargets. Once this is placed in your graph, plug your VertexNormals texture into the “Morph Normal” pin and plug your VertexOffsets into the “Morph Texture” pin.
Now we need to supply values for the other inputs. For now, it may not make sense, but create a Dynamic Parameter with values of “State”, “Frame”, “Speed”, and “Emitter Age.” Next Create a “Scalar Parameter” named “Frame”. Create a “StaticSwitchParameter” named “OverrideFrames” with “Frame” going into the True value and the Dynamic Parameter’s “Frame” value going into False. This will allow you to (if desired) scrub through animation frames inside of the mesh preview. This is really helpful for determining start and end frames of animations, and making sure that your vertex texture animations look proper without having a niagara particle system setup. Feed the output of the StaticSwitchParameter into the Morph Animation pin.
For the “Number of Morph Targets” pin we want to hook that up to another scalar parameter called “MaxFrame” that we set to the total number of frames within the export. And finally, for the “0-1 Animation Value?” we want to hook this up to a Static Bool that will be used as input data.
With all our inputs configured, we can drag from the outputs into the Material Output. Connect the following:
”Pixel Shader World Vertex Normal” -> Normal
”World Position Offset” -> World Position Offset
”Custom UV 2” -> Customized UV2
”Customized UV 3” -> Customized UV3
In the end, your material should look something like this:

Once you connect this material to your crow, you can open up the Crow Mesh and will see the parameters for MaxFrame, Override Frames, and (if Override Frames is checked) Frame. You can play with these values to make sure that your crow is animating and looks correct. If all looks good, you can start making the Niagara particle system!
Niagara Particle System: Bird Circle
The first particle system I'll cover is the bird circle, this is the more complex of the two, but once you know one the other should be a breeze. However, there is one more big function we have to create that are a bit of a pain. These are shown in the video I linked, however, I didn’t seem to have access to the same functions as they did, so I will show their version, as well as mine if you are like me and don’t seem to be able to get the same functions listed. To create this function, right-click in the content browser, and go to FX->Niagara Dynamic Input Script. From here, you can create all the functionality listed below.
First, their version:
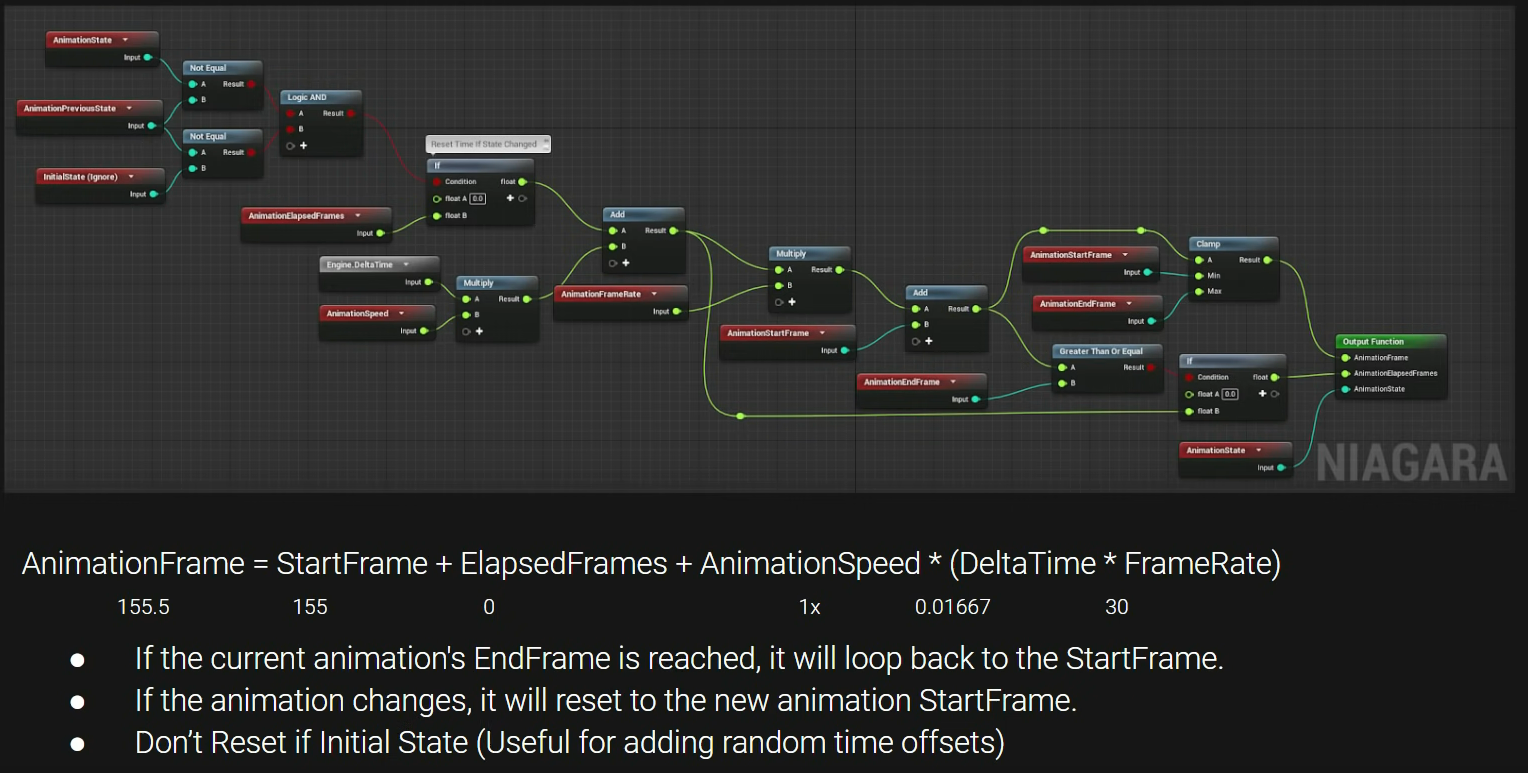
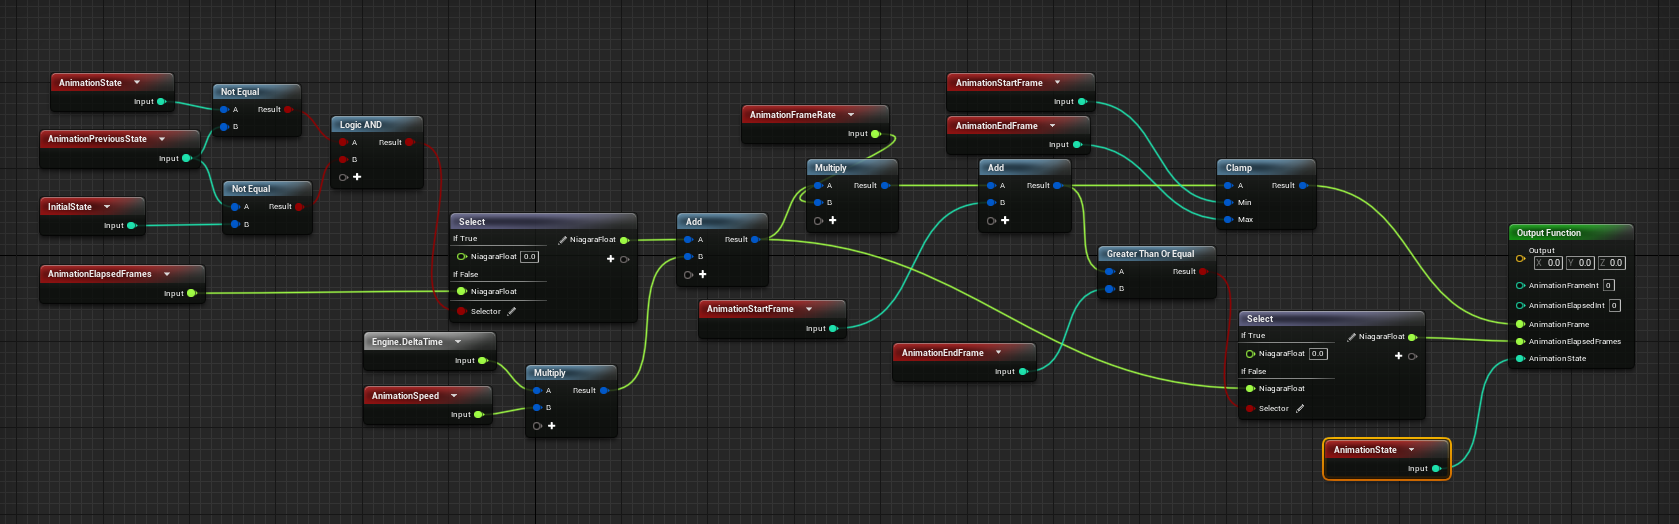
You can see that they are more or less the same, however I couldn’t seem to get access to the if statement conditionals, which I swapped for Select statements. My function also seemed to want to convert all units into Niagara Numerics instead of working with them as floats or ints. Which was occasionally troublesome. If someone knows why I was running into this issue, it would be greatly appreciated if you let me know what I am doing wrong!
From here we can go about creating the actual Niagara Particle System. Once again, right-click in the Content Browser and go to FX->Niagara System and then click on “Empty System” and your Niagara system should pop up!
From here, right-click and add Emitter -> Empty. Make sure to (under the View Options) enable Engine and Plugin Content if you can’t see the Empty emitter. Next, click the add button under Renderer and add a mesh renderer. On the mesh renderer, select the bird that we exported from Blender.
To spawn the bird, click on the Plus button on Emitter Update and add Spawn Burst Instantaneous. Set the Spawn count to 1 (for now). Next, click on the Particle State and make sure to uncheck the setting “Kill Particles when lifetime has elapsed.” Next, click on the entire Emitter State and find the Life Cycle Mode, and set this to “Self” Loop Behaviour to “Once” and a duration to “Infinite”.
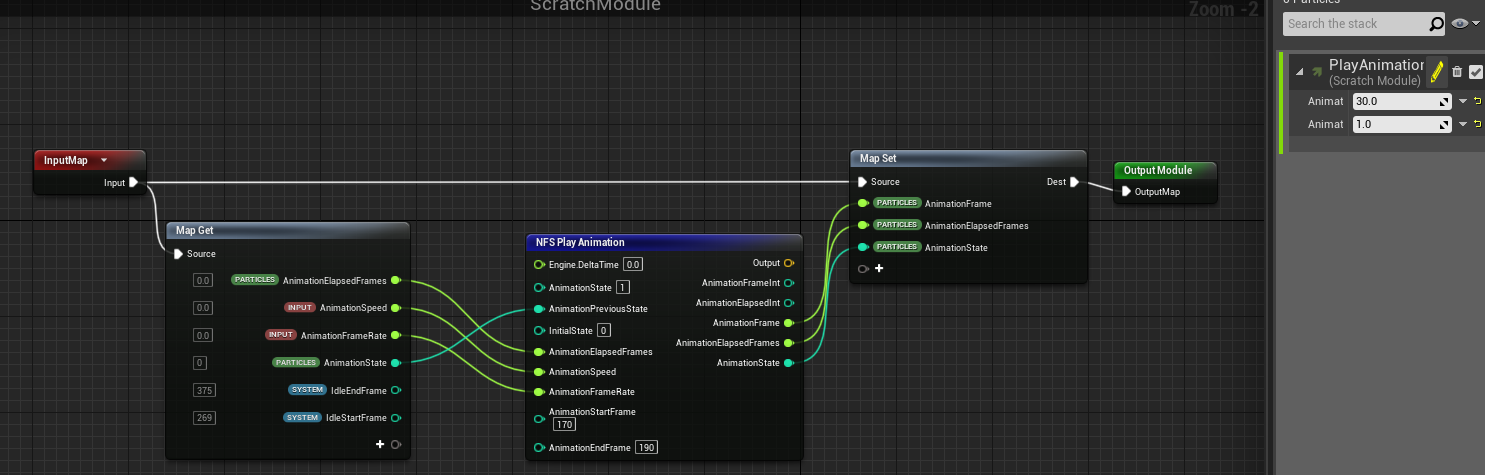
Now for the good stuff, we want to animate the bird and move it’s position. Under Particle Update, add a “New Scratch Pad Module.” Call this PlayAnimation. Once it opens up, you will see an Input Map a Map Get, Map Set and an Output Module. Here is where we add our custom function that we developed above! Right-Click and add your custom Play Animation function, and you should see exposed parameters to all of the input data we had listed. Now, because we know some of the things we want, I’m going to hard-code many of these values but some we will pull out from the Map Get operation. From Map Get, we want to pull “Animation Elapsed Frames”, “Animation Speed”, “Animation Frame Rate”, and “Animation State”. And we want to plug these into the Play Animation function as such:
AnimationState -> AnimationPreviousState
AnimationElapsedFrames->AnimationElapsedFrames
AnimationSpeed->AnimationSpeed
AnimationFrameRate->AnimationFrameRate
For the other values, we’ll hard code:
Engine.DeltaTime : 0
Animation State : 1
InitialState : 0
AnimationStartFrame : 170 (in my case this is 170, but select the first frame of the flying animation, this will take some messing around with to get proper)
AnimationEndFrame : 190 (As above, this is just my case, your number will differ and take playing around with)
And send the values AnimationFrame, AnimationElapsedFrames and AnimationState into the Map Set.
The next thing we’ll want to do is set our Dynamic Material Parameters that we had setup earlier in our crow, namely the current frame to display! Go back to the System Overview tab, and in Particle Update, add a Dynamic Material Parameters. We want to write Parameter Index 0, and set the Frame to the Particles Animation Frame. Next, we want the birds to fly in a circle, so also under Particle Update, add a Rotate Around Point operation. Here we’ll want to set the Rotation Phase to be random between 0 and 1, (spawn only) and for the rotation rate I set this to a random range between 0.025 and 0.075 (Also spawn only) to give some variation to the birds flying. Next we want to set the radius, and I actually exposed these as User parameters so that I could set these values from within the Unreal inspector, Just go to the parameters tab, and under User Parameters, add the parameters you would like. I have one for the min radius and max radius, and is determined randomly at spawn. I would also now go and add this for the Spawn Burst Instantaneous Spawn count. Finally, I have the Set Particle Positions unchecked, so that I could add a little bit more control if I wanted to into a second scratch pad names Update Positions.
The Update Positions scratch pad is nothing more than taking the Output Position from the Rotate Around Point, and I am taking the particle position and am setting everything to be the Rotate Around Point’s values, except for the Z axis, so that I could add some vertical movement if I pleased, although I removed this, as occasionally, after a long time of running, the z offset would get greater from the original than I would have liked, and I found it unnecessary.

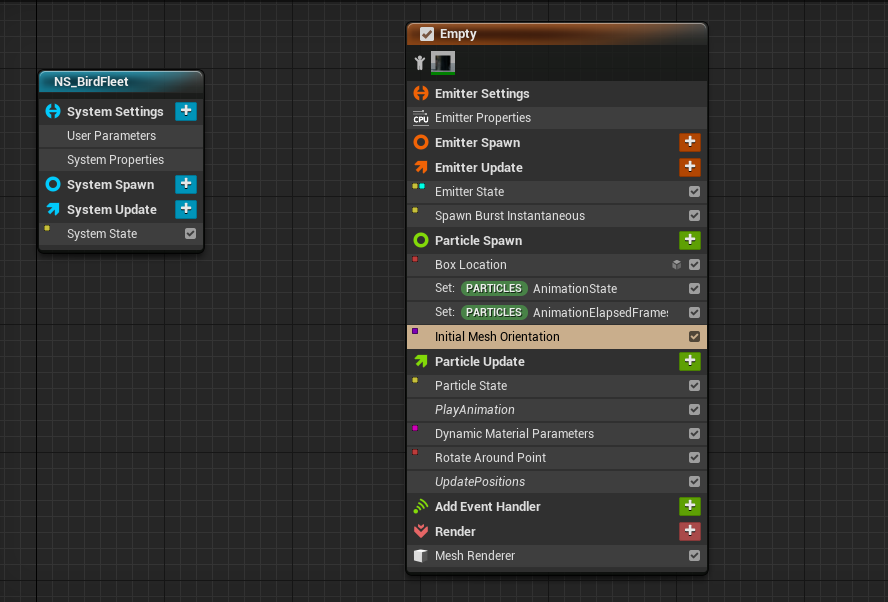
The last things I did were to add some randomness and control under the Particle Spawn settings. I first added a Box Location, and under the Box Origin, I set this to be the position of the particle system, as I liked that the system moved when I moved the origin in Unreal. Next, I set the Animation State to 0. And I set the Animation Elapsed Frames to be a random float to give some variation between all the birds so they didn’t all play in unison. I also set the Initial Mesh Orientation to be a random rotation in the Z axis between 0 and 359 degrees. This was in part because I was never able to figure out how to get the birds to rotate in the tangential direction of the circle they were rotating around. One day I’ll figure it out. here’s a quick look at the overall system.
An with that, you should have your very own circle of birds!
Niagara System 2: Idle Birds
The next system is quite a lot simpler than the last. Here’s how it goes. First, duplicate the system that we just made for the bird circle. And delete the Update Positions Scratch Pad, and the Rotate Around Point operation. Instead, we want to mess with the spawning positions of the birds. So under Particle Spawn, add a Sample Static Mesh and hook up the mesh you would like (similarly to before, I set this as a User parameter to set within the editor details panel view). Next add a Static Mesh Location and link the Sampled Mesh normal and Sampled Mesh Position to the Sample Static Mesh we added. It’s worth also dropping down the advanced options and setting the World Axis Constraint and World Axis Constraint Threshold to limit the spawning of birds onto surfaces with too steep a normal. The only other thing to do is, step into the Play Animation scratch pad and play with some new numbers to change the flapping flying animation into a nice relaxing idle animation.
Once this is done and you have a mesh assigned, you may notice that it’s not working! Well, this is due to needing CPU access to the sampled mesh, so that it can read data off of it, so navigate to the mesh asset of the sampled mesh you are trying to supply and under the General Settings, you should find a checkbox for “Allow CPUAccess” by default this is unchecked, you will need to check it and then save your changes. Now you should have some birds that are just hanging around!
Conclusion:
I hope that this was helpful and supplemental to the original video, I know that while they show much of the process, some of the vital points the cut took me a really long time to figure out how to get setup. I hope that you have learned a bit about Niagara. I know I have. and that you’re able to expand upon what I showed here and maybe ACTUALLY recreate some of the really nice and complex systems that they have shown there.
Best of luck!

