Player Footstep Sounds in Unreal Engine UE4
So you have a character, they walk around, and have nice animations, but now you are lacking sound effects!
No worries, adding sound effects to your character is made quite easy in Unreal, so long as you have access to the sound effect *.wav files that you plan to use! The asset store has many options, and they are many free sites out there, but make sure to read the copyright information, to make sure you use the assets and give credit properly.
Footstep Audio Design
Now, I am not an audio person, nor am I an audio engineer, however, I can tell you that footstep sounds are vital to making your world feel whole. However, that being said, it’s not something that you want your player to necessarily notice. We’ll go through the steps to modify pitch and clamp the max/min volumes of the assets within the engine, so you don’t have to worry about modifying *.wav files outside of the engine. The other thing that’s important is to have a good library of sounds, for multiple surfaces, pretty much as many surfaces as you can reasonably represent within the game, and get good assets for. If a character walks through water, up onto a beach, through tall grass, onto the sidewalk, and finally into my carpeted home. I would expect different sounds for each of those surfaces. Also, if there are too few files at your disposal, such as a single footstep sound, it’s going to be very apparent (and get very old very quickly) that I can notice this single footstep sound. I think that you should aim to have at least 5 different assets (but ideally more) for each surface. But also keep in mind that you don’t need 100! somewhere from 5-10 should be plenty.
Trigger Methods
There are two methods that I have used or considered when incorporating footsteps, you could attach “Anim Notify Events” to the character’s animations, or you could set up box triggers on your characters feet and trigger the SFX when the triggers begin to overlap something other than the main actor.
There are a few advantages/disadvantages to each approach as I see it. The primary advantage to the trigger system, is that no matter what animation is playing, no matter what’s going on, you can very simply and reliably play the footstep sound when they touch near the ground. This also comes with a disadvantage as well! If you for instance have a separate sound effect for landing from great heights, you would have to ensure that your player state is set, and being checked against within your triggers to ensure that they would not play, as you want the other sound effect instead. Similarly, in our game Howloween Hero, our dog uses IK to move the feet up and down to match the environment, sometimes, it gets confused or something gets in it’s way and it begins to twitch. In this case, the trigger would repeatedly fire in an annoying fashion that would not sound good.
Another advantage from the trigger system, is that it would be quite easy to pinpoint which foot hit the ground, what it collided against, where that point is, and what that singular foot is standing on. All of this can be accomplished the same with Animation Notifies, however, you would need to make your own custom AnimNotify blueprint class, create a variable to pass the hit foot index, and then you would need to grab the positions from bones, within the event, and perform a line trace down from that foot towards the ground and hit and get out the information needed. You would also now need to edit that foot index on each animNotify. That should be easy in a left/right situation, but our game has 4 legs, and you could imagine a spider, for instance having 8 of these indices. (However, if you have this many legs, you probably don’t necessarily want to play a sound for each foot, but that’s more of an audio design discussion.)
The advantage of using the AnimNotify is that you have much more control over when these sounds trigger, you can very easily just play the animation, and right when the foot hits the ground, at the exact moment that you like, you can trigger the event.
In the end, between these two methods, it seems like it mainly boils down to less control and easier implementation, or more manual implementation with more control. In our case, we will be going over the latter example, however, I imagine that you can gather how to put the first version together once you see how the anim notify example works.
Making Sound Queues:
The first thing that you will need is sound! So ideally at this point you have a number of sound effects for a number of surfaces imported into your project. From there, we will want to right-click->Sounds->Sound Cue

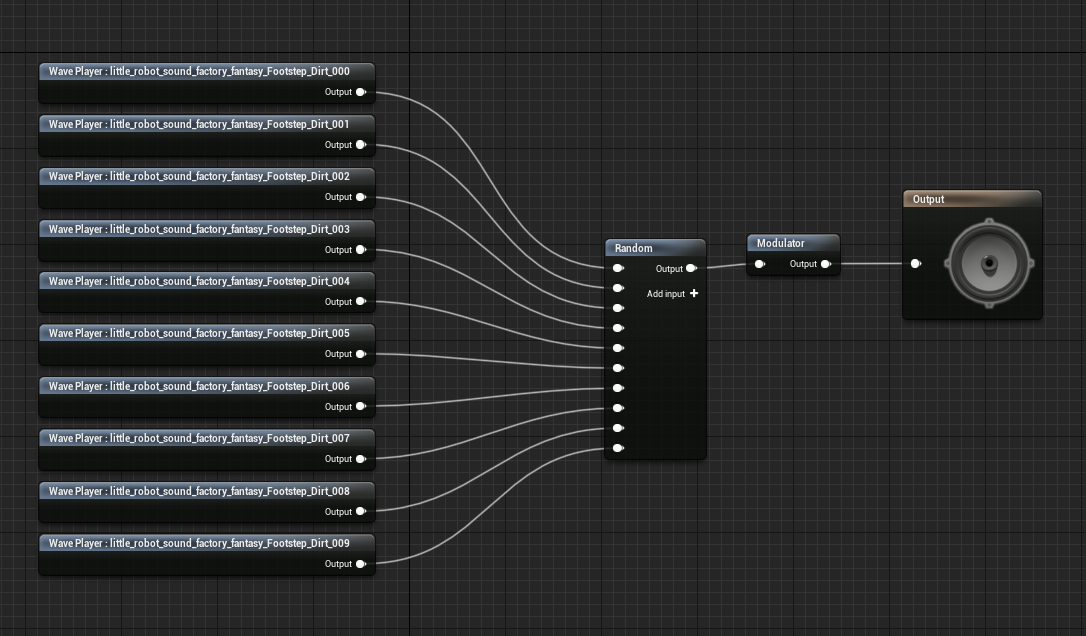
This sound cue will be for a single surface. So make sure to name it accordingly such as “SC_FootstepGrass”. Then, once you name your Sound Cue, you will want to open it, and then have both your content browser, and your Sound Cue open. Select all the sound effects for this sound cue, and drag them into the editor.
With all of your sound assets in the editor, select them all, right-click and select “random”. This will attach all of your sound files into a “random” node. This will do what it sounds like, it will select one of your input sounds at random. Then take that output and feed it into a “Modulator” to get this, simply right-click and type in “Modulator”.
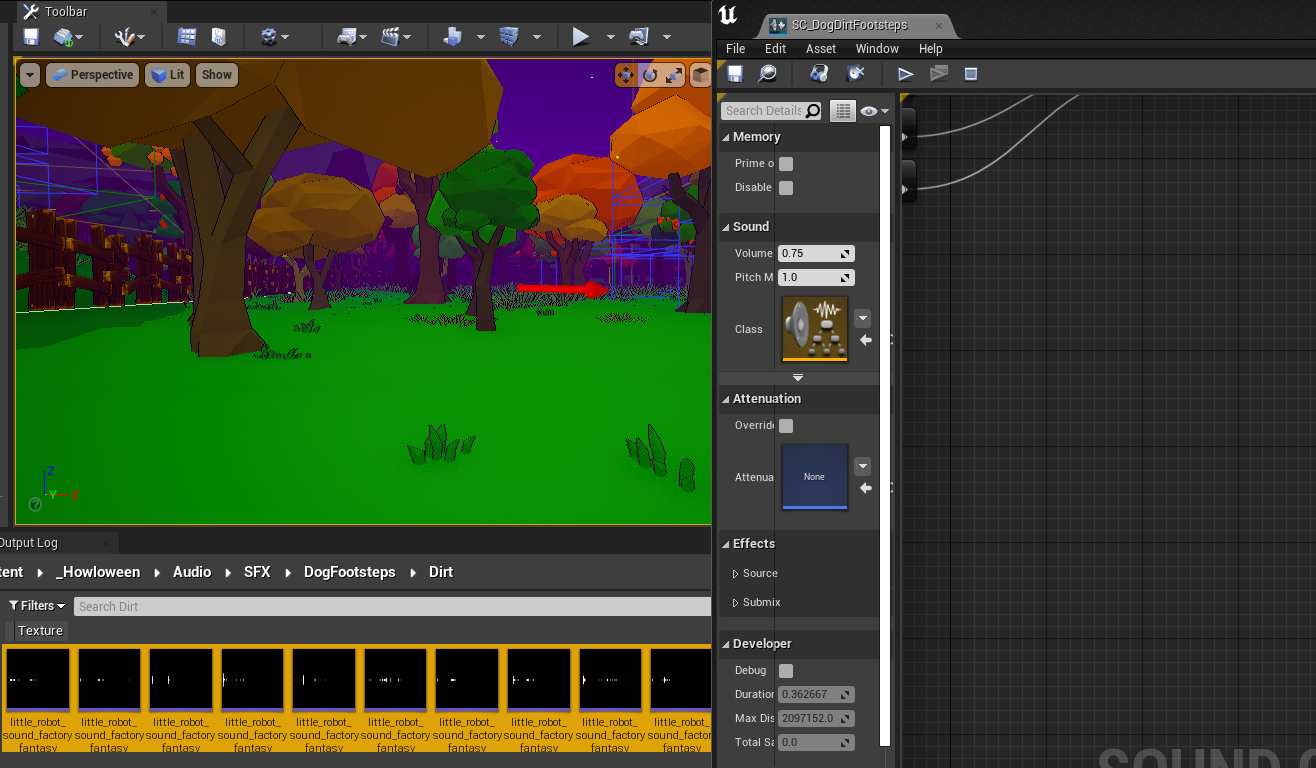
With our output linked up, you should be able to press the “Play” button in the toolbar at the top of the window and hear the sound cue fire once. As you press play, you will see a red line trace along from the selected audio file, through the modulator and through the output. You should see that this changes and is “random” each play. Make sure to mess around with the values on the “Modulator” to get the sounds to your liking, specifically, make sure to clamp the “Volume Max” and “Volume Min” to values that are appropriate to the sound files and the surface material. Similarly set these for the min/max pitch. For footsteps, especially things like concrete, I tend to keep the max pitch around 1, and lower my min pitch for a lower range sound.
So your Sound cue is setup! At least the basics are. If you have a Sound class setup for sound effects, you will want to set the sound class on the “Sound Cue” settings, you may also want to adjust the Volume Multiplier on the entire “Sound Cue” itself.
Making your Anim Notify
Now we can get on to make our Anim Notify class that we can fire off from within our animation! We’ll add a variable that can give us a foot index, just to make it general to fit more than a left/right foot situation.
To make an AnimNotify is actually just a Blueprint. So if you right-click->Blueprint Class then under “All Classes” and search for “AnimNotify” you can select that base class, and name your anim notify something like “AN_Footstep”.
Once you open this AnimNotify, you can add a variable on the side, in our case we’ll add an integer named “footIndex”. Make sure to click the eyeball, making the variable public and instance editable.
Next, go to the “functions” section, and click the “overrides” dropdown and add the “Received_Notify” function.
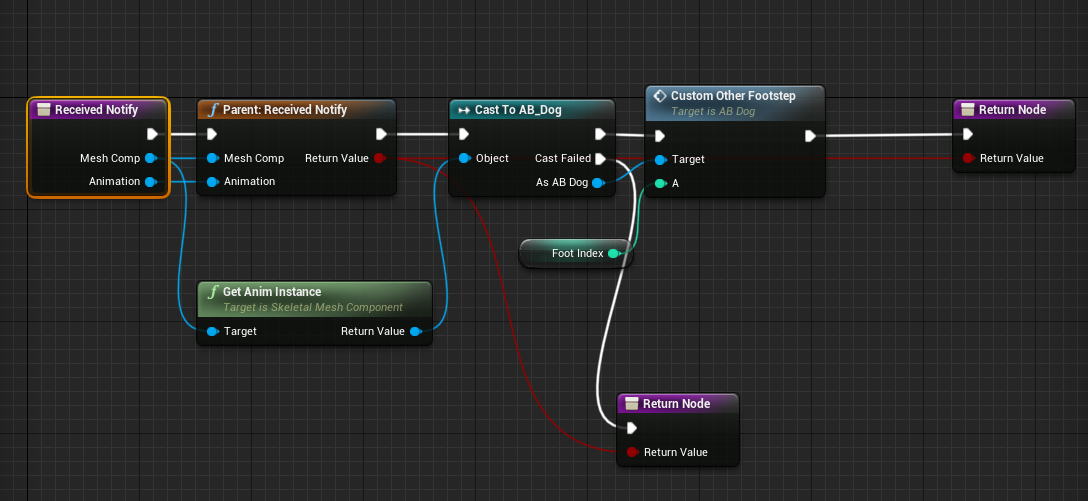
Now, at this point, you will need a CustomEvent on your animation blueprint that accepts any inputs you’d like to send it, such as our “footIndex” integer. I’ll name my event “Custom_OtherFootstep”. From here, you will want to call the parent class, by right-clicking RecievedNotify and click “Add call to parent function”, then get the Anim Instance off of your MeshComponent, and then cast it to the Anim Blueprint that you are looking for and finally call the function!
Triggering your Anim Notify Events
Now, for the fun and easy part, load up your walking, and running animations. Any animations in which the character is moving their feet that you want a footstep sound. Then, scrub to when the foot hit’s the floor (You may want to turn on the floor, in the Preview Scene Settings “Show Floor” boolean), and in the Notifies section of the animation, right-click->Add Notify->AN_Footstep (or whatever you named you AN class). Then, in the details panel you can pass in whatever footIndex you’d like!
Setting the Physical Materials
From here, we need to play the proper sound at the proper location! Well, as of yet, we don’t have any way to determine the type of material we are standing on! One of the simplest way’s I’ve found to do this is via physical materials. You can create one physical material for each type of surface you can step on. You can create one via right-clicking in the content browser->Physics->Physical Material. If you already have or are using materials, feel free to edit your existing materials. From here, you want to navigate to the Physical Properties section, and edit the dropdown from Default to whatever the name of your surface group is called. Chances are you haven’t actually defined these yet! So you will probably only have Default as a valid option. To add Physical surface groups, navigate to your Project Settings->Physics->Physical Surface and then name “SurfaceType1” to something like “Grass”, “SurfaceType2” to “Concrete”, etc.
Once done naming your physical surfaces, navigate back to your Physical material, and select the proper material from the dropdown. Continue creating Physical materials until you have covered all of your surfaces.
Once these are created, you can assign a material, or a mesh a specific physical material, whichever method works best for you! From here, we will be able to determine the surface type of whatever we are standing on, so we can play the correct sound cue!
Playing the Sound Cue
Finally! We can play a sound on character’s footsteps. If we navigate back to the animation blueprint for your character, and navigate to your custom function that we created, we want to do two things. Determine the surface we are standing on, and play the appropriate sound at that location.
To get the foot location, we can simply grab our mesh off of our character using GetOwningComponent. Then use GetSocketLocation and input a socket name that is determined based on our index that we passed in!

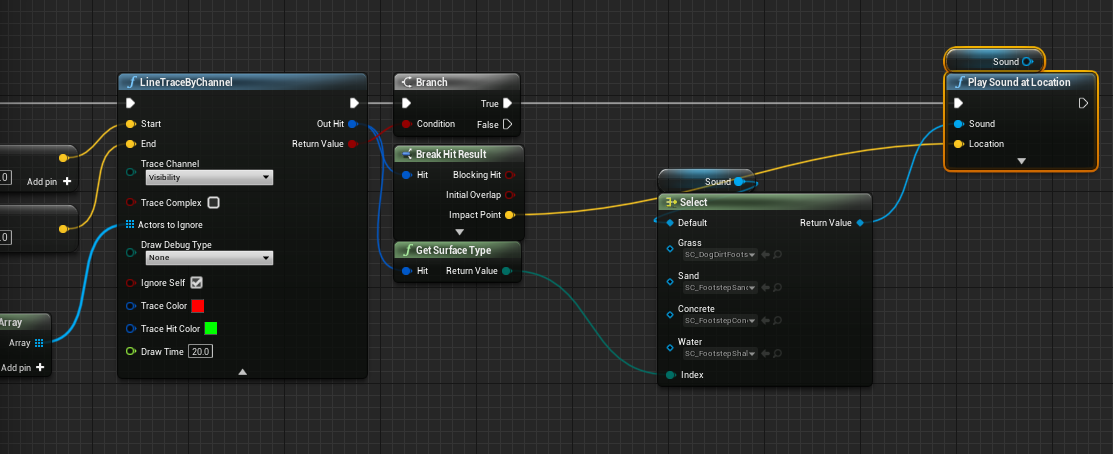
Then, using our position, we can determine a start and end position for shooting our raycast (linetrace). In my case, I want to observe a little above the foot and shoot below the foot and see if anything get’s hit. You’ll also want to make sure to draw debug lines to make sure the line is tracing where you expect!
Once you do your linetrace, you can use your hit to get the surface type, and get the impact point of the hit! From there, we can switch on the surface type to play the specific sound cue we would like, and we can play it at the point of the impact!
Once you have this setup, you should be able to play and test out your sounds! You should also be able to see your debug line traces to make sure that you are playing the correct line trace at the right foot.
And there you have it! You should be able to hear your footsteps! Now it’s just a matter of configuration and tweaking to make it sound just right! I hope that this helps someone out there! Let me know if you have any questions on my Twitter!

