Releasing a Unity Asset
So I just released my first Unity Asset! I was originally planning to release the package last year, but instead decided to remake the asset, from scratch, THREE times. I felt that this was necessary so that I could release the best asset I could. But ideally, it doesn’t take you a year. The process of making an asset in Unity is actually quite simple, and Unity provides some great tools and documentation to help!
This article is going to focus on what steps you need to take, to try and make it as simple for you to release your asset as possible. And hopefully it will encourage you to think about what kinds of assets you can make!
Plug
Like I said, I just released my first asset, Easy Dialogue. You can find it here if you are so inclined. : https://assetstore.unity.com/packages/tools/utilities/easy-dialogue-169776
Overview
Here is just a quick breakdown of the steps you will need to release your asset.
Set up a publisher account on Unity https://publisher.assetstore.unity3d.com/
Create your asset in the publisher portal
Create your Asset within Unity
Package everything under one folder
Provide Documentation
Provide a Sample Scene
Download https://assetstore.unity.com/packages/tools/utilities/asset-store-tools-115
Import the asset store tools into your Unity Project
Open up the tools portal, and select the folder that your assets are under.
Scan this folder to validate that all the pre-check steps have been completed
Upload the package to the associated “asset” on the Unity site.
Create Promotional Artwork in accordance to the Key Art Templates
As of February 2020, there are 5 different art pieces you need.
Make sure not to cover any text areas in the key art templates
Update the asset store page with metadata, artwork, and description
Push to the review process!
That’s it! It may seem like a lot of steps, but it’s not too bad, especially once you have your publisher account setup.
Unity Documentation
Make sure to check out this page for an explicit, up-to-date list from Unity https://unity3d.com/asset-store/sell-assets
Set Up Publisher Account
In order to sell on Unity, they need tax information, as well as bank account info, and you need a publisher profile to associate it to and for users to be able to see, if they want to see all of our products! This part is probably the biggest pain and most annoying, but it is required and you only have to do this once! You can sign up here: https://publisher.assetstore.unity3d.com/
Create Your Asset In Publisher Portal
When you log onto https://publisher.assetstore.unity3d.com/ you should now be able to (under the packages section) click “Create New Package.” Currently, Unity is undergoing a UI overhaul, so I will show the new UI, in hopes that this sticks. If viewing this BEFORE the new UI has taken place, you should see a screen like this:
I would recommend that you click the blue banner at the top to use the new UI. Which should look like this:
Just give your package a name and a category. And you’re all set!
Create Your Asset
This SHOULD be pretty self explanatory, but just make whatever you’re going to make! Even if it’s just art, 2D or 3D, make sure that you create it, and import it all into Unity. And make sure that all of your assets are under one folder.
Now, I don’t know that all of these aspects are forcibly REQUIRED by Unity, but they are quite simple requests, and it should make your package better, so I would strongly recommend that you do these (and they may even be required). You need to make sure for sure that you have Documentation, a demo scene. Now like I said, it says you only NEED a demo scene, if there is something to show off, and only NEED Documentation if you have code, but I think you might as well include these things. Here is a picture of the validator that shows the things Unity is looking for in your package.
Now, I have my own other PERSONAL pet-peeves that I would enjoy if other people did.
Don’t use spaces in folder/file names. This makes traversal annoying for me when adding/updating things in git or command line. Use underscores instead, or UpperCammelCase.
Use folders. It is annoying when importing an asset and things are unorganized, everything is either in the base folder, or parts are in the wrong folders.
Name your top-level folder the same thing as your asset. I have such a hard time when these don’t match up.
Also, just in case there are any people like me out there. I included other code from people that I did not create. This code is under MIT license and is fair to use and sell, but I need to let Unity know about that. So, to do that, you need to include a file called Third_Party_Notices.txt in your top-level folder. Here is the example text I have included in mine.
Asset is governed by the Asset Store EULA; however, the following components are governed by the licenses indicated below:
xNode : MIT license
SerializableDictionary : MIT license
This worked for me in my submission, nothing crazy, just nice and simple.
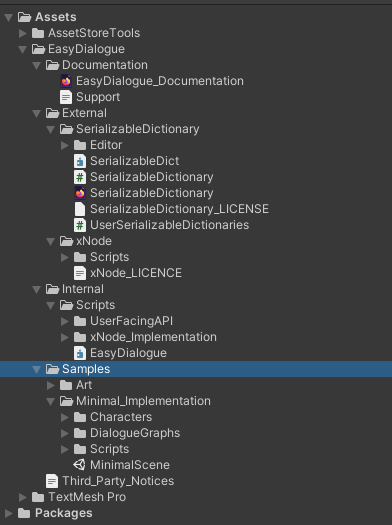
To help with folder structure this is mine for Easy Dialogue:
Asset Store Tools From Unity
This is a simple toolset for you to use in Unity, it gives you access to the validator I showed earlier, as well as the tool to upload your asset to the connected asset on the Unity Publisher site that you created earlier.
You can download the Asset here: https://assetstore.unity.com/packages/tools/utilities/asset-store-tools-115
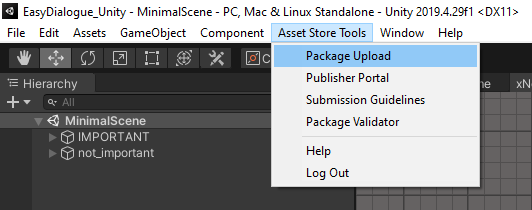
The only thing you need from this asset is the Package Uploader. Once you have downloaded and imported the asset into your project, an “Asset Store Tools” option becomes available at the top.
Creating Your Store Page
Once you use the tool to upload your asset, you just need to setup your page with a description, tags, and images. When creating your images, make sure to download and use the latest Key Art Templates from Unity. I can’t actually seem to find them, which is a bummer. I can upload the last templates I had access to and refer you to this page at the least: https://support.unity.com/hc/en-us/articles/210122403-What-makes-a-great-key-image-
Once you have your images created, and I would recommend getting someone to make them for you if you are not artistic. And you have your description and tags setup, you should be good to go! Just push to the review process, wait a few weeks, and hopefully you pass. Don’t feel bad if you don’t I failed twice. I will say that after your first review, all subsequent reviews go much faster, same goes for content updates!
Good luck and feel free to email if you have any questions or anything to add!


