LODs in Unreal Engine (Level of Detail) (UE4)
LODs
LOD stands for Level of Detail. For a single asset, there can be multiple levels of detail. The lowest level of detail (LOD0) is the most detailed, for when you are close to the object. The highest level of detail (LODx) has the least amount of detail, for when the object is very far away from the camera and you cannot see detail. Unreal supports 8 levels of detail, so you can have many steps in-between your lowest and highest levels of detail. When you have multiple LODs, Unreal will automatically swap between them for you, so long as you have them configured properly.
Unreal can even automatically generate LODs for your static and skeletal meshes. It will store references to each version and swap between these LODs whenever appropriate based on the size the object takes up on your screen. There are also LODs for particle systems and Niagara systems.
LODs are good to use for performance optimization, as it lessens the load on your computer when an object is farther away. LODs will not only cut the number of triangles on a mesh, but also can reduce the number of materials, or even swap to lower, less expensive materials. Morph targets and bones can be stripped away as well. In the end, we have a relatively simple asset. For example, when an object is 10,000 units away there may be no need to cast shadows or sample normal maps. You may only a quarter of the triangles for your mesh. Once these alterations are made to the lower LOD, the asset will utilize less of your machine’s resources. It is worth noting that these LODs, and their information must be stored somewhere in memory, and calculations will be needed to determine when to swap, so you may not want to LOD all assets, or have 8 LODs for every asset in your game.
Static/Skeletal Meshes
These are the simplest assets to create LODs for, as Unreal can automatically generate them for you. All you have to do is open the Skeletal/Static mesh asset, navigate the the “LOD Settings” section in the details panel. From here, there are two options that we really care about: “Number of LODs”, and “Auto Compute LOD Distances”.
“Number of LODs” is a number from 1 to 8 that specifies how many levels of detail you want to have. The number for this will depend greatly on it’s complexity, it’s scale, how complex the mesh is, etc. But typically you can aim for higher numbers of LODs for large objects or characters, and fewer LODs for small props. I like to start with 3-5 LODs, and increase or decrease as needed.
“Auto Compute LOD Distances” is a tick-box that specifies if you want Unreal to calculate the points at which it will step from one LOD to another. It does this, by detecting the difference in pixel values on-screen, and once the difference is below a threshold, it determines that it’s good enough to step down. I have found that this can be really accurate sometimes, and then other times it’s wildly off. It will take more time, as you have to manually set all of your values, but I find to get much better results when I set the values manually, so I almost always uncheck this box.
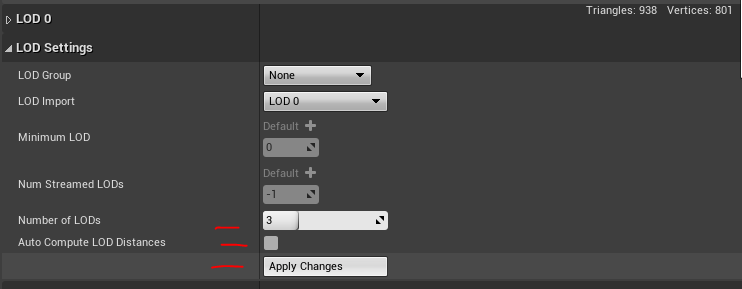
Once you increase the number of LODs, you can also check or uncheck the “Automatically generate distances” box to get more or less control as to when Unreal will switch between your assets. Once you are set, click the “Apply Changes” button and your LODs will be generated for you!
Now, if you scroll up to the “LOD Picker” section, if you click on the “Custom” tick-box, it will display and give you all the information about all of your generated LODs.

Now, you will notice that directly underneath of the “LOD Picker” section are sections for each specific LOD. LOD0, LOD1, and LOD2 in my case.
If you scroll to one of these secions, LOD1 for instance, you will see a couple of subsections listed: “Sections”, “Screen Size”, and “Reduction Settings”. “Sections” gives you control of the materials associated with the mesh. You may plug in a new material that is less expensive in the top, under the “Material Slots” section, and then reference it here. You may also have options such as toggling “Cast Shadow”, “Visible in Ray Tracing”, or “Force Opaque”. Once an object is far enough away, and thus a low enough detail, I almost always uncheck “Cast Shadow” as I won’t be seeing the shadows from that distance.

"Screen Size” allows you to determine at what point Unreal will swap over to this version of the mesh. For a value of .05, that means that the object will need to take up less than 5% of the screen until it swaps to LOD1. Any size above 5% will use LOD0, then at 5% it will swap to LOD1. LOD2’s “Screen Size” must be smaller than LOD1, and Unreal will continue to display LOD1, until it’s size becomes smaller than LOD2’s “Screen Size” value, and then it will swap down to LOD2.
Under the “Reduction Settings” subcategory, there are the following important options: “Percent Triagnels”, and “Base LOD”. “Percent Triangles is strangely a 0-1 scale on Skeletal Meshes, and 0-100 on Static Meshes. Where .25 on a Skeletal Mesh represents a reduction of the topology by 75%, and a value of 25 on a Static Mesh also represents a 75% reduction of the topology. This is the value that represents the percentage of triangles that you want to KEEP. So if your mesh is 100,000 tris, and you set the LOD1 to 10, it will set LOD1 to have 10,000 tris.
The other important option is the “Base LOD” this is a number that specifies what LOD it should reference when generating this LOD, a “Base LOD” of 0, means it will generate the LOD from LOD 0 as it’s reference. However, if you are working on LOD2 for instance, and you want it to be half as large as whatever LOD1 is, you can specify a the “Base LOD” as 1, and set the percent triangles to 50. This can be useful if you want to ensure that your LOD 2 is smaller than LOD1, (as percent triangles = 100, on LOD2 referencing LOD1, will be equal to LOD1). It also ensures that if you come along later and update LOD1 to be larger/smaller, LOD2 will update accordingly to LOD1. I however, prefer just referencing LOD0. I like to make sure that it has all of the data avalible when determining how to reduce the mesh. I also like knowing that LOD4 is 5% as large as LOD0, without having to figure out it’s size relative to 3, which is relative to 2, and finally 1. It may not be important to know, but that’s my prefered working method.
LOD Groups
Many of these attributes, such as number of LODs, the Percent Triangles each LOD should be from base, number of streamed LODs, as well as some hidden variables that I am unsure if are still used, such as PixelError, and SilhouetteImportance which help to determine the distance needed to swap between LODs when automatically generating the distance. Unreal has these automatically created for you with different presets, these include things such as Deco, Foliage, SmallProp, HighDetail, etc. Each with slightly different configurations that help to make the import process and generating LODs much easier. You should utilize these where applicable!
Custom LOD Groups
You can also create your own LOD groups, can share then Engine wide, or project wide. You actually have to set these up outside of the engine in your configuration files. In order to create one for your project, navigate to {YOUR-PROJECT-DIR}\Config\DefaultEngine.ini. From here, you can add a section titled StaticMeshLODSettings, here I am defining a CustomSmallProp category that only has 3 LODs. Here is what you paste into your DefaultEngine.ini
[StaticMeshLODSettings] CustomSmallProp=(NumLODs=3,MaxNumStreamedLODs=0,bSupportLODStreaming=0,LODPercentTriangles=50,PixelError=12,SilhouetteImportance=4,Name=LOCTEXT("CustomSmallPropLOD","Custom Small Prop"))You can also find your Engine wide LOD Groups, and make new Engine wide groups inside of your BaseEngine.ini that will be included in the source for the engine, or with the installed binaries, wherever you have the engine installed. You will find an existing secion, with definitions for the groups mentioned above (Deco, Foliage, etc.)
Skeletal Mesh Specific
Skeletal meshes have extra configurations and work slightly differently compared to that of Static Meshes. As mentioned earlier, the “Percent of Triangles” variable here is from 0-1, while on a static mesh it ranges from 0-100.
Other differences include: “Max Triangles Count”, “Remap Morph Targets”, “Max Bones Influence”, “Bones to Prioritize”, “Weight of Prioritization”, and “Bones to Remove”.
”Max Triangles Count” is as simple as it sounds, this will limit the maximum number of triangles to retain for the LOD.
“Remap Morph Targets” is also quite simple, if your character uses morph targets, it will simply map them over to the new LOD.
“Max Bones Influence” will limit the number of bones that can be assigned to each vertex, which will amount to more janky animations when lowered, but remember that these are for when the player is at a distance.
”Bones to Prioritize” and “Weight of Prioritization” go hand-in-hand, “Bones to Prioritize” will try to retain triangles that have verts referencing specific bones on your mesh. This can be really useful for LOD1, where you may chose to keep the structure and shape of the face and lower-limbs, but limit the number of verts within the torso and upper-limb regions. The amount in which they are prioritized as being kept for quality is determined by the “Weight of Prioritization”. It simply works by itterating over each triangle in the mesh, and collapsing an edge, however, if it has a weight of prioritization it should simply decrement this weight and come back to it later. Once it’s reduced, this counter resets meaning that with a prioritization of 10, the verts attached to the referenced bones should be reduced 10 times less than all other edges.
”Bones to Remove” is nice for when the mesh is far away and you know you nolonger need facial expressions, or tongue movement, you may even be able to remove fingers or toes depending on your mesh and it’s use cases and it’s distance from the camera.
LODSettings Data Asset
Similarly to LOD Groups on Static Meshes, Skeletal Meshes have an LOD Setting Data Asset, to make an asset, simply set up the settings for your Skeletal Mesh however you like, once it’s setup, scroll to the “LOD Settings” section, and click “Generate Asset.” If you click on the asset that is generated, you will be able to clearly see all of the fields that are open to modification. When working on another Skeletal Mesh, you can simply drag in, or select this Data Asset, and the rest will take care of itself!
Testing to Determine LOD sizes on Screen
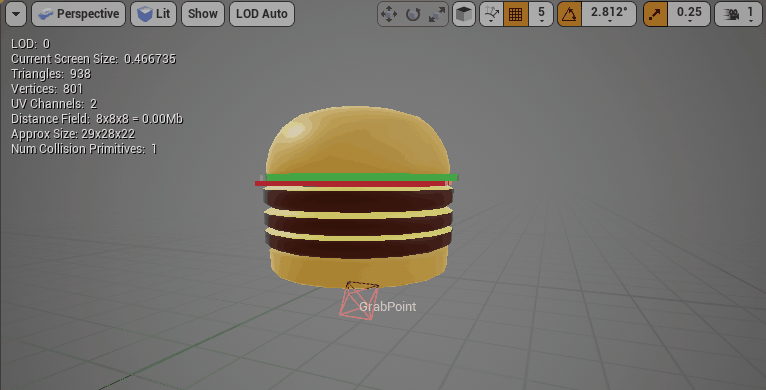
When you are manually assigning an LOD’s “Size on Screen” and “Percent Triangles”, you will want to be able to easily test it right in the viewport, luckily you can! In the viewport, make sure your LOD is set to “LOD Auto” and then when you zoom in and out of the viewport, you will see the mesh change from one LOD to the next, and it will also tell you which LOD is displayed in the top-left of the screen.
Particle System LODs
Particles are some of the most performance insensitive assets, as they are typically transparent, and they constantly run. One of the simplest things to do is create LODs for particle systems, and simply keep them as is, but on lower LODs, reduce the spawn count. If you do complex physics, color, or size overtime, you can cut or simplify any of these calculations to make sure that you aren’t wasting time on things the player won’t notice.
The Cascade Particle System LODs works very similarly to how the Static/Skeletal meshes work, it’s just that it’s through a different kind of interface. The main way that you will be creating, selecting and observing LODs here is through the toolbar.
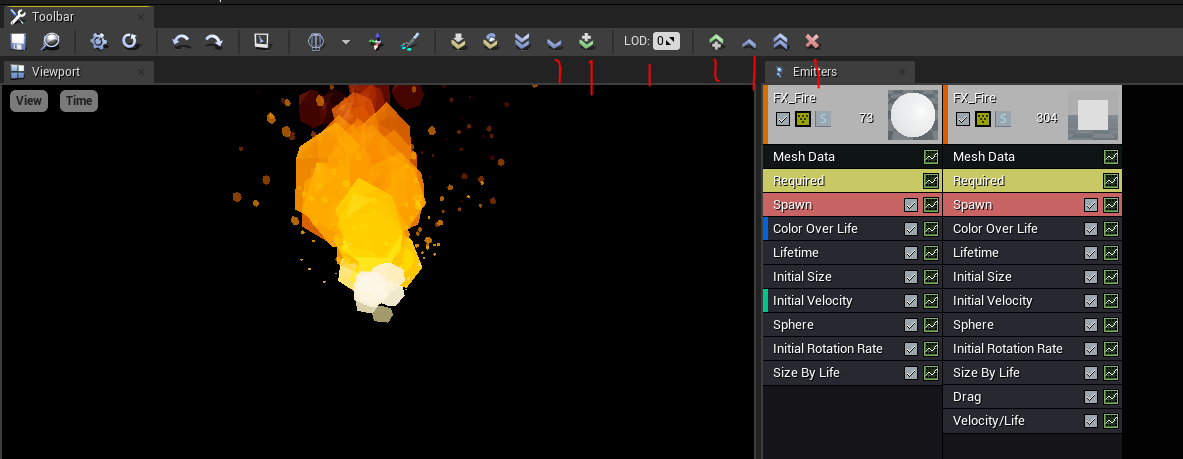
Going through the toolbar options that are marked red in the picture (from left to right).
The leftmost icon will allow you to select the next lowest LOD (more detailed). The icon to the right of that (2nd from left) will generate a new LOD that is lower than the currently selected LOD. To the right of that, we see the currently selected LOD, you can also type into this box the exact number of the LOD you would like to edit. Moving on to the right, we see that we can also generate a new LOD that is one level higher than our currently selected LOD. Next we have the button to select the next higher LOD from the currently selected. Finally, all the way on the right we have a button to delete our currently selected LOD.
To get started, first develop the asset to look how you would like to see it, this will be your LOD0. From there, you can click on the “Add LOD After Current” button in the toolbar to create a new, higher, LOD. By default, this LOD will work exaclty as the one that you generated it from, you will have to explicitly select components of your emitters and tell them to duplicate the functionality to be altered for this LOD. For example, if you wanted to alter the spawn rate of your LOD1, you would right-click on the “Spawn” component, and select “Duplicate From Higher” to take the values from whatever LOD is right above it.
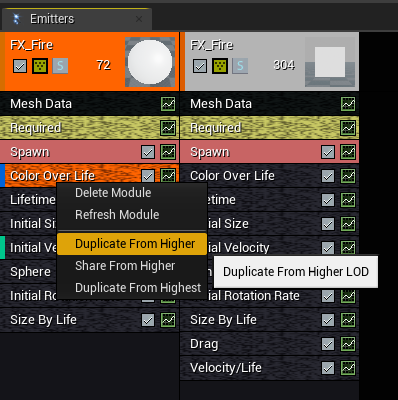
Now, in the details pannel, you can see that you are able to alter any of the Spawn component settings, such as the Spawn Rate! In my case, the LOD0 spawn rate is a constant value of 16. So for LOD1, I want it to emit half-as-many particles, so I set this value to 8. The particle system will update accordingly inside of the viewport, and you can swap back and forth between your LODs using the “Select Higher/Lower LOD” buttons in the toolbar.
Once you are satisfied with your LODs, you need to tell Unreal when to swap between these LODs, this works differently from the Static/Skeletal Meshes, it is not based on the screen-size, but on the distance between the camera and the particle system. If you click in the viewport of the particle system, the particle system’s details pannel will show up, inside look for the secion titled “LOD” here you will be able to supply: "LODDistance Check Time”, “LODDistances”, “LODSettings”, and “LODMethod”.
“LODDistance Check Time” should be set to how frequently you want to check to see if you should swap to a lower LOD particle system, this value is up to you, but something like once a second should suffice.
“LODDistances” is an array of values that specify when you should swap into the new LODs, make sure that index 0 is set to a distance of 0. You will need to make sure that the number of LODDistances indexes is equal to the number of LODs you have (if you have 3 LODs, make sure there are indexes 0-2).
“LODSettings” is a struct with currently only one piece of data, you don’t need to mess with it, just make sure that the number of data points is equal to that of the number of LODs you have generated.
“LODMethod” determines the method for which Unreal picks the LOD to show. The three ways are: “Automatic”, which checks every “LODDistance Check Time” to determine the LOD to show, “Direct Set” which means the LOD can only be set by game code, or “Activate Automatic” which will automatically set the LOD, but only once, at start. Leaving this at “Automatic” is probably the best choice for you.
That’s it! Once you have all of these set, it should work in your game. Please note that when in the Map Editor viewport, unlike Mesh LODs, Particle System LODs will not swap between thier LODs unless you are in Play (PIE) mode. This means that they will also not be coloured accordingly when using the “Mesh LOD Coloration” view mode.
Niagara Systems
Now Niagara Systems (as of UE4.27.2) don’t actually have LODs, however, they do have Scalabilty Settings and NiagaraEffectTypes to make a set configuration for your Niagara Systems. This will allow you to set things such as the Update Frequency for which scalabilty is checked, how culling is handled, how to handle significance of these types of FX, as well has System and Emitter settings that are dependent upon the Scalability settings (Low, Medium, High, Epic, Cinematic). Then when the Scalability Setting EffectsQuality (sg.EffectsQuality) is set at compilation time, or changed at runtime, it will update the Niagara Systems and Emitters accordingly.
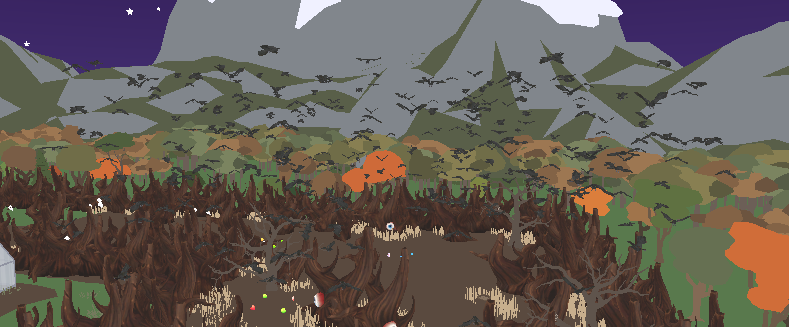
This is my Ambient Bird Niagara System at sg.EffectsQuality=4
And here it is again but with sg.EffectsQuality=0
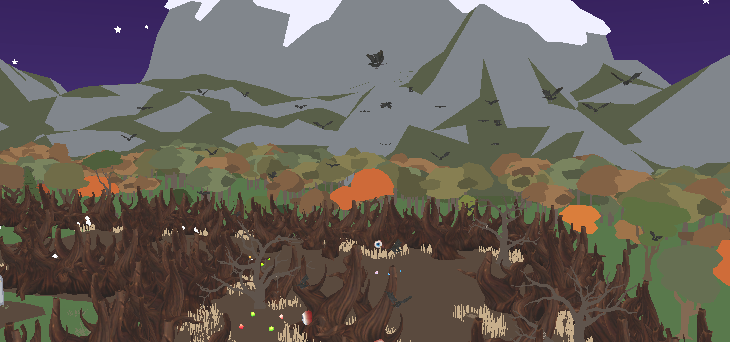
The main thing visible here is the number of bird particles emitted is much lower, but I also change the culling distances, and the max time to run without being rendered.
To create a NiagaraEffectType, in your Content Browser, right-click navigate to FX->Niagara Effect Type.

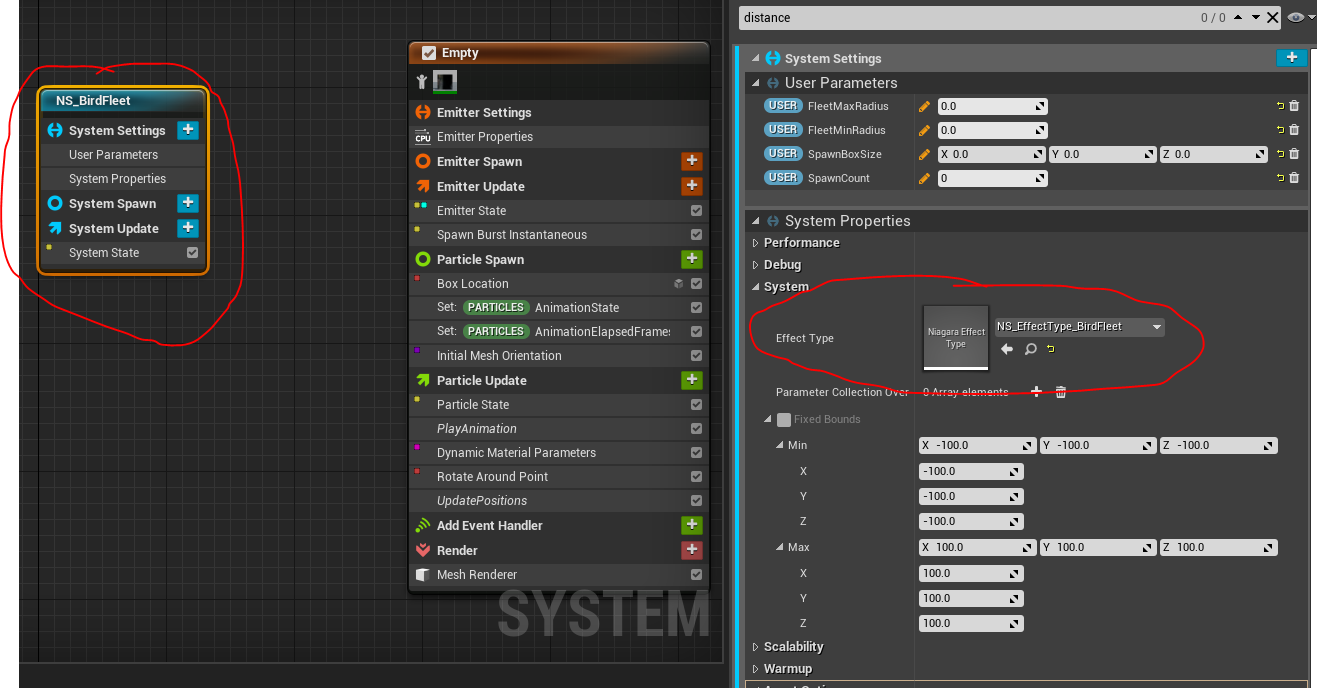
From here you are able to set all the values of the options we talked about above. In order to properly test and see it actually effect your Niagara Systems, you need to tell the system to use your effect type. If you want this effect type to be global across all Niagara Systems, you can do so by setting the “Default Effect Type” setting in your Project Settings. Navigate to Edit->Project Settings then to the Plugins->Niagara and then under the “Niagara” section set “Default Effect Type”.
If you want this effect to be specific to one particular subset of your Niagara Systems, you will need to navigate to the Niagara System asset in your Content Browser, then click on the system. Under "System Settings->System Properties->System you will be able to plug in a Niagara Effect Type into the Effect Type slot.
Conclusion
As you can see, Unreal provides lots of options to easily improve the performance of your game with LODs! LODs are super versatile and are integrated natively into many areas of the engine. They are surely a great option when looking to optimize your game!